
A perfect dessert should be like the best episode of your favorite show—leaving you utterly satisfied yet craving more. When you bite into the deep chocolate fudginess giving way to cool, tangy creaminess, you know you’ve hit the jackpot.
That’s exactly the sensation awaiting you with these incredibleBrownie Bottom Mini Cheesecakes | Easy Chocolate Cheesecake Dessert, marrying two culinary champions into one glorious, portable treat.
- Effortless Elegance: Achieve bakery-quality presentation without needing specialized pastry skills, making impressive desserts accessible for beginners.
- Dual Texture Delight: Experience the perfect marriage of a rich, chewy brownie base supporting a smooth, velvety, tangy cheesecake filling.
- Portable Perfection: These mini cheesecakes are ideal for parties, picnics, or easy portion control for decadent, guilt-free enjoyment.
- Versatile Flavor Canvas: Easily customize the topping with fresh berries, chocolate ganache, or caramel sauce to suit any occasion or preference.
The Unexpected Origin Story of the Perfect Mini Dessert
I am a firm believer that the best recipes are often born out of sheer panic and desperation. This recipe forBrownie Bottom Mini Cheesecakes | Easy Chocolate Cheesecake Dessertis no exception. It all started when I was hosting a dinner party and promised a grand finale dessert. I had two separate plans: a fancy, multi-layered cheesecake requiring three days of commitment and a classic, fudgy brownie that was supposed to serve as a casual snack later in the week.
Then, disaster struck. The main course took twice as long as anticipated, the guests were arriving in thirty minutes, and my carefully planned, water-bath-loving, full-sized cheesecake was still looking suspiciously liquid in the center. Panic mode engaged. I looked at the half-baked brownie batter sitting forlornly on the counter and the cream cheese filling I had already mixed. In a moment of pure, unadulterated culinary madness, I grabbed my trusty muffin tins and decided to combine the two.
The resulting dessert wasn’t just good; it was revolutionary. It skipped the need for the tedious water bath, cooked perfectly in individual portions, and delivered a double punch of texture and flavor that instantly silenced the table. My guests thought I was a genius who had planned this sophisticated, individual serving masterpiece all along. I just smiled, wiped the chocolate smudge off my cheek, and kept my little secret—that these miniature works of art are actually the easiest chocolate cheesecake dessert you will ever attempt.
Mastering the Brownie Base: Fudgy vs. Cakey
The foundation of a great brownie bottom cheesecake is, naturally, the brownie. We aren’t looking for a light, airy cake brownie here; we need something dense, fudgy, and substantial enough to stand up to the creamy filling. Think of it as the bedrock for your dairy mountain of deliciousness. The secret lies in the fat-to-flour ratio and keeping the baking time minimal for the base.
For this recipe, we use melted butter and a higher ratio of cocoa and melted chocolate, which ensures that ultra-dense, chew-resistant interior. When you press the brownie batter into the muffin liners, make sure you don’t overfill them. The goal is a thin, compact layer—about 1/4 inch thick—that provides the perfect bite of chocolate without overwhelming the delicate cheesecake flavor. Baking the brownie for just 10 minutes before adding the filling is critical. This par-baking step creates a firm crust that prevents the cream cheese mixture from sinking and mingling in a messy way.
A helpful tip for achieving the perfect consistency: use high-quality cocoa powder. The difference between standard baking cocoa and a rich, Dutch-processed variety is enormous. Since this dessert relies on intense chocolate flavor to contrast the tangy filling, investing in good cocoa will elevate this simple treat into something truly extraordinary. Remember, once the filling is added, these little guys need time to chill and consolidate their flavors, so don’t rush the cooling process!
The Art of the Cream Cheese Filling
Now, let’s talk about the creamy counterpart. Cheesecake filling is deceptively simple, but achieving that silky, lump-free texture requires patience and proper temperature management. Always, and I meanalways, start with room-temperature cream cheese. If your cream cheese is cold, you will end up with pesky little lumps that refuse to incorporate smoothly, resulting in a grainy texture that will sabotage your mini masterpieces.
The standard mixing procedure involves beating the cream cheese first until it is light and fluffy, almost cloud-like. Then, gradually incorporate the sugar. The key to maintaining structure is to scrape down the bowl constantly. Once the sugar is in, add the eggs one at a time, mixing only until they are just combined. Overmixing the eggs introduces too much air, which causes the cheesecake to puff dramatically while baking and then crack or sink severely as it cools. Since we are using a smaller format for these mini cheesecakes, they are less prone to catastrophic cracking than a full-sized cake, but careful mixing still ensures the creamiest result.
To add a touch of flavor complexity and stability, we include a bit of sour cream or Greek yogurt. This not only enhances the signature tanginess but also adds moisture and helps maintain that desirable smooth texture. A splash of pure alcohol-free vanilla extract ties all the flavors together. This filling is the reason theseBrownie Bottom Mini Cheesecakes | Easy Chocolate Cheesecake Dessertdisappear so quickly from the serving platter—they are irresistibly creamy.
Essential Tips for Flawless Mini Cheesecake Baking
Baking mini cheesecakes in a muffin tin is much easier than a traditional springform pan, but there are still a few cardinal rules to follow for absolute success. First, paper liners are your best friend. They ensure easy removal and prevent sticking. Gently press the brownie base into the bottom of the liner, ensuring it is level.
Second, precision filling is essential. I highly recommend using a small ice cream scoop or a measured ladle to distribute the cream cheese mixture evenly over the par-baked brownie crusts. Aim for a level line, leaving a small space at the top of the liner, as the filling will expand slightly during baking. Even portions mean even baking times, which is crucial when dealing with quick-cooking desserts like this.
Third, the cooling process is non-negotiable. When the mini cheesecakes are finished baking—the edges should look set, but the center might still have a very slight wobble—turn off the oven and prop the door open slightly. Let the cheesecakes cool inside the oven for 15–20 minutes. This gradual temperature change helps them set without shocking the structure, minimizing the risk of sinking centers. Once cooled in the oven, remove them, cool completely on a wire rack, and then transfer them to the refrigerator. They absolutely must chill for at least four hours, preferably overnight, before serving. They taste infinitely better when cold and firm.
Ingredients for Brownie Bottom Mini Cheesecakes | Easy Chocolate Cheesecake Dessert
Here’s what you’ll need to make this delicious dish:
- All-Purpose FlourProvides the foundational structure for the fudgy brownie base, ensuring it holds its shape when sliced.
- Unsalted ButterUsed melted in the brownie batter to enhance richness and create a dense, chewy texture for the foundation.
- Granulated SugarSweetens both the brownie and the cheesecake filling, balancing the bitterness of the chocolate and the tang of the cream cheese.
- High-Quality Cocoa PowderEssential for deep chocolate flavor in the brownie base; Dutch-processed is recommended for intensity.
- Baking PowderA small amount helps the brownie base rise just enough to achieve a slightly chewy, rather than flat, structure.
- Cream Cheese (Full Fat)The star of the filling; ensure it is fully softened to room temperature for a guaranteed lump-free, creamy result.
- EggsAct as the primary binder for both layers; use large eggs at room temperature to ensure easy and uniform incorporation into the batter.
- Sour Cream or Greek YogurtAdds essential moisture, a delightful tang, and contributes to the silky smooth texture of the baked cheesecake.
- Pure Alcohol-Free Vanilla ExtractEnhances the overall flavor profile, providing a warm aromatic depth that complements both the chocolate and the cream cheese.
- SaltA pinch balances the sweetness and intensifies the flavor of the chocolate, making the brownie base taste richer.
The full ingredients list, including measurements, is provided in the recipe card directly below.
How to Make Brownie Bottom Mini Cheesecakes | Easy Chocolate Cheesecake Dessert
Follow these simple steps to prepare this delicious dish:
Step 1: Prepare the Brownie Base and Preheat the Oven
Preheat your oven to 350°F (175°C). Line a standard 12-cup muffin tin with paper liners. In a medium bowl, whisk together the melted butter, sugar, and alcohol-free vanilla extract. Add the eggs one at a time, mixing until just combined. Gently fold in the dry ingredients—flour, cocoa powder, baking powder, and salt—until a fudgy batter forms. Distribute about one generous tablespoon of batter into the bottom of each prepared muffin liner and gently press it down to create a flat, even layer.
Step 2: Par-Bake the Brownie Crusts
Place the muffin tin into the preheated oven and bake the brownie bases for exactly 10 minutes. This crucial par-baking step sets the crusts so they remain distinct from the filling. While the crusts are baking, move on to preparing the creamy filling. Remove the par-baked bases from the oven and set them aside to cool slightly.
Step 3: Prepare the Cream Cheese Filling
In a large mixing bowl, beat the room-temperature cream cheese using an electric mixer until it is perfectly smooth and airy, scraping down the sides frequently. Gradually add the granulated sugar and mix until well blended and creamy. Add the sour cream or Greek yogurt and alcohol-free vanilla extract, mixing until just incorporated. Finally, beat in the remaining eggs one at a time, mixing only until the yolk disappears. Do not overmix this step to prevent excess air bubbles.
Step 4: Fill and Bake the Cheesecakes
Carefully spoon or pour the cream cheese mixture over the partially baked brownie bases, filling each liner almost to the top. Return the muffin tin to the oven and bake for an additional 15 to 18 minutes. The edges of the cheesecakes should appear set, but the center will still have a slight, delicate wobble. They will firm up completely during the cooling process.
Step 5: Cool and Chill Thoroughly
Once baked, turn off the oven and prop the oven door open slightly with a wooden spoon, allowing the mini cheesecakes to cool inside the warm environment for 15 minutes. Remove the tin and transfer the cheesecakes to a wire rack, allowing them to cool completely at room temperature. Once cooled, place the tin in the refrigerator and chill the cheesecakes for a minimum of 4 hours, or ideally overnight, before attempting to remove the paper liners.
Transfer to plates and drizzle with a dusting of cocoa powder or a dollop of whipped cream for the perfect finishing touch.
Storing and Serving Your Chocolate Cheesecake Treats
These mini cheesecakes are fantastic for making ahead, which is a major bonus for party planning. Once fully chilled, they can be stored in an airtight container in the refrigerator for up to 5 days. For longer storage, these little desserts freeze exceptionally well. Place the chilled cheesecakes on a baking sheet and freeze until solid. Once frozen, wrap each one individually in plastic wrap and then store them in a freezer-safe bag or container for up to 2 months. Thaw them overnight in the refrigerator before serving.
When it comes to serving, presentation matters, even for an easy chocolate cheesecake dessert. While they are beautiful naked, a simple garnish elevates the entire experience. Consider topping them with fresh raspberries or strawberries just before serving; the acidity of the berries cuts through the richness beautifully. Alternatively, a drizzle of homemade caramel sauce or a shaving of dark chocolate provides an extra layer of decadence. If you’re feeling ambitious, a sprinkle of flaky sea salt on the top before chilling enhances the deep chocolate flavor of the brownie base, creating a sophisticated sweet and salty profile.
Regardless of how you choose to decorate these beautiful treats, the combination of the dense, fudgy brownie and the creamy, cool cheesecake filling ensures that theseBrownie Bottom Mini Cheesecakes | Easy Chocolate Cheesecake Dessertwill be the highlight of any gathering, proving that sometimes, the best culinary masterpieces are the ones that save your dinner party at the very last minute.
The Accidental Discovery of Sunshine on a Plate

I needed a quick dessert but only had leftover brownie batter and cream cheese. My failure to plan turned into a glorious triumph. These Brownie Bottom Mini Cheesecakes were born from chaos, offering the ultimate easy chocolate cheesecake dessert experience in one perfect bite. Seriously, keep this recipe secret.
You know those days? The ones where you promised your guests (or yourself) a decadent dessert, but you suddenly realize you have thirty minutes and zero motivation for anything complicated? That was me last Tuesday. I had scheduled a baking marathon, but life intervened with urgent calls and a surprisingly clingy cat. I stared forlornly at a block of cream cheese, mourning my ambitious layer cake plans.
Then, the lightning bolt struck. Why not merge the best of both worlds? The fudgy, dense joy of a good brownie combined with the cool, creamy tang of a classic cheesecake. But full-sized cheesecakes take forever and involve precarious water baths. The solution? Miniatures! Individual portions are always better, less intimidating to bake, and infinitely cuter. This recipe for mini cheesecake cups uses the brownie layer as a sturdy, built-in crust, ensuring maximum flavor with minimal effort.
If you have always feared making cheesecake because of cracking, sinking, or uneven baking, fear not. We are throwing perfection out the window—or rather, scaling it down. Baking these individual portions in a standard muffin tin eliminates almost all traditional cheesecake angst. Plus, they look incredibly sophisticated, fooling everyone into thinking you spent hours slaving away. We are going to make the most addictive Brownie Bottom Mini Cheesecakes you have ever tasted.
The Quest for the Perfect Fudgy Base
The foundation is everything. We aren’t using dry, crumbly cookie crusts here. We are diving deep into rich, chocolatey goodness. We start with a quick, simple brownie batter. Ensure you use good quality cocoa powder—it makes a monumental difference. Think dark, volcanic soil richness, not dusty chocolate. Once the batter is ready, scoop a generous spoonful into your lined muffin tin. This forms the essential base for our easy chocolate cheesecake dessert adventure.
Ingredients for Brownie Bottom Mini Cheesecakes
This recipe requires standard pantry staples, but always ensure your dairy ingredients are at room temperature. Cold cream cheese is the nemesis of smooth cheesecake batter. Plan ahead and let that block sit out for an hour before you begin whipping.
Brownie Layer
- ½ cup all-purpose flour
- ¼ cup unsweetened cocoa powder
- ½ teaspoon baking powder
- ¼ teaspoon salt
- ½ cup granulated sugar
- ¼ cup unsalted butter, melted
- 1 large egg
- 1 teaspoon alcohol-free vanilla extract
Cheesecake Layer
- 8 ounces cream cheese, softened
- ⅓ cup granulated sugar
- 1 large egg yolk (reserve the white for another use!)
- 1 teaspoon alcohol-free vanilla extract
- 1 tablespoon lemon juice (for tang, not flavor complexity)
Perfecting the Cooking Process
First, combine the dry brownie ingredients, then mix in the wet elements. Divide this base into the muffin cups. Next, prepare the cheesecake filling, ensuring it is lump-free. Spoon the filling carefully over the brownie base and bake immediately. Chilling afterward is mandatory for structure.
Step-by-Step Assembly Guide
Mixing these two elements is remarkably straightforward. Start by preheating your oven to the specified temperature and lining a 12-cup muffin tin with paper liners. Do not skip the liners, or you will face a catastrophic sticky situation. For the brownie layer, gently combine the melted butter, sugar, and vanilla, then whisk in the egg. Separately, mix the dry components (flour, cocoa, baking powder, salt) and then integrate them into the wet mixture until just combined. Overmixing the brownie batter develops too much gluten, resulting in tough bases—we want fudgy tenderness.
Now, distribute about a generous tablespoon of the brownie mix into the bottom of each liner. Press it down lightly to form a compact base. You do not need to pre-bake this layer; they bake together beautifully. For the cheesecake layer, beat the softened cream cheese until it is smooth and cloud-like. Slowly add the sugar, then the vanilla, lemon juice, and finally, the egg yolk. Mix only until the ingredients are incorporated. Excess air will cause the cheesecakes to puff up wildly and then deflate dramatically, leading to those infamous craters.
Gently spoon the creamy mixture over the brownie base, filling the cups about three-quarters full. Bake until the centers look mostly set but still have a slight jiggle—this is the secret to creamy interiors. Once cooled slightly, transfer the Brownie Bottom Mini Cheesecakes to the fridge for at least four hours. Patience, while difficult, yields perfect results.
One of the most appealing aspects of creating these individual Mini Cheesecakes is the sheer joy of presentation. Serving a whole cheesecake can be messy and intimidating, requiring precise slicing. With these bite-sized beauties, serving is effortless. Just place them on a platter, perhaps with a dusting of cocoa powder or a single fresh mint leaf, and watch them disappear.
Add Your Touch
Customize these easy chocolate cheesecake desserts with fun toppings. Try swirling raspberry preserves or caramel sauce into the cream cheese before baking. For a citrus kick, swap the alcohol-free vanilla extract for orange zest. You can also sprinkle coarse sea salt on the brownie base before baking for enhanced depth.
Elevating Your Mini Cheesecakes
While the basic Brownie Bottom Mini Cheesecakes recipe is divine on its own, sometimes you want to dress them up for a special occasion. Since we rely on the subtle acid of lemon juice for balance, think about complementary fruit flavors. A dollop of strawberry compote or cherry topping makes these individual brownie desserts truly spectacular. If you crave even more chocolate, melt some semi-sweet chocolate chips and drizzle it lavishly over the chilled tops. A sprinkle of mini chocolate shavings or a single fresh berry provides that professional finish.
For a sophisticated texture contrast, try folding finely chopped pecans or walnuts into the brownie batter before pressing it into the liners. Remember to keep the cheesecake layer simple so the textures remain complementary. This easy chocolate cheesecake dessert is a canvas awaiting your creative flourish. Experimentation is the spice of the dessert life!
These are the perfect solution for gatherings, parties, or simply ensuring you always have a ready-made, spectacular dessert waiting for you after a long day. They travel well, stack easily, and satisfy that deep, complex craving for both chocolate and creamy sweetness simultaneously. They are the ultimate demonstration that sometimes, the simplest recipes yield the most profound culinary delight.
Storing & Reheating
Store cooled mini cheesecake desserts in an airtight container in the refrigerator for up to five days. Since these rely on creaminess, freezing works well; wrap them tightly. Thaw overnight in the fridge. Do not try to reheat them; enjoy these delightful treats chilled for the best texture.
Pro Tips for Perfect Mini Chocolate Cheesecake Desserts
- Use room temperature cream cheese only; whipping cold cream cheese introduces lumps that cannot be fully smoothed out later, ruining the texture.
- Do not open the oven door during the first 15 minutes of baking. Steady heat prevents the tops from cracking or sinking prematurely.
- If you do not have lemon juice, substitute 1 teaspoon of white vinegar to provide the necessary acid balance and brightness to the rich cream cheese.
My sister once tried to sneak an extra mini cheesecake while they were still cooling, resulting in a slightly exploded base and a very guilty face. That moment confirmed how irresistible these small chocolate cheesecakes are, even when slightly warm!
Conclusion for Brownie Bottom Mini Cheesecakes | Easy Chocolate Cheesecake Dessert
These Brownie Bottom Mini Cheesecakes successfully combine fudgy decadence with creamy elegance in a convenient, individual serving. We’ve managed to strip away the complexity of traditional baking while retaining maximum flavor. Remember the key techniques: room temperature cream cheese, gentle mixing to prevent cracks, and mandatory chilling time.
This easy chocolate cheesecake dessert proves you do not need hours in the kitchen to produce a breathtaking result. Whether you are hosting a formal dinner or just treating yourself, these mini wonders offer a perfect blend of texture and taste that guarantees rave reviews. Go forth and conquer the dessert world, one tiny, chocolate-based cheesecake at a time!
Print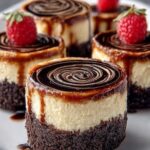
Brownie Bottom Mini Cheesecakes | Easy Chocolate Cheesecake Dessert
- Total Time: 35 minutes
- Yield: 4 servings 1x
Description
Rich, fudgy brownie meets silky smooth vanilla cheesecake in these simple mini desserts. The perfect two-bite chocolate indulgence! Instructions & nutrition details provided.
Ingredients
- 1 box (18.3 oz) fudge brownie mix (plus ingredients called for on the box)
- 16 oz cream cheese, softened
- 1/2 cup granulated sugar
- 2 large eggs
- 1 teaspoon alcohol-free vanilla extract
- 1/4 cup vegetable oil (required for brownie mix)
- 2 tablespoons water (required for brownie mix)
Instructions
- Step 1: Preheat oven to 350°F (175°C). Line a standard 12-cup muffin tin with paper liners. Prepare the brownie mix according to package directions, using the required oil and water. Spoon approximately 1 1/2 tablespoons of brownie batter into the bottom of each prepared liner.
- Step 2: Bake the brownie bases for 8 to 10 minutes until they begin to set but are still slightly soft. Remove from the oven and reduce the oven temperature to 325°F (160°C).
- Step 3: While the bases cool slightly, prepare the cheesecake filling. In a medium bowl, beat the softened cream cheese and granulated sugar until smooth and creamy. Beat in the 2 large eggs and vanilla powder until just combined, being careful not to overmix.
- Step 4: Evenly distribute the cheesecake filling over the partially baked brownie bases, filling each liner almost to the top. Return the muffin tin to the 325°F oven and bake for 18 to 22 minutes, or until the edges of the cheesecakes are set and the centers are mostly firm with only a slight jiggle.
- Step 5: Remove the mini cheesecakes from the oven and allow them to cool completely in the muffin tin on a wire rack. Once cooled, transfer the cheesecakes to the refrigerator and chill for at least 4 hours (or overnight) before serving.
Notes
- For the best texture, store leftovers tightly covered in the refrigerator for up to 4 days, ensuring they are protected from strong odors.
- Always serve these directly from the refrigerator, as the chilled cheesecake filling provides the perfect creamy contrast to the dense brownie crust.
- Elevate this easy dessert by adding a simple topping like a dollop of stabilized whipped cream, a fresh raspberry, or a drizzle of melted chocolate right before presentation.
- When mixing the cheesecake filling, stop beating as soon as the eggs are incorporated to prevent adding too much air, which can cause the mini cheesecakes to crack or dome during baking.
- Prep Time: 15 minutes
- Cook Time: 20 minutes
- Method: Stovetop
- Cuisine: American
Nutrition
- Serving Size: 1 mini cheesecake
- Calories: 265
- Sodium: 145mg
- Fat: 19g
- Saturated Fat: 12.5g
- Trans Fat: 0g
- Protein: 22g


Leave a Comment