
Baileys Cheesecake Balls: A Decadent Delight
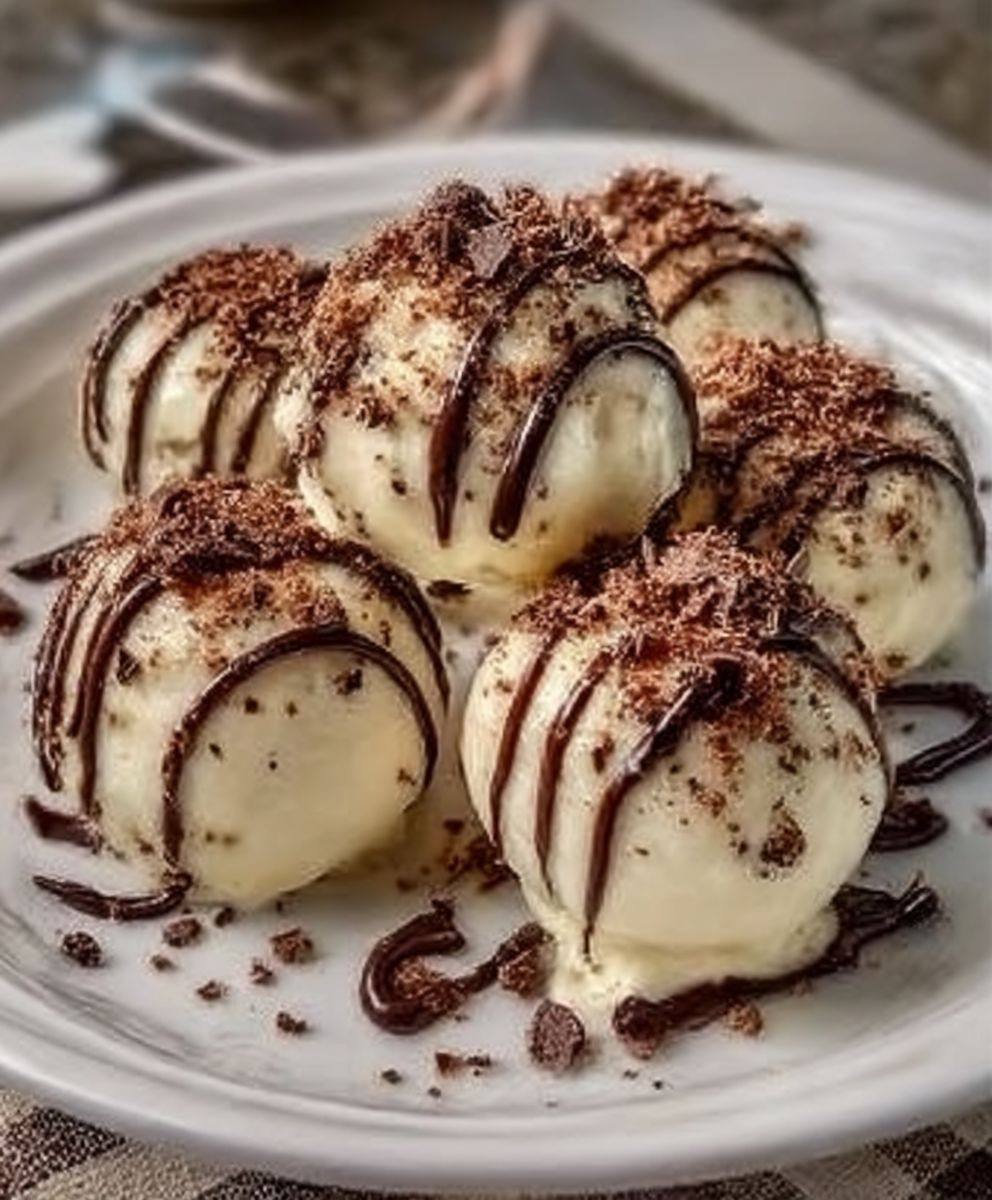
Baileys Cheesecake Balls are the perfect indulgence for any occasion, combining the rich, creamy flavor of cheesecake with the delightful kick of Baileys Irish Cream. These bite-sized treats are not only a feast for the taste buds but also a visual delight, making them an ideal dessert for parties, gatherings, or simply a sweet treat at home. The history of cheesecake dates back to ancient Greece, but the modern twist of incorporating Baileys adds a unique flair that has captured the hearts of dessert lovers everywhere.
People adore Baileys Cheesecake Balls for their luscious texture and the harmonious blend of flavors. The smooth, creamy filling encased in a delicate chocolate coating creates a delightful contrast that is simply irresistible. Plus, they are incredibly convenient to make, allowing you to whip up a batch in no time. Whether you’re celebrating a special occasion or just treating yourself, Baileys Cheesecake Balls are sure to impress and satisfy your sweet cravings.

Ingredients:
- 1 cup cream cheese, softened
- 1/2 cup powdered sugar
- 1/4 cup Baileys Irish Cream
- 1 teaspoon vanilla extract
- 1 1/2 cups graham cracker crumbs
- 1/2 cup semi-sweet chocolate chips
- 1 tablespoon unsweetened cocoa powder
- 1/4 cup crushed nuts (optional, for coating)
- 1/4 cup shredded coconut (optional, for coating)
- 1/4 cup sprinkles (optional, for coating)
Preparing the Cheesecake Mixture
- In a large mixing bowl, combine the softened cream cheese and powdered sugar. Using an electric mixer, beat the mixture on medium speed until it is smooth and creamy, about 2-3 minutes.
- Add the Baileys Irish Cream and vanilla extract to the cream cheese mixture. Continue to mix on medium speed until fully incorporated, ensuring that the mixture is well-blended and smooth.
- Gradually add the graham cracker crumbs to the mixture. Mix on low speed until the crumbs are evenly distributed throughout the cheesecake mixture. The mixture should be thick and slightly sticky.
Chilling the Mixture
- Once the cheesecake mixture is well combined, cover the bowl with plastic wrap or a lid. Place it in the refrigerator and let it chill for at least 1 hour. This will help the mixture firm up, making it easier to roll into balls.
Forming the Cheesecake Balls
- After the mixture has chilled, remove it from the refrigerator. Using a small cookie scoop or your hands, take about 1 tablespoon of the mixture and roll it into a ball. Place the ball on a baking sheet lined with parchment paper.
- Repeat this process until all the mixture has been rolled into balls. You should have approximately 20-25 cheesecake balls, depending on the size you choose.
- Once all the balls are formed, place the baking sheet back in the refrigerator for another 30 minutes to firm up.
Melting the Chocolate
- While the cheesecake balls are chilling, prepare the chocolate coating. In a microwave-safe bowl, add the semi-sweet chocolate chips.
- Microwave the chocolate in 30-second intervals, stirring in between, until the chocolate is completely melted and smooth. Be careful not to overheat the chocolate, as it can burn easily.
Coating the Cheesecake Balls
- Once the cheesecake balls are firm and the chocolate is melted, remove the balls from the refrigerator. Using a fork or a toothpick, dip each cheesecake ball into the melted chocolate, ensuring it is fully coated.
- Allow any excess chocolate to drip off before placing the coated ball back onto the parchment-lined baking sheet.
- If you want to add additional coatings, such as crushed nuts, shredded coconut, or sprinkles, sprinkle them over the chocolate-coated balls while the chocolate is still wet. This will help the toppings adhere better.
- Repeat the dipping process for all the cheesecake balls until they are all coated in chocolate.
Final Chilling and Serving
- Once all the cheesecake balls are coated, return the baking sheet to the refrigerator for at least 30 minutes to allow the chocolate to set completely.
- After the chocolate has hardened, you can transfer the cheesecake balls to an airtight container for storage. They can be kept in the refrigerator for up to a week.
- When ready to serve, arrange the cheesecake balls on a platter. They make a delightful treat for parties, gatherings, or just a sweet indulgence at home!
Tips for Success
- For a richer flavor, you can use dark chocolate instead of semi-sweet chocolate for coating.
- If you prefer a less sweet cheesecake ball, reduce the amount of powdered sugar to your taste.
- Feel free to experiment with different toppings, such as crushed cookies, chopped dried fruits, or even a
Conclusion:
In conclusion, these Baileys Cheesecake Balls are an absolute must-try for anyone looking to indulge in a delightful treat that combines the rich, creamy flavor of cheesecake with the smooth, velvety notes of Baileys Irish Cream. Whether you’re hosting a party, celebrating a special occasion, or simply treating yourself, these bite-sized desserts are sure to impress. The combination of the sweet, tangy cheesecake filling and the chocolate coating creates a perfect balance that will leave your taste buds dancing with joy.
For serving suggestions, I recommend presenting these delectable balls on a beautiful platter, garnished with a sprinkle of cocoa powder or a drizzle of melted chocolate for an extra touch of elegance. You can also pair them with fresh berries or a scoop of vanilla ice cream to elevate the dessert experience even further. If you’re feeling adventurous, consider rolling some of the cheesecake balls in crushed nuts, sprinkles, or even crushed cookies for added texture and flavor. The possibilities are endless, and you can easily customize them to suit your preferences or the occasion.
I encourage you to try this Baileys Cheesecake Balls recipe and share your experience with friends and family. Not only will you enjoy the process of making these delightful treats, but you’ll also create lasting memories as you share them with loved ones. Don’t forget to snap a few photos of your creations and post them on social media—tagging your friends and inviting them to join in on the fun!
If you have any variations or unique twists on the recipe, I would love to hear about them. Perhaps you want to experiment with different flavors of liqueur or incorporate seasonal ingredients to make them even more special. Whatever your approach, I believe that these Baileys Cheesecake Balls will quickly become a favorite in your dessert repertoire.
So, roll up your sleeves, gather your ingredients, and get ready to whip up a batch of these irresistible Baileys Cheesecake Balls. Trust me, once you take that first bite, you’ll understand why this recipe is a crowd-pleaser and a delightful addition to any dessert table. Happy baking, and I can’t wait to hear how your cheesecake balls turn out!
Baileys Cheesecake Balls: A Decadent No-Bake Dessert Recipe
Enjoy these Baileys Irish Cream Cheesecake Balls, a delicious combination of creamy cheesecake and a rich chocolate coating. Perfect for any occasion, these easy-to-make bite-sized treats are sure to impress your guests!
Ingredients
- 1 cup cream cheese, softened
- 1/2 cup powdered sugar
- 1/4 cup Baileys Irish Cream
- 1 teaspoon vanilla extract
- 1 1/2 cups graham cracker crumbs
- 1/2 cup semi-sweet chocolate chips
- 1 tablespoon unsweetened cocoa powder
- 1/4 cup crushed nuts (optional, for coating)
- 1/4 cup shredded coconut (optional, for coating)
- 1/4 cup sprinkles (optional, for coating)
Instructions
- In einer großen Schüssel die weiche Frischkäse und den Puderzucker vermengen. Mit einem elektrischen Mixer die Mischung bei mittlerer Geschwindigkeit 2-3 Minuten lang schlagen, bis sie glatt und cremig ist.
- Den Baileys Irish Cream und den Vanilleextrakt zur Frischkäsemischung hinzufügen. Weiterhin bei mittlerer Geschwindigkeit mixen, bis alles gut vermischt und glatt ist.
- Die Graham-Cracker-Krümel nach und nach hinzufügen und bei niedriger Geschwindigkeit mixen, bis sie gleichmäßig verteilt sind. Die Mischung sollte dick und leicht klebrig sein.
- Die Schüssel mit Frischhaltefolie oder einem Deckel abdecken und mindestens 1 Stunde im Kühlschrank kühlen, um die Mischung zu festigen.
- Nach dem Kühlen die Mischung aus dem Kühlschrank nehmen. Mit einem kleinen Keksausstecher oder den Händen etwa 1 Esslöffel der Mischung zu einer Kugel formen und auf ein mit Backpapier ausgelegtes Backblech legen.
- Wiederholen, bis die gesamte Mischung zu Kugeln geformt ist (ca. 20-25).
- Das Backblech für weitere 30 Minuten in den Kühlschrank zurückstellen, um die Kugeln zu festigen.
- In einer mikrowellengeeigneten Schüssel die halb-süßen Schokoladenstückchen hinzufügen. In 30-Sekunden-Intervallen in der Mikrowelle erhitzen und zwischendurch umrühren, bis sie geschmolzen und glatt sind.
- Die Cheesecake-Kugeln aus dem Kühlschrank nehmen. Jede Kugel mit einer Gabel oder einem Zahnstocher in die geschmolzene Schokolade tauchen, sodass sie vollständig bedeckt ist.
- Überschüssige Schokolade abtropfen lassen, bevor die beschichtete Kugel zurück auf das Backblech gelegt wird.
- Falls gewünscht, während die Schokolade noch nass ist, gehackte Nüsse, Kokosraspeln oder Streusel über die schokoladenüberzogenen Kugeln streuen.
- Für alle Cheesecake-Kugeln wiederholen.
- Das Backblech für mindestens 30 Minuten in den Kühlschrank zurückstellen, damit die Schokolade vollständig fest wird.
- Sobald die Kugeln gehärtet sind, in einen luftdichten Behälter zur Aufbewahrung (bis zu einer Woche) umfüllen.
- Auf einer Platte servieren für einen köstlichen Genuss bei Partys oder als süße Versuchung zu Hause!
Notes
- For a richer flavor, consider using dark chocolate for coating.
- Adjust the amount of powdered sugar to your taste for a less sweet cheesecake ball.
- Experiment with different toppings like crushed cookies or chopped dried fruits for variety.
Leave a Comment