
Banana Sushi Snack: A Fun and Nutritious Treat
Banana Sushi Snack is not just a delightful twist on traditional sushi; it’s a creative and healthy option that both kids and adults adore. Imagine the sweet, creamy texture of ripe bananas wrapped in a layer of nut butter and sprinkled with colorful toppings. This recipe is not only visually appealing but also incredibly easy to make, making it a perfect choice for a quick snack or a fun party treat.
The concept of Banana Sushi Snack has gained popularity in recent years, especially among health-conscious individuals and parents looking for nutritious alternatives to sugary snacks. This dish combines the beloved flavors of bananas with the satisfying crunch of toppings like granola, coconut, or even chocolate chips. People love this dish for its versatility; you can customize it to suit your taste preferences or dietary needs.
Whether you’re preparing a quick after-school snack or looking to impress guests at your next gathering, Banana Sushi Snack is sure to be a hit. With its delightful combination of taste and texture, it’s no wonder this recipe has become a favorite in many households. So, let’s dive into the world of Banana Sushi Snack and discover how to create this delicious treat!

Ingredients:
- 2 ripe bananas
- 1 cup of nut butter (peanut butter, almond butter, or any preferred nut butter)
- 1 cup of rolled oats
- 1/2 cup of honey or maple syrup
- 1/2 cup of mini chocolate chips (optional)
- 1/2 cup of shredded coconut (optional)
- 1/2 cup of chopped nuts (optional)
- 1/2 teaspoon of cinnamon (optional)
- 1/4 teaspoon of salt
- 1 tablespoon of chia seeds (optional)
Preparing the Bananas
- Start by peeling the bananas. Make sure they are ripe but not overly soft, as they need to hold their shape.
- Once peeled, place the bananas on a cutting board. Using a sharp knife, slice each banana in half lengthwise. This will create two long halves for each banana.
Making the Nut Butter Mixture
- In a medium-sized mixing bowl, add the nut butter of your choice. If you prefer a smoother consistency, you can warm the nut butter slightly in the microwave for about 15-20 seconds.
- Add the honey or maple syrup to the nut butter. This will help to sweeten the mixture and make it easier to spread.
- Mix the nut butter and sweetener together until well combined. You can use a spatula or a whisk for this step.
- If you’re using cinnamon, salt, or chia seeds, add them to the mixture now and stir until evenly distributed.
Preparing the Oat Mixture
- In another bowl, combine the rolled oats with any optional ingredients you want to include, such as mini chocolate chips, shredded coconut, or chopped nuts.
- Mix the dry ingredients together until they are well combined. This will add texture and flavor to your banana sushi.
Assembling the Banana Sushi
- Take one of the banana halves and spread a generous layer of the nut butter mixture over the cut side of the banana. Make sure to cover it evenly.
- Next, sprinkle a layer of the oat mixture over the nut butter. Press down gently to ensure the oats stick to the nut butter.
- Repeat this process with the other banana halves, using the remaining nut butter and oat mixture.
- Once all the banana halves are assembled, you can choose to roll them up. If you prefer, you can leave them flat as well.
Chilling and Serving
- After assembling the banana sushi, place them on a plate or a baking sheet lined with parchment paper.
- For best results, cover the plate with plastic wrap and place it in the refrigerator for about 30 minutes. This will help the nut butter set and make the sushi easier to slice.
- Once chilled, remove the banana sushi from the refrigerator. If you rolled them, slice them into bite-sized pieces. If they are flat, you can cut them into smaller sections or leave them as is.
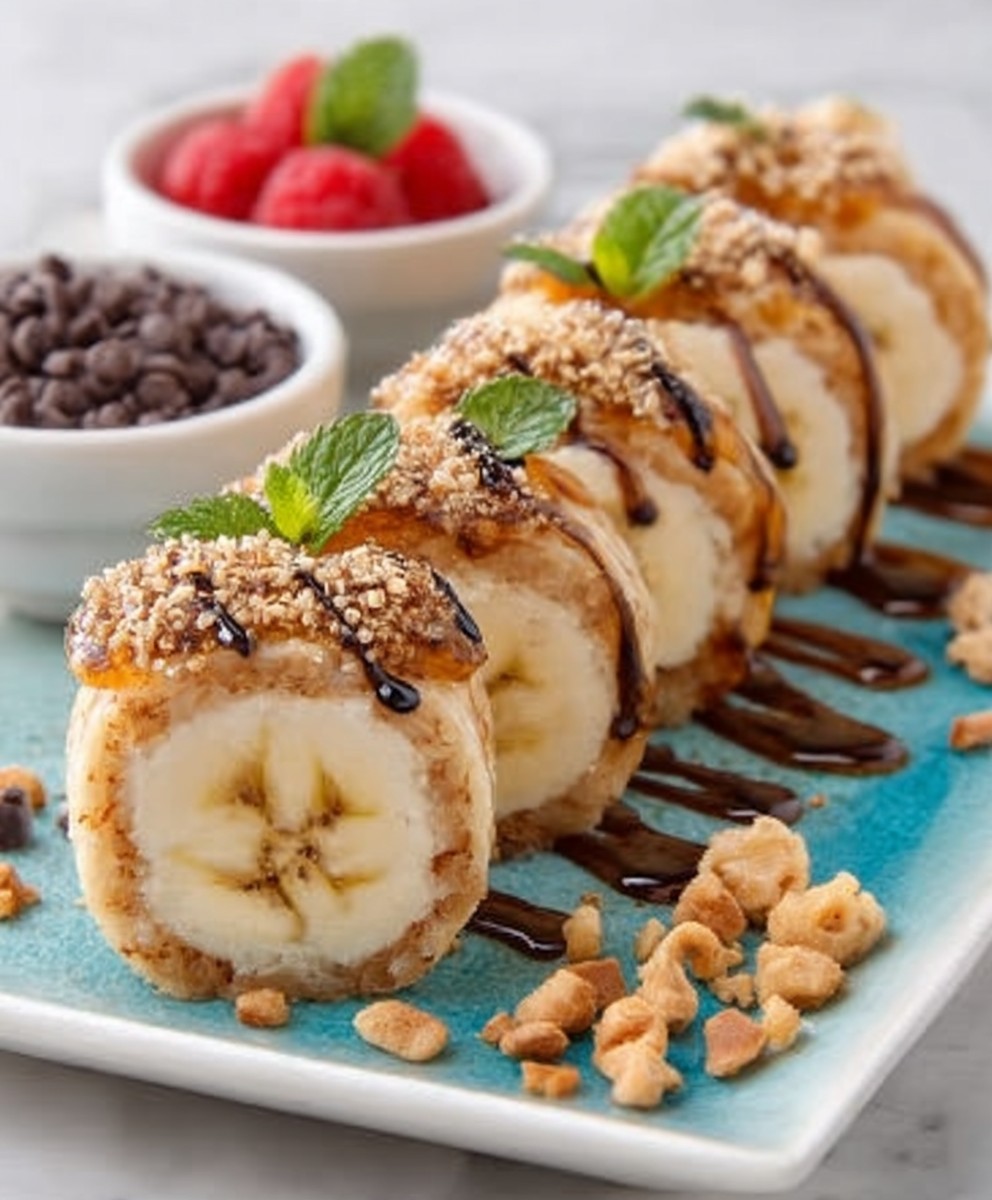
- Arrange the banana sushi on a serving platter. You can drizzle a little extra honey or chocolate sauce on top for added sweetness if desired.
Enjoying Your Banana Sushi
- Serve the banana sushi as a fun snack or a healthy dessert. They are perfect for kids and adults alike!
- Feel free to experiment with different nut butters, toppings, and add-ins to create your own unique versions of banana sushi.
- Store any leftovers in an airtight container in the refrigerator for up to 2 days. Enjoy them cold or at room temperature!
Tips for Customization
- Try using different fruits like strawberries or apples instead of bananas for a twist on the recipe.
- For a vegan option, ensure that the nut butter and sweetener are plant-based.
- Experiment with different spices like nutmeg or vanilla extract for added flavor.
- For a protein
Conclusion:
If you’re looking for a fun, nutritious, and delicious snack, this Banana Sushi recipe is an absolute must-try! Not only is it incredibly easy to make, but it also offers a delightful combination of flavors and textures that will satisfy your cravings while keeping you energized. The creamy banana wrapped in a layer of nut butter and rolled in crunchy toppings creates a perfect balance that is both indulgent and healthy. Plus, it’s a fantastic way to get your kids involved in the kitchen, making it a great family activity!
When it comes to serving suggestions, the possibilities are endless! You can slice the Banana Sushi into bite-sized pieces for a fun party platter or serve it as a quick breakfast on the go. Pair it with a side of yogurt for a protein boost, or enjoy it with a drizzle of honey or maple syrup for an extra touch of sweetness. If you’re feeling adventurous, try adding a sprinkle of cinnamon or a dash of cocoa powder to the nut butter before spreading it on the banana. You can also experiment with different toppings like shredded coconut, crushed nuts, or even granola for added crunch.
For those who are looking to switch things up, consider using different types of nut butters such as almond, cashew, or even sunflower seed butter for a nut-free option. You can also substitute the banana with other fruits like strawberries or apples, creating a delightful twist on the classic Banana Sushi. The versatility of this recipe makes it suitable for various dietary preferences and occasions, whether you’re preparing a snack for yourself, a healthy treat for your kids, or a fun addition to a potluck.
I encourage you to give this Banana Sushi recipe a try! It’s not only a delicious snack but also a great way to incorporate more fruits into your diet. Once you’ve made it, I’d love to hear about your experience! Share your thoughts, variations, and any creative twists you come up with. You can even snap a picture and tag me on social media; I can’t wait to see how your Banana Sushi turns out! Remember, the joy of cooking comes from experimenting and sharing, so don’t hesitate to make this recipe your own. Enjoy your culinary adventure with this delightful Banana Sushi snack!
Banana Sushi Snack: A Fun and Healthy Treat for All Ages
Enjoy a fun and healthy twist on snacks with this Banana Sushi! Ripe bananas are spread with your choice of nut butter and topped with rolled oats, creating a customizable treat that's perfect for all ages. Add your favorite toppings for a delicious and nutritious snack or dessert!
Ingredients
- 2 ripe bananas
- 1 cup of nut butter (peanut butter, almond butter, or any preferred nut butter)
- 1 cup of rolled oats
- 1/2 cup of honey or maple syrup
- 1/2 cup of mini chocolate chips (optional)
- 1/2 cup of shredded coconut (optional)
- 1/2 cup of chopped nuts (optional)
- 1/2 teaspoon of cinnamon (optional)
- 1/4 teaspoon of salt
- 1 tablespoon of chia seeds (optional)
Instructions
- Start by peeling the bananas. Make sure they are ripe but not overly soft, as they need to hold their shape.
- Once peeled, place the bananas on a cutting board. Using a sharp knife, slice each banana in half lengthwise to create two long halves for each banana.
- In a medium-sized mixing bowl, add the nut butter of your choice. If you prefer a smoother consistency, warm the nut butter slightly in the microwave for about 15-20 seconds.
- Add the honey or maple syrup to the nut butter to sweeten the mixture and make it easier to spread.
- Mix the nut butter and sweetener together until well combined using a spatula or whisk.
- If using cinnamon, salt, or chia seeds, add them to the mixture now and stir until evenly distributed.
- In another bowl, combine the rolled oats with any optional ingredients you want to include, such as mini chocolate chips, shredded coconut, or chopped nuts.
- Mix the dry ingredients together until well combined to add texture and flavor to your banana sushi.
- Take one of the banana halves and spread a generous layer of the nut butter mixture over the cut side of the banana, covering it evenly.
- Sprinkle a layer of the oat mixture over the nut butter and press down gently to ensure the oats stick.
- Repeat this process with the other banana halves, using the remaining nut butter and oat mixture.
- Once all the banana halves are assembled, you can choose to roll them up or leave them flat.
- Place the assembled banana sushi on a plate or a baking sheet lined with parchment paper.
- Cover the plate with plastic wrap and refrigerate for about 30 minutes to help the nut butter set and make the sushi easier to slice.
- After chilling, remove the banana sushi from the refrigerator. If rolled, slice them into bite-sized pieces. If flat, cut them into smaller sections or leave them as is.
- Arrange the banana sushi on a serving platter. Drizzle with extra honey or chocolate sauce on top for added sweetness if desired.
- Serve the banana sushi as a fun snack or a healthy dessert, perfect for kids and adults alike!
- Feel free to experiment with different nut butters, toppings, and add-ins to create your own unique versions of banana sushi.
- Store any leftovers in an airtight container in the refrigerator for up to 2 days. Enjoy them cold or at room temperature!
Notes
- Try using different fruits like strawberries or apples instead of bananas for a twist on the recipe.
- For a vegan option, ensure that the nut butter and sweetener are plant-based.
- Experiment with different spices like nutmeg or vanilla extract for added flavor.


Leave a Comment