
Blooming Onions: A Deliciously Unique Appetizer
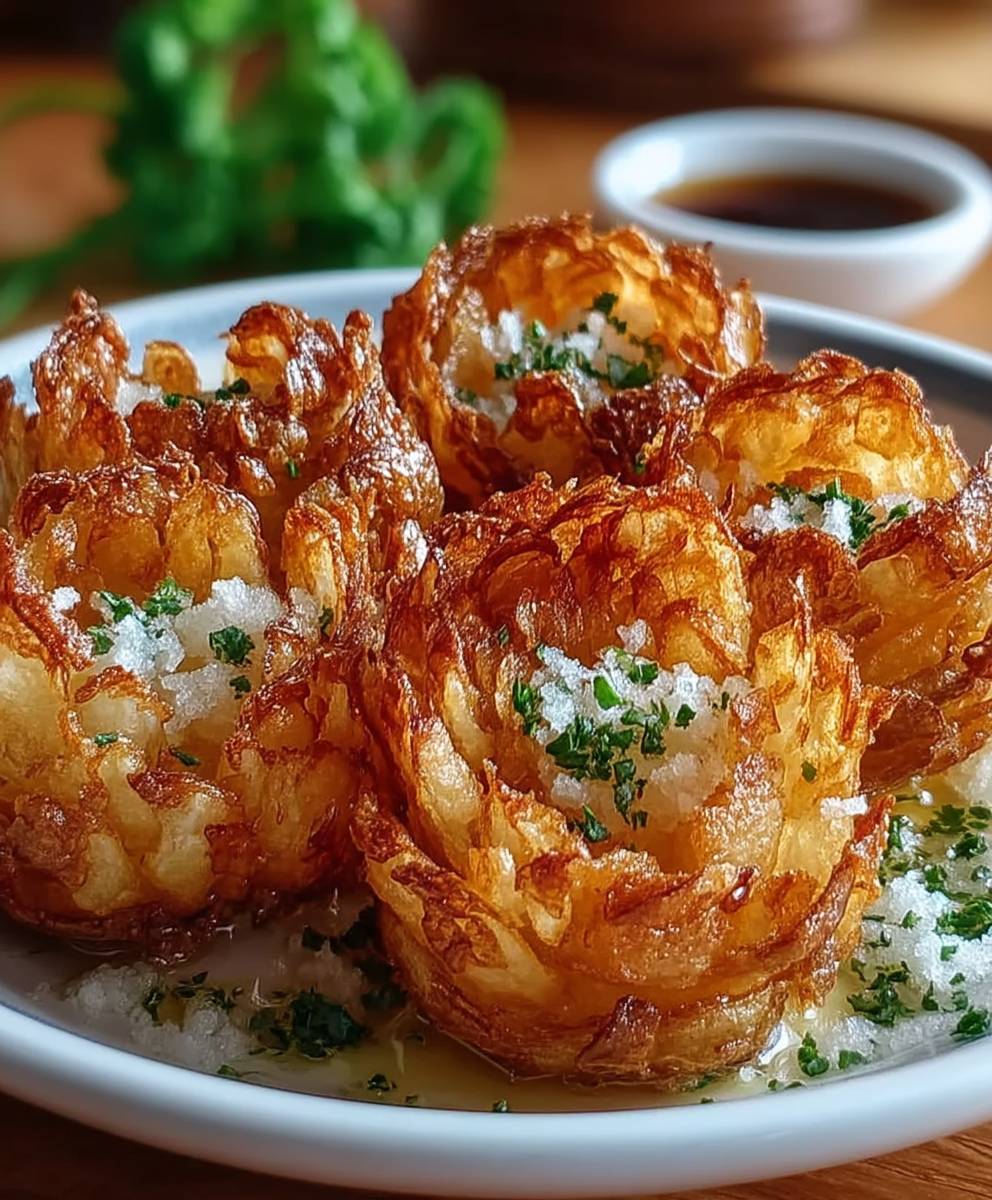
Blooming onions are not just a dish; they are an experience that tantalizes the taste buds and brings people together. This iconic appetizer, often found in American steakhouses, features a whole onion that is expertly cut to resemble a flower, then battered and deep-fried to golden perfection. The result is a crispy exterior that gives way to tender, flavorful onion petals, perfect for dipping in zesty sauces.
The history of blooming onions can be traced back to the 1980s, where they quickly gained popularity for their impressive presentation and delightful taste. People love this dish not only for its unique appearance but also for the satisfying crunch and savory flavor that each petal offers. Whether served at a party or enjoyed as a snack, blooming onions are a crowd-pleaser that never fails to impress.
In this article, I will guide you through the steps to create your very own blooming onions at home. Get ready to indulge in this crispy, flavorful treat that is sure to become a favorite in your household!

Ingredients:
- 1 large sweet onion (such as Vidalia or Walla Walla)
- 1 cup all-purpose flour
- 1 teaspoon paprika
- 1 teaspoon garlic powder
- 1 teaspoon onion powder
- 1 teaspoon cayenne pepper (adjust to taste)
- 1 teaspoon salt
- 1/2 teaspoon black pepper
- 1 cup buttermilk
- 1 large egg
- Vegetable oil (for frying)
- Optional: dipping sauce (such as ranch or spicy mayo)
Preparing the Onion
- Start by selecting a large, firm sweet onion. The larger the onion, the more impressive the bloom will be.
- Peel the onion and trim off the top, leaving the root end intact. This will help hold the layers together.
- Place the onion root-side down on a cutting board. Using a sharp knife, make four vertical cuts down into the onion, stopping about 1 inch from the root. Make sure to space the cuts evenly around the onion.
- Next, make four additional cuts between the first cuts, creating a total of 16 sections. Be careful not to cut all the way through the root.
- Gently pull apart the layers of the onion to create the “bloom” effect. You can use your fingers to separate the layers slightly, but be gentle to avoid breaking them.
Preparing the Batter
- In a large mixing bowl, combine the flour, paprika, garlic powder, onion powder, cayenne pepper, salt, and black pepper. Whisk together until well combined.
- In another bowl, whisk together the buttermilk and egg until smooth. This will be your wet mixture.
- Take the prepared onion and dip it into the wet mixture, ensuring that it is fully coated. Allow any excess to drip off.
- Next, transfer the onion to the bowl with the dry mixture. Use your hands to coat the onion thoroughly, making sure to get the flour mixture between the layers. This is key to achieving a crispy texture.
- Once coated, gently shake off any excess flour and set the onion aside on a plate. Let it rest for about 10 minutes to allow the batter to adhere better.
Cooking Process
- In a large, deep skillet or a heavy-bottomed pot, pour in enough vegetable oil to submerge the onion (about 2-3 inches deep). Heat the oil over medium-high heat until it reaches 350°F (175°C). You can use a thermometer to check the temperature or drop a small piece of bread into the oil; if it sizzles and browns quickly, the oil is ready.
- Carefully lower the coated onion into the hot oil, root side down. You can use a slotted spoon or a frying basket to help with this. Be cautious to avoid splattering hot oil.
- Fry the onion for about 5-7 minutes, or until it turns a deep golden brown. You may need to adjust the heat to maintain the oil temperature.
- Once the onion is golden brown, carefully remove it from the oil and place it on a plate lined with paper towels to drain any excess oil.
- Let the onion cool for a few minutes before serving. This will help the layers firm up a bit more.
Assembling and Serving
- Once the onion has cooled slightly, you can place it on a serving platter. You can gently pull apart the layers to create a more dramatic presentation.
- If desired, sprinkle a little extra salt over the top for added flavor.
- Serve the blooming onion with your choice of dipping sauce. Ranch dressing is a classic choice, but you can also try spicy mayo or a zesty aioli for a twist.
- Encourage your guests to pull apart the layers and dip them into the sauce for a fun and interactive eating experience.
Tips for Success
- Make sure your oil is hot
Conclusion:
If you’re looking for a show-stopping appetizer that’s sure to impress your guests, then this Blooming Onion recipe is an absolute must-try! Not only is it visually stunning, but the combination of crispy, golden petals and a zesty dipping sauce creates a flavor explosion that’s hard to resist. The process of making a Blooming Onion may seem a bit daunting at first, but I assure you, it’s easier than it looks and incredibly rewarding.
One of the best things about this recipe is its versatility. You can serve your Blooming Onion as a delightful starter at a dinner party, a fun snack for game day, or even as a unique side dish at your next barbecue. Pair it with a tangy ranch or spicy aioli for dipping, and watch as your friends and family dive in with excitement. If you want to mix things up, consider experimenting with different seasonings or even adding a sprinkle of cheese on top before baking for an extra layer of flavor. You could also try using different types of onions, such as sweet Vidalia or even red onions, to give your dish a unique twist.
I encourage you to gather your ingredients and give this Blooming Onion recipe a try. It’s a fantastic way to bring people together, and I can guarantee that it will be the highlight of your meal. Don’t forget to take some pictures and share your experience with friends and family! I would love to hear how your Blooming Onion turned out and any variations you tried.
So, roll up your sleeves, get ready to impress, and enjoy the process of creating this delicious and fun dish. Trust me, once you’ve tasted that crispy, flavorful goodness, you’ll be hooked and want to make it again and again. Happy cooking!
Blooming Onions: A Delicious Guide to Making This Appetizing Appetizer
A delicious and easy-to-make dish that combines fresh ingredients and bold flavors, perfect for any occasion. Enjoy a satisfying meal that is both nutritious and delightful!
Ingredients
- 500 g Mehl (Type 550)
- 10 g Salz
- 5 g Trockenhefe
- 350 ml Wasser
- 3 Zehen Knoblauch, gehackt
- 2 EL Olivenöl
Instructions
- In einer großen Schüssel Mehl, Salz und Hefe vermengen.
- Wasser hinzufügen und zu einem Teig verrühren.
- Knoblauch und Olivenöl unterrühren.
- Teig 12 Stunden gehen lassen.
Notes
- Der Teig darf während der Ruhezeit nicht bewegt werden.
- Für ein intensiveres Knoblaucharoma können mehr Zehen verwendet werden.

Leave a Comment