
Blue Christmas Truffles: A Festive Delight
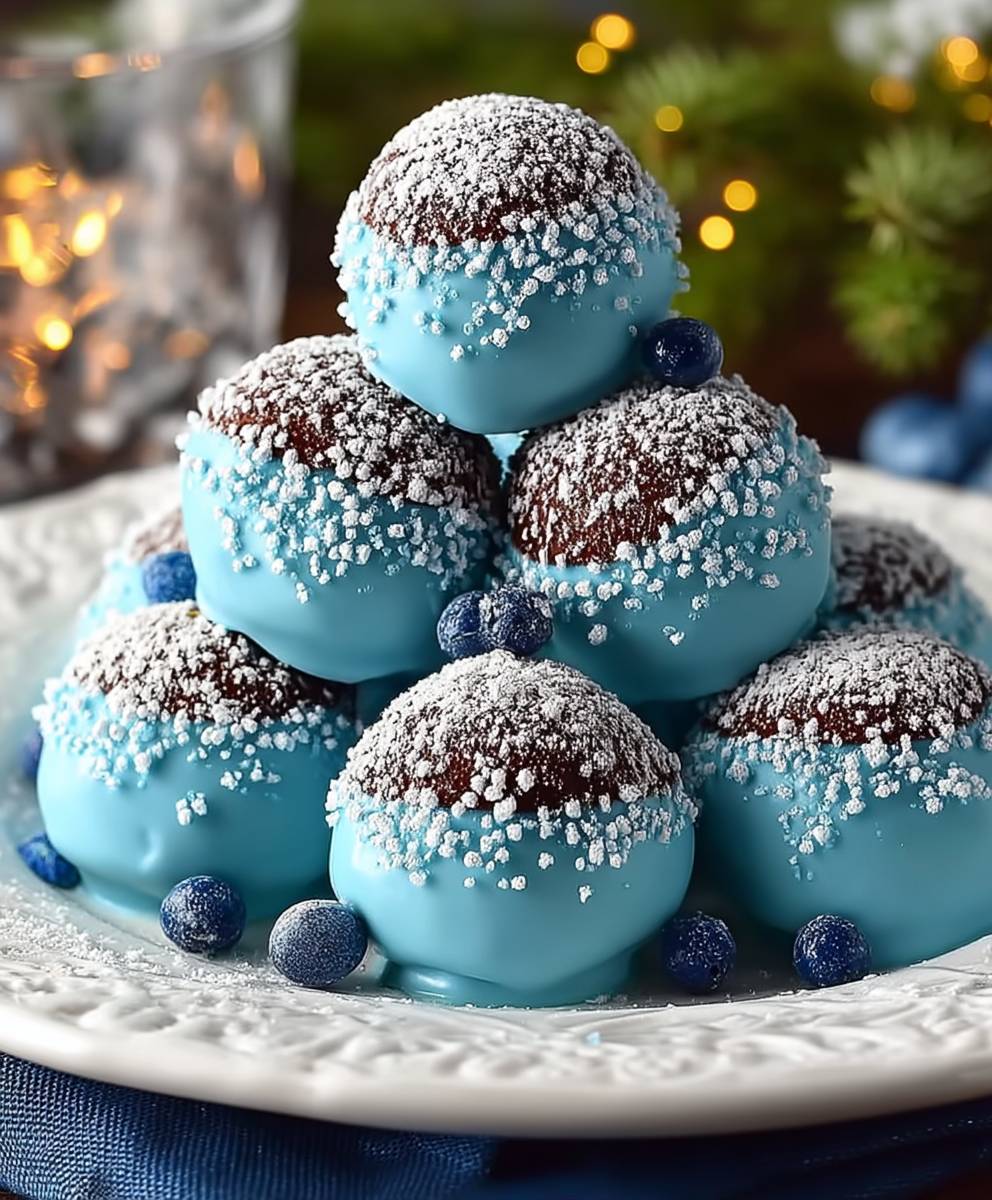
Blue Christmas Truffles are not just a treat; they are a celebration of the holiday spirit wrapped in a delightful bite. As the festive season approaches, these truffles bring a touch of elegance and whimsy to any gathering. Originating from the classic chocolate truffle, this modern twist incorporates vibrant blue hues, making them a stunning centerpiece for your holiday dessert table.
People adore Blue Christmas Truffles for their rich, creamy texture and the perfect balance of sweetness. Each bite melts in your mouth, offering a delightful contrast to the crunch of the outer coating. Not only are they visually appealing, but they are also incredibly easy to make, allowing you to spend more time enjoying the festivities with loved ones. Whether you’re hosting a holiday party or looking for a unique gift, these truffles are sure to impress and spread joy. So, let’s dive into the recipe and create some magical moments with Blue Christmas Truffles!

Ingredients:
- 1 cup of crushed graham crackers
- 1 cup of powdered sugar
- 1/2 cup of unsweetened cocoa powder
- 1/2 cup of sweetened condensed milk
- 1/4 cup of unsalted butter, softened
- 1 teaspoon of vanilla extract
- 1/2 teaspoon of peppermint extract
- 1 cup of blue candy melts
- 1/2 cup of white chocolate chips
- Sprinkles or edible glitter for decoration
Preparing the Truffle Mixture
- In a large mixing bowl, combine the crushed graham crackers, powdered sugar, and cocoa powder. Mix well until all dry ingredients are evenly distributed.
- Add the softened unsalted butter, sweetened condensed milk, vanilla extract, and peppermint extract to the dry mixture. Use a spatula or your hands to combine everything until a thick, cohesive dough forms. It should be slightly sticky but manageable.
- Once the mixture is well combined, cover the bowl with plastic wrap and refrigerate for about 30 minutes. This will help the mixture firm up, making it easier to roll into balls.
Shaping the Truffles
- After chilling, remove the mixture from the refrigerator. Using a small cookie scoop or your hands, take about a tablespoon of the mixture and roll it into a ball. Place the rolled truffles on a parchment-lined baking sheet.
- Continue this process until all the mixture is shaped into balls. You should have around 20-25 truffles, depending on the size you choose.
- Once all the truffles are shaped, place the baking sheet back in the refrigerator for another 15-20 minutes to firm up while you prepare the coating.
Melting the Candy Coating
- In a microwave-safe bowl, add the blue candy melts. Microwave in 30-second intervals, stirring in between, until the candy melts are completely smooth and melted. Be careful not to overheat, as this can cause the candy to seize.
- If you want a thinner consistency for easier dipping, you can add a teaspoon of vegetable oil to the melted candy melts and stir until combined.
Coating the Truffles
- Once the truffles are firm and the candy melts are ready, take a truffle from the refrigerator. Using a fork, dip the truffle into the melted blue candy coating, ensuring it is fully covered.
- Lift the truffle out of the coating and gently tap the fork against the edge of the bowl to remove any excess coating. This will help create a smooth finish.
- Place the coated truffle back onto the parchment-lined baking sheet. Repeat this process for all the truffles.
- While the coating is still wet, sprinkle some edible glitter or festive sprinkles on top of each truffle for a beautiful holiday touch.
Finishing Touches
- In a separate microwave-safe bowl, melt the white chocolate chips using the same method as the blue candy melts. Once melted, let it cool slightly.
- Using a fork or a piping bag, drizzle the melted white chocolate over the coated truffles for an elegant finish. This adds a nice contrast to the blue coating.
- Allow the truffles to set at room temperature for about 30 minutes, or until the coating is completely hardened.
Storing the Truffles
- Once the truffles are set, you can store them in an airtight container. They can be kept at room temperature for up to a week or in the refrigerator for up to two weeks.
- If you want to keep them longer, consider freezing them. Place the truffles in a single layer on a baking sheet and freeze until solid. Then transfer them to a freezer-safe container or bag. They can be frozen for up to three months.
Serving Suggestions
- These Blue Christmas Truffles make a delightful addition to any holiday dessert table. You can serve them on
Conclusion:
If you’re looking for a festive treat that captures the spirit of the season, these Blue Christmas Truffles are an absolute must-try! Not only do they boast a stunning blue hue that adds a pop of color to your holiday dessert table, but their rich, creamy texture and delightful flavor will leave your guests raving. The combination of chocolate and a hint of peppermint creates a perfect balance that embodies the essence of Christmas. Plus, they’re incredibly easy to make, which means you can whip them up even on the busiest of holiday days!
When it comes to serving suggestions, these truffles are incredibly versatile. You can present them in a beautiful holiday-themed box or on a decorative platter, dusted with powdered sugar or cocoa powder for an elegant touch. For an extra festive flair, consider drizzling some white chocolate over the top or rolling them in crushed candy canes for a delightful crunch. If you want to mix things up, try experimenting with different flavors by adding a splash of orange zest or a hint of almond extract to the chocolate mixture. You could even swap out the peppermint for other flavors like hazelnut or raspberry to create a unique twist on this classic treat.
I encourage you to give these Blue Christmas Truffles a try this holiday season. They’re not just a treat; they’re a conversation starter and a delightful way to spread joy among family and friends. Whether you’re hosting a holiday party, attending a potluck, or simply looking to indulge in something sweet, these truffles will surely impress.
Once you’ve made them, I’d love to hear about your experience! Share your thoughts, any variations you tried, or even a photo of your beautiful creations on social media. It’s always wonderful to see how others put their spin on a recipe. So, roll up your sleeves, gather your ingredients, and let’s make this holiday season a little sweeter with these delightful Blue Christmas Truffles!
Blue Christmas Truffles: A Festive Treat for the Holiday Season
Indulge in these festive Blue Christmas Truffles, featuring a delicious blend of chocolate and peppermint, all encased in a vibrant blue candy coating. Perfect for holiday gatherings or as sweet gifts, these treats are sure to delight friends and family!
Ingredients
- 1 cup of crushed graham crackers
- 1 cup of powdered sugar
- 1/2 cup of unsweetened cocoa powder
- 1/2 cup of sweetened condensed milk
- 1/4 cup of unsalted butter, softened
- 1 teaspoon of vanilla extract
- 1/2 teaspoon of peppermint extract
- 1 cup of blue candy melts
- 1/2 cup of white chocolate chips
- Sprinkles or edible glitter for decoration
Instructions
- In einer großen Schüssel die zerdrückten Graham-Cracker, Puderzucker und Kakaopulver vermengen. Gut mischen, bis alle trockenen Zutaten gleichmäßig verteilt sind.
- Die weiche ungesalzene Butter, gesüßte Kondensmilch, Vanilleextrakt und Pfefferminzextrakt zur trockenen Mischung hinzufügen. Mit einem Spatel oder den Händen alles vermengen, bis ein dicker, zusammenhängender Teig entsteht. Er sollte leicht klebrig, aber handhabbar sein.
- Die Schüssel mit Frischhaltefolie abdecken und die Mischung etwa 30 Minuten im Kühlschrank kühlen, damit sie fester wird und sich leichter zu Kugeln formen lässt.
- Nach dem Kühlen die Mischung aus dem Kühlschrank nehmen. Mit einem kleinen Keksausstecher oder den Händen etwa einen Esslöffel der Mischung nehmen und zu einer Kugel rollen. Die geformten Trüffel auf ein mit Backpapier ausgelegtes Backblech legen.
- Den Vorgang wiederholen, bis die gesamte Mischung zu Kugeln geformt ist. Es sollten etwa 20-25 Trüffel entstehen, je nach gewählter Größe.
- Nachdem alle Trüffel geformt sind, das Backblech wieder für weitere 15-20 Minuten in den Kühlschrank stellen, damit sie fester werden, während die Beschichtung vorbereitet wird.
- In einer mikrowellengeeigneten Schüssel die blauen Candy Melts hinzufügen. In 30-Sekunden-Intervallen in der Mikrowelle erhitzen und zwischendurch umrühren, bis die Candy Melts vollständig glatt und geschmolzen sind. Vorsicht, nicht überhitzen, da dies die Candy Melts zum Klumpen bringen kann.
- Wenn eine dünnere Konsistenz für einfacheres Eintauchen gewünscht wird, kann ein Teelöffel Pflanzenöl zu den geschmolzenen Candy Melts hinzugefügt und gut verrührt werden.
- Sobald die Trüffel fest sind und die Candy Melts bereit sind, eine Trüffel aus dem Kühlschrank nehmen. Mit einer Gabel die Trüffel in die geschmolzene blaue Candy-Beschichtung tauchen, sodass sie vollständig bedeckt ist.
- Die Trüffel aus der Beschichtung heben und die Gabel sanft gegen den Rand der Schüssel klopfen, um überschüssige Beschichtung zu entfernen. Dies hilft, eine glatte Oberfläche zu erzeugen.
- Die beschichtete Trüffel zurück auf das mit Backpapier ausgelegte Backblech legen. Diesen Vorgang für alle Trüffel wiederholen.
- Während die Beschichtung noch feucht ist, etwas essbaren Glitzer oder festliche Streusel auf jede Trüffel streuen, um einen schönen Feiertagsakzent zu setzen.
- In einer separaten mikrowellengeeigneten Schüssel die weißen Schokoladenstückchen mit derselben Methode wie die blauen Candy Melts schmelzen. Nach dem Schmelzen etwas abkühlen lassen.
- Mit einer Gabel oder einem Spritzbeutel die geschmolzene weiße Schokolade über die beschichteten Trüffel träufeln, um einen eleganten Abschluss zu erzielen. Dies sorgt für einen schönen Kontrast zur blauen Beschichtung.
- Die Trüffel bei Raumtemperatur etwa 30 Minuten ruhen lassen, bis die Beschichtung vollständig ausgehärtet ist.
- Sobald die Trüffel fest sind, können sie in einem luftdichten Behälter aufbewahrt werden. Sie können bis zu einer Woche bei Raumtemperatur oder bis zu zwei Wochen im Kühlschrank aufbewahrt werden.
- Wenn Sie sie länger aufbewahren möchten, können Sie sie einfrieren. Legen Sie die Trüffel in einer einzigen Schicht auf ein Backblech und frieren Sie sie ein, bis sie fest sind. Dann in einen gefriergeeigneten Behälter oder Beutel umfüllen. Sie können bis zu drei Monate eingefroren werden.
Notes
- Feel free to customize the decorations with different colored sprinkles or edible glitter to match your holiday theme.
- For a stronger peppermint flavor, you can increase the peppermint extract to taste.

Leave a Comment