
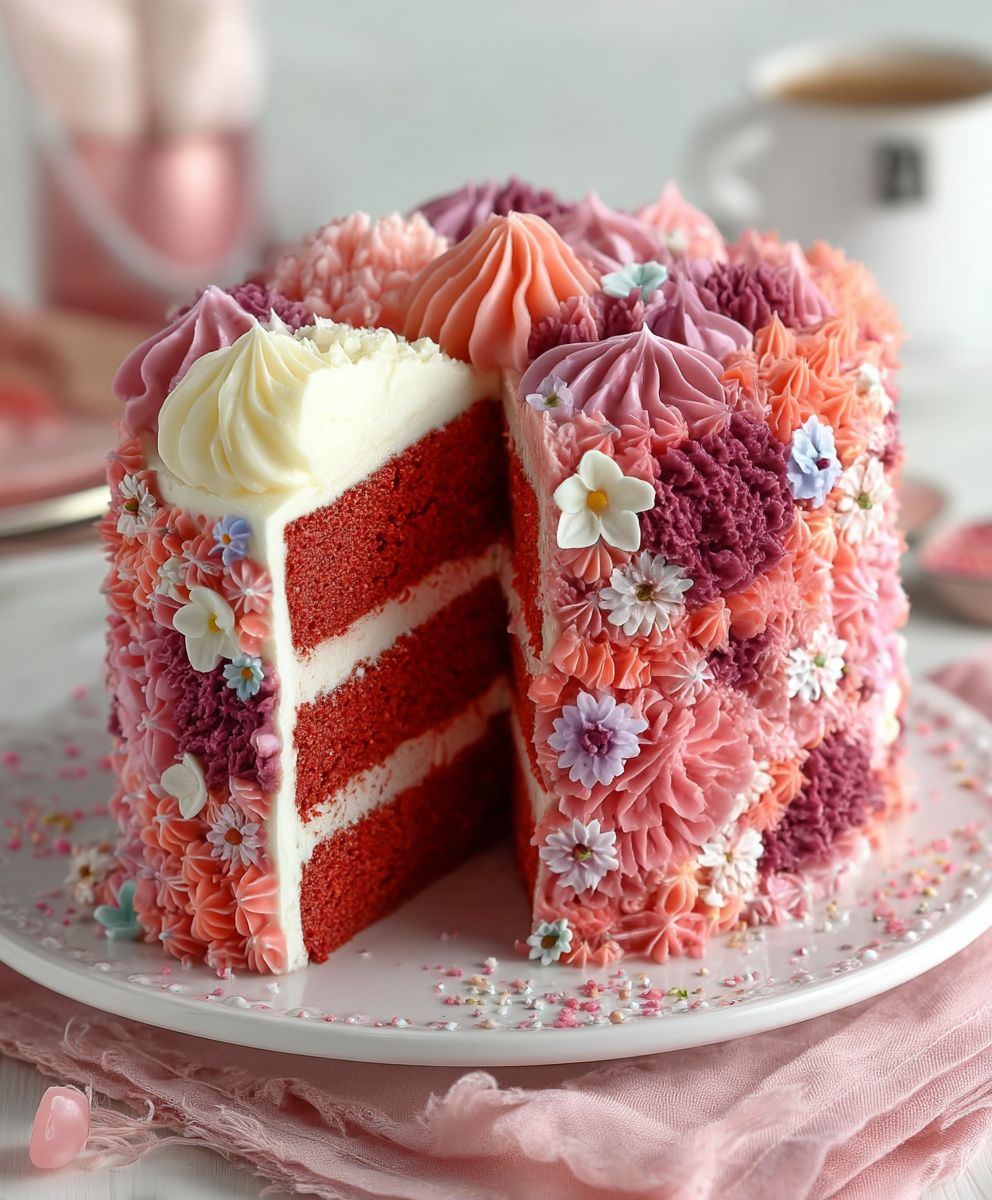
Blue Velvet Cake: A Delicious Twist on a Classic
Blue Velvet Cake is not just a feast for the eyes; it’s a delightful treat that tantalizes the taste buds. This stunning dessert, with its vibrant blue hue, is a modern twist on the traditional red velvet cake, and it has quickly become a favorite for celebrations and special occasions. The origins of velvet cakes date back to the 1800s, where they were known for their soft, velvety texture, and the blue version adds a unique flair that captures attention and sparks conversation.
People love Blue Velvet Cake for its rich flavor and moist crumb, which is perfectly complemented by a creamy frosting. The combination of buttermilk and cocoa creates a subtle chocolate taste that pairs beautifully with the cake’s striking color. Whether you’re serving it at a birthday party, wedding, or simply enjoying a slice with your afternoon tea, this cake is sure to impress. Plus, it’s surprisingly easy to make, making it a convenient choice for both novice and experienced bakers alike. Join me as we dive into the delightful world of Blue Velvet Cake!

Ingredients:
- 2 ½ cups all-purpose flour
- 1 ½ cups granulated sugar
- 1 cup unsweetened cocoa powder
- 1 ½ teaspoons baking powder
- 1 ½ teaspoons baking soda
- 1 teaspoon salt
- 1 cup vegetable oil
- 1 cup buttermilk, at room temperature
- 2 large eggs, at room temperature
- 2 teaspoons vanilla extract
- 1 tablespoon red food coloring
- 1 teaspoon white vinegar
Preparing the Batter
- Preheat your oven to 350°F (175°C). Grease and flour two 9-inch round cake pans. You can also line the bottoms with parchment paper for easier removal.
- In a large mixing bowl, combine the all-purpose flour, granulated sugar, cocoa powder, baking powder, baking soda, and salt. Whisk these dry ingredients together until they are well combined and there are no lumps.
- In another bowl, mix together the vegetable oil, buttermilk, eggs, and vanilla extract. Whisk until the mixture is smooth and well blended.
- Gradually add the wet ingredients to the dry ingredients, mixing on medium speed with an electric mixer. Be sure to scrape down the sides of the bowl to ensure everything is incorporated. Mix until just combined; do not overmix.
- In a small bowl, combine the red food coloring and white vinegar. Stir this mixture into the batter, mixing until the color is evenly distributed. The batter should have a rich, deep red hue.
Baking the Cake
- Divide the batter evenly between the two prepared cake pans. Use a spatula to smooth the tops if necessary.
- Bake in the preheated oven for 25 to 30 minutes, or until a toothpick inserted into the center comes out clean. Keep an eye on the cakes as baking times may vary slightly based on your oven.
- Once baked, remove the cakes from the oven and let them cool in the pans for about 10 minutes. Then, carefully turn them out onto a wire rack to cool completely.
Preparing the Frosting
- 1 cup unsalted butter, softened
- 4 cups powdered sugar
- 1/4 cup heavy cream
- 2 teaspoons vanilla extract
- Pinch of salt
- In a large mixing bowl, beat the softened butter with an electric mixer on medium speed until it is creamy and smooth.
- Gradually add the powdered sugar, mixing on low speed until combined. This will help prevent a sugar cloud from forming.
- Once the sugar is incorporated, add the heavy cream, vanilla extract, and a pinch of salt. Beat on medium-high speed for about 3-5 minutes until the frosting is light and fluffy. If the frosting is too thick, you can add a little more cream to reach your desired consistency.
Assembling the Cake
- Once the cakes are completely cooled, place one layer on a serving plate or cake stand. This will be the bottom layer.
- Spread a generous amount of frosting on top of the first layer, using a spatula to create an even layer.
- Carefully place the second layer on top of the frosted first layer. Press down gently to ensure it adheres.
- Use the remaining frosting to cover the top and sides of the cake. You can create a smooth finish or use a spatula to create swirls and peaks for a more textured look.
- If desired, you can decorate the top of the cake with chocolate shavings, fresh berries, or edible flowers for an extra touch of elegance.
Serving the Cake
- Once assembled, let the cake sit for about 30 minutes to allow the frosting to set slightly.
- When ready to serve, use a sharp knife to cut the cake into slices. Wipe
Conclusion:
If you’re looking for a show-stopping dessert that combines elegance with a delightful flavor, then this Blue Velvet Cake is an absolute must-try! The rich, velvety texture paired with the subtle sweetness of cream cheese frosting creates a dessert experience that is both indulgent and memorable. Not only does it taste incredible, but its stunning blue hue makes it a perfect centerpiece for any occasion, whether it’s a birthday party, wedding, or just a cozy gathering with friends and family.
When it comes to serving suggestions, I highly recommend pairing this Blue Velvet Cake with a scoop of vanilla ice cream or a dollop of whipped cream to enhance its flavors even further. The contrast of the cold ice cream against the warm cake is simply divine! For a fun twist, consider adding fresh berries on the side, such as strawberries or blueberries, which not only add a pop of color but also a refreshing tartness that complements the sweetness of the cake beautifully.
If you’re feeling adventurous, you can also experiment with variations of this recipe. For instance, try adding a hint of lemon zest to the cream cheese frosting for a citrusy kick, or incorporate a layer of blueberry compote between the cake layers for an extra burst of flavor. You could even swap out the traditional cream cheese frosting for a chocolate ganache for a decadent twist that chocolate lovers will adore. The possibilities are endless, and that’s what makes this Blue Velvet Cake so versatile!
I encourage you to give this recipe a try and experience the joy of baking something truly special. Whether you’re a seasoned baker or a novice in the kitchen, this cake is straightforward to make and will impress anyone who takes a bite. Don’t forget to share your experience with friends and family, and let them know how much you enjoyed making this delightful Blue Velvet Cake. I would love to hear your thoughts and any creative variations you come up with! So roll up your sleeves, gather your ingredients, and let’s get baking! You won’t regret it!
Blue Velvet Cake: A Delicious Twist on a Classic Dessert
Indulge in a rich and decadent Red Velvet Cake with a moist chocolate base and creamy cream cheese frosting, perfect for any celebration or sweet craving.
Ingredients
- 2 ½ cups all-purpose flour
- 1 ½ cups granulated sugar
- 1 cup unsweetened cocoa powder
- 1 ½ teaspoons baking powder
- 1 ½ teaspoons baking soda
- 1 teaspoon salt
- 1 cup vegetable oil
- 1 cup buttermilk, at room temperature
- 2 large eggs, at room temperature
- 2 teaspoons vanilla extract
- 1 tablespoon red food coloring
- 1 teaspoon white vinegar
- 1 cup unsalted butter, softened
- 4 cups powdered sugar
- 1/4 cup heavy cream
- 2 teaspoons vanilla extract
- Pinch of salt
Instructions
- Preheat your oven to 350°F (175°C). Grease and flour two 9-inch round cake pans, or line the bottoms with parchment paper for easier removal.
- In a large mixing bowl, combine the all-purpose flour, granulated sugar, cocoa powder, baking powder, baking soda, and salt. Whisk until well combined and free of lumps.
- In another bowl, mix together the vegetable oil, buttermilk, eggs, and vanilla extract. Whisk until smooth and well blended.
- Gradually add the wet ingredients to the dry ingredients, mixing on medium speed with an electric mixer. Scrape down the sides of the bowl to ensure everything is incorporated. Mix until just combined; do not overmix.
- In a small bowl, combine the red food coloring and white vinegar. Stir this mixture into the batter until the color is evenly distributed.
- Divide the batter evenly between the two prepared cake pans. Smooth the tops with a spatula if necessary.
- Bake in the preheated oven for 25 to 30 minutes, or until a toothpick inserted into the center comes out clean. Keep an eye on the cakes as baking times may vary.
- Once baked, remove the cakes from the oven and let them cool in the pans for about 10 minutes. Carefully turn them out onto a wire rack to cool completely.
- In a large mixing bowl, beat the softened butter with an electric mixer on medium speed until creamy and smooth.
- Gradually add the powdered sugar, mixing on low speed until combined to prevent a sugar cloud.
- Once incorporated, add the heavy cream, vanilla extract, and a pinch of salt. Beat on medium-high speed for about 3-5 minutes until the frosting is light and fluffy. If too thick, add a little more cream to reach your desired consistency.
- Once the cakes are completely cooled, place one layer on a serving plate or cake stand.
- Spread a generous amount of frosting on top of the first layer, creating an even layer.
- Carefully place the second layer on top of the frosted first layer and press down gently.
- Use the remaining frosting to cover the top and sides of the cake. Create a smooth finish or use a spatula for texture.
- Optionally, decorate the top with chocolate shavings, fresh berries, or edible flowers.
- Let the assembled cake sit for about 30 minutes to allow the frosting to set slightly.
- When ready to serve, use a sharp knife to cut the cake into slices.
Notes
- Ensure all ingredients are at room temperature for the best results.
- You can store leftover cake in an airtight container at room temperature for up to 3 days.
Leave a Comment