
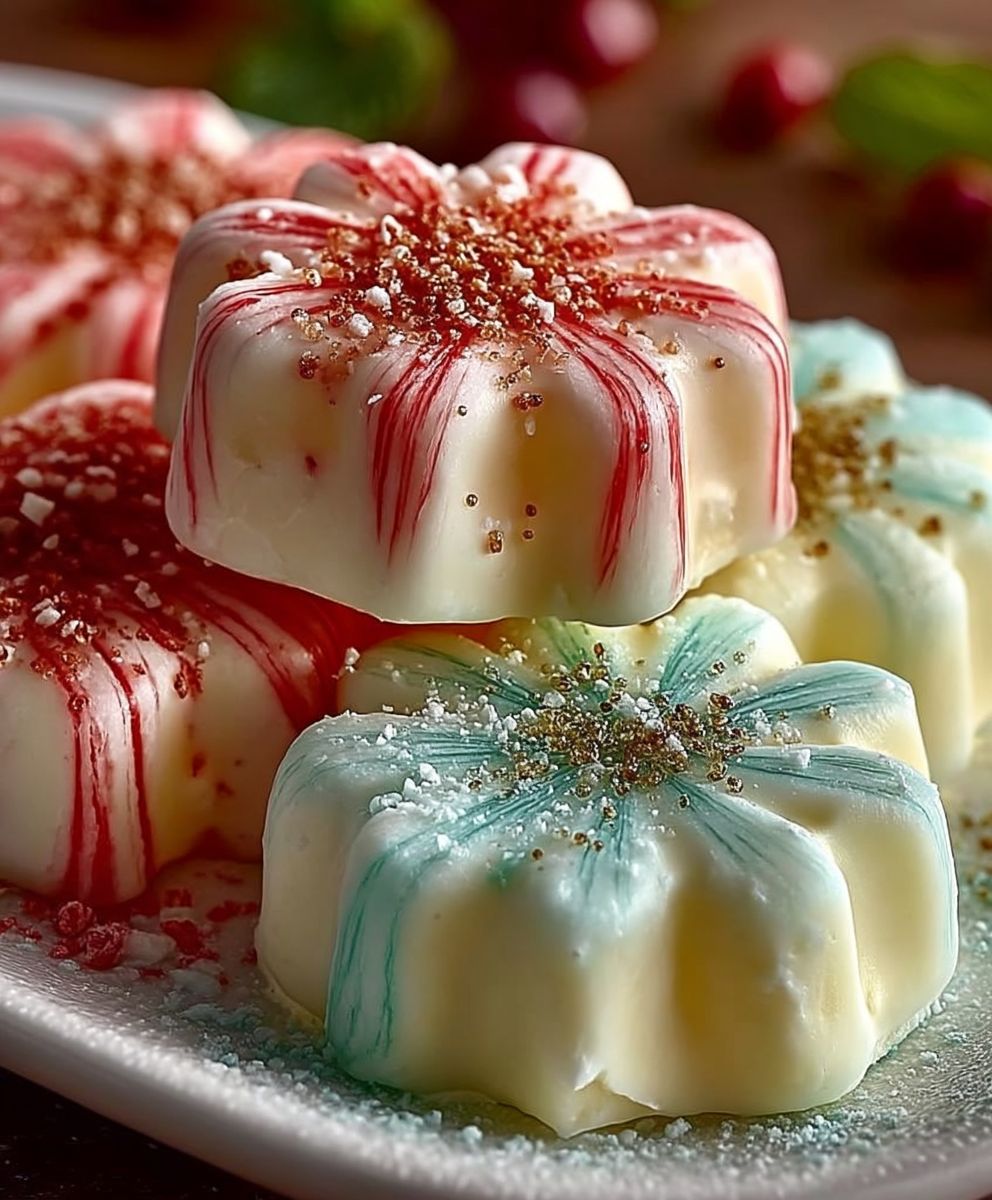
Butter Mints: A Sweet Delight for Every Occasion
Butter mints are a delightful treat that brings a touch of nostalgia to any gathering. These creamy, melt-in-your-mouth confections have been a staple at weddings, parties, and holiday celebrations for generations. Originating in the United States, butter mints are often associated with Southern hospitality, where they are served as a sweet gesture to guests. Their rich, buttery flavor combined with a hint of mint creates a perfect balance that keeps people coming back for more.
What makes butter mints so beloved is not just their taste, but also their texture. The smooth, creamy consistency makes them a joy to eat, while their refreshing minty finish leaves a pleasant aftertaste. Plus, they are incredibly easy to make at home, allowing you to customize flavors and colors to suit any occasion. Whether you’re hosting a bridal shower or simply want a sweet treat to enjoy with your afternoon tea, butter mints are sure to impress. Join me as we dive into this simple yet delightful recipe that will have everyone asking for seconds!

Ingredients:
- 1 cup unsalted butter, softened
- 4 cups powdered sugar
- 1/4 cup sweetened condensed milk
- 1 teaspoon peppermint extract
- 1/4 teaspoon salt
- Food coloring (optional)
- Granulated sugar for coating (optional)
Preparing the Butter Mixture
- In a large mixing bowl, add the softened unsalted butter. Make sure the butter is at room temperature for easy mixing.
- Using an electric mixer, beat the butter on medium speed until it becomes creamy and smooth, which should take about 2-3 minutes.
- Gradually add the powdered sugar, one cup at a time, mixing on low speed to prevent a sugar cloud. Once all the sugar is incorporated, increase the speed to medium and beat until the mixture is fluffy, about 2-3 minutes.
- Pour in the sweetened condensed milk, peppermint extract, and salt. Mix on low speed until combined, then increase to medium speed and beat for another 2 minutes until the mixture is smooth and well-blended.
Coloring the Mixture (Optional)
- If you want to add color to your butter mints, divide the mixture into separate bowls based on how many colors you want to use.
- Add a few drops of food coloring to each bowl. Start with a small amount and mix thoroughly until you achieve your desired shade. Remember, the color will lighten slightly as the mints set.
- Once colored, you can choose to leave the mints as is or combine colors for a marbled effect.
Shaping the Mints
- Prepare a clean work surface by dusting it lightly with powdered sugar to prevent sticking.
- Using a small cookie scoop or your hands, take a small amount of the butter mixture (about 1 teaspoon) and roll it into a ball. If the mixture is too sticky, you can dust your hands with powdered sugar.
- Once you have rolled the mixture into balls, place them on a parchment-lined baking sheet, leaving some space between each mint.
- If you prefer a more traditional mint shape, you can flatten each ball slightly with the palm of your hand or the bottom of a glass.
Coating the Mints (Optional)
- If you want to coat your butter mints in granulated sugar for added sweetness and texture, pour some granulated sugar into a shallow bowl.
- Roll each mint ball in the sugar until fully coated, then return them to the parchment-lined baking sheet.
Chilling the Mints
- Once all the mints are shaped and coated (if desired), cover the baking sheet with plastic wrap or aluminum foil.
- Place the baking sheet in the refrigerator and chill for at least 1-2 hours, or until the mints are firm. This step is crucial as it helps the mints hold their shape.
Storing the Butter Mints
- After the mints have chilled and firmed up, you can transfer them to an airtight container.
- Store the butter mints in the refrigerator for up to 2 weeks. If you want to keep them longer, you can freeze them for up to 3 months. Just make sure to separate layers with parchment paper to prevent sticking.
Serving Suggestions
- Butter mints are perfect for holiday gatherings, weddings, or as a sweet treat to enjoy at home.
- Consider serving them in decorative bowls or packaging them in small bags tied with ribbons for gifts.
- These mints can also be a delightful addition to a dessert table or as a refreshing after-dinner treat.
Tips for Perfect Butter Mints
- Make sure your butter is softened but not melted for the best texture.
- Feel free to experiment with different flavor extracts, such as vanilla or almond, for a unique twist.
- 1 cup unsalted butter, softened
- 4 cups powdered sugar
- 1/4 cup sweetened condensed milk
- 1 teaspoon peppermint extract
- 1/4 teaspoon salt
- Food coloring (optional)
- Granulated sugar for coating (optional)
- In einer großen Schüssel die weiche, ungesalzene Butter hinzufügen und mit einem elektrischen Mixer bei mittlerer Geschwindigkeit 2-3 Minuten cremig und glatt schlagen.
- Den Puderzucker nach und nach, jeweils eine Tasse, bei niedriger Geschwindigkeit hinzufügen, um eine Zuckersäule zu vermeiden. Nach der vollständigen Einmischung die Geschwindigkeit erhöhen und 2-3 Minuten weiter schlagen, bis die Mischung fluffig ist.
- Die gesüßte Kondensmilch, den Pfefferminzextrakt und das Salz hinzufügen. Bei niedriger Geschwindigkeit vermengen und dann die Geschwindigkeit auf mittel erhöhen und weitere 2 Minuten schlagen, bis die Mischung glatt und gut vermischt ist.
- Falls gewünscht, die Mischung in separate Schüsseln aufteilen und einige Tropfen Lebensmittelfarbe hinzufügen. Gründlich mischen, bis der gewünschte Farbton erreicht ist.
- Eine saubere Arbeitsfläche leicht mit Puderzucker bestäuben, um ein Kleben zu verhindern.
- Mit einem kleinen Keksausstecher oder den Händen etwa 1 Teelöffel der Buttermasse nehmen und zu einer Kugel rollen. Die Hände mit Puderzucker bestäuben, wenn die Mischung zu klebrig ist.
- Die gerollten Kugeln auf ein mit Backpapier ausgelegtes Backblech legen und zwischen den einzelnen Mints Platz lassen.
- Für eine traditionelle Minzform jede Kugel leicht mit der Handfläche oder dem Boden eines Glases flachdrücken.
- Falls gewünscht, Granulated Sugar in eine flache Schüssel geben und jede Minzkugel darin rollen, bis sie vollständig bedeckt ist, und dann zurück auf das Backblech legen.
- Das Backblech mit Frischhaltefolie oder Aluminiumfolie abdecken und in den Kühlschrank stellen, um die Mints mindestens 1-2 Stunden oder bis sie fest sind, zu kühlen.
- Nach dem Kühlen die Mints in einen luftdichten Behälter umfüllen und im Kühlschrank bis zu 2 Wochen oder bis zu 3 Monate im Gefrierschrank aufbewahren, wobei die Schichten mit Backpapier getrennt werden, um ein Kleben zu verhindern.
- Die Butter-Mints bei Feiertagsversammlungen, Hochzeiten oder als süße Leckerei zu Hause servieren.
- Für Geschenke dekorative Schalen oder kleine Beutel mit Schleifen in Betracht ziehen.
- Diese Mints sind auch eine köstliche Ergänzung zu Desserttischen oder als erfrischende Nachspeise nach dem Abendessen.
- Ensure your butter is softened but not melted for the best texture.
- Experiment with different flavor extracts, such as vanilla or almond, for a unique twist.
Conclusion:
If you’re looking for a delightful treat that’s both simple to make and irresistibly delicious, then this Butter Mints recipe is a must-try! These little gems are not only perfect for satisfying your sweet tooth but also make for a charming addition to any gathering or celebration. The creamy, buttery flavor combined with a hint of mint creates a refreshing taste that’s sure to impress your family and friends. Plus, they’re incredibly easy to whip up, making them an ideal choice for both novice and experienced bakers alike.
When it comes to serving suggestions, the possibilities are endless! You can present these Butter Mints in a decorative bowl at your next party, or package them in cute little bags as party favors. They also make a lovely addition to holiday dessert trays or as a sweet treat to accompany your afternoon tea. If you want to get creative, consider experimenting with different flavors by adding a few drops of food coloring or using flavored extracts like peppermint, spearmint, or even chocolate mint. You could also roll them in crushed nuts or sprinkle them with edible glitter for an extra touch of flair!
I encourage you to try this Butter Mints recipe and share your experience with others. Whether you’re making them for a special occasion or just to enjoy at home, I’d love to hear how they turn out for you. Did you try any unique variations? How did your friends and family react? Sharing your journey not only helps inspire others to give this recipe a go but also creates a wonderful sense of community around the joy of cooking and baking.
So, gather your ingredients, roll up your sleeves, and dive into the delightful world of Butter Mints. I promise you won’t regret it! These little treats are bound to become a favorite in your household, and who knows, they might even become a cherished family tradition. Happy baking, and I can’t wait to hear all about your Butter Mints adventures!
Butter Mints: The Perfect Sweet Treat for Any Occasion
These creamy butter mints are sweet, refreshing, and perfect for any occasion. Infused with peppermint flavor, they can be customized with colors and coatings for a festive touch, making them an ideal treat for holiday gatherings, weddings, or simply as a delightful snack at home.
Leave a Comment