
Classic Homemade Orange Candy: A Sweet Nostalgia
Classic Homemade Orange Candy is not just a treat; it’s a delightful journey back to simpler times. As a child, I remember the joy of unwrapping these vibrant, citrus-flavored confections, their sweet aroma filling the air. This recipe is steeped in tradition, often passed down through generations, making it a beloved staple in many households. The bright, zesty flavor of orange combined with the satisfying chewiness creates a perfect balance that keeps everyone coming back for more.
People adore this Classic Homemade Orange Candy for its unique taste and texture. The candy is not only delicious but also incredibly easy to make, allowing you to whip up a batch in no time. Whether you’re looking to impress guests at a gathering or simply indulge in a sweet treat, this recipe is sure to please. Join me as we dive into the world of homemade candy, where every bite is a burst of sunshine!

Ingredients:
- 2 cups fresh orange juice (about 6-8 oranges)
- 1 tablespoon grated orange zest
- 2 cups granulated sugar
- 1/4 cup light corn syrup
- 1/4 teaspoon salt
- 1/2 teaspoon pure vanilla extract
- 1/4 teaspoon citric acid (optional, for tartness)
- Powdered sugar, for dusting
Preparing the Orange Juice and Zest
- Start by washing the oranges thoroughly under running water to remove any dirt or pesticides.
- Using a zester or a fine grater, carefully remove the zest from the oranges. Be sure to only take the orange part of the peel, avoiding the bitter white pith underneath. You will need about 1 tablespoon of zest.
- Cut the oranges in half and juice them using a citrus juicer or a manual juicer. Strain the juice through a fine mesh sieve to remove any seeds and pulp. Measure out 2 cups of fresh orange juice.
Making the Candy Mixture
- In a large, heavy-bottomed saucepan, combine the fresh orange juice, grated orange zest, granulated sugar, light corn syrup, and salt. Stir the mixture gently to combine all the ingredients.
- Place the saucepan over medium heat and bring the mixture to a gentle boil, stirring occasionally to ensure the sugar dissolves completely.
- Once the mixture reaches a boil, reduce the heat to medium-low and continue to cook without stirring. Use a candy thermometer to monitor the temperature closely.
- Cook the mixture until it reaches the soft-ball stage, which is around 235°F to 240°F (113°C to 115°C). This process usually takes about 15-20 minutes, but keep an eye on it to prevent burning.
Adding Flavor and Texture
- Once the mixture reaches the desired temperature, remove the saucepan from the heat. Stir in the pure vanilla extract and citric acid (if using) to enhance the flavor and add a slight tartness.
- Let the mixture cool for about 5 minutes. This will allow it to thicken slightly before pouring it into the mold.
Pouring and Setting the Candy
- Prepare a baking dish or a candy mold by lining it with parchment paper or lightly greasing it with cooking spray. This will help prevent the candy from sticking.
- Carefully pour the orange candy mixture into the prepared dish or mold, spreading it evenly with a spatula if necessary.
- Allow the candy to cool at room temperature for several hours, or until it is completely set. This can take anywhere from 4 to 6 hours, depending on the humidity and temperature of your kitchen.
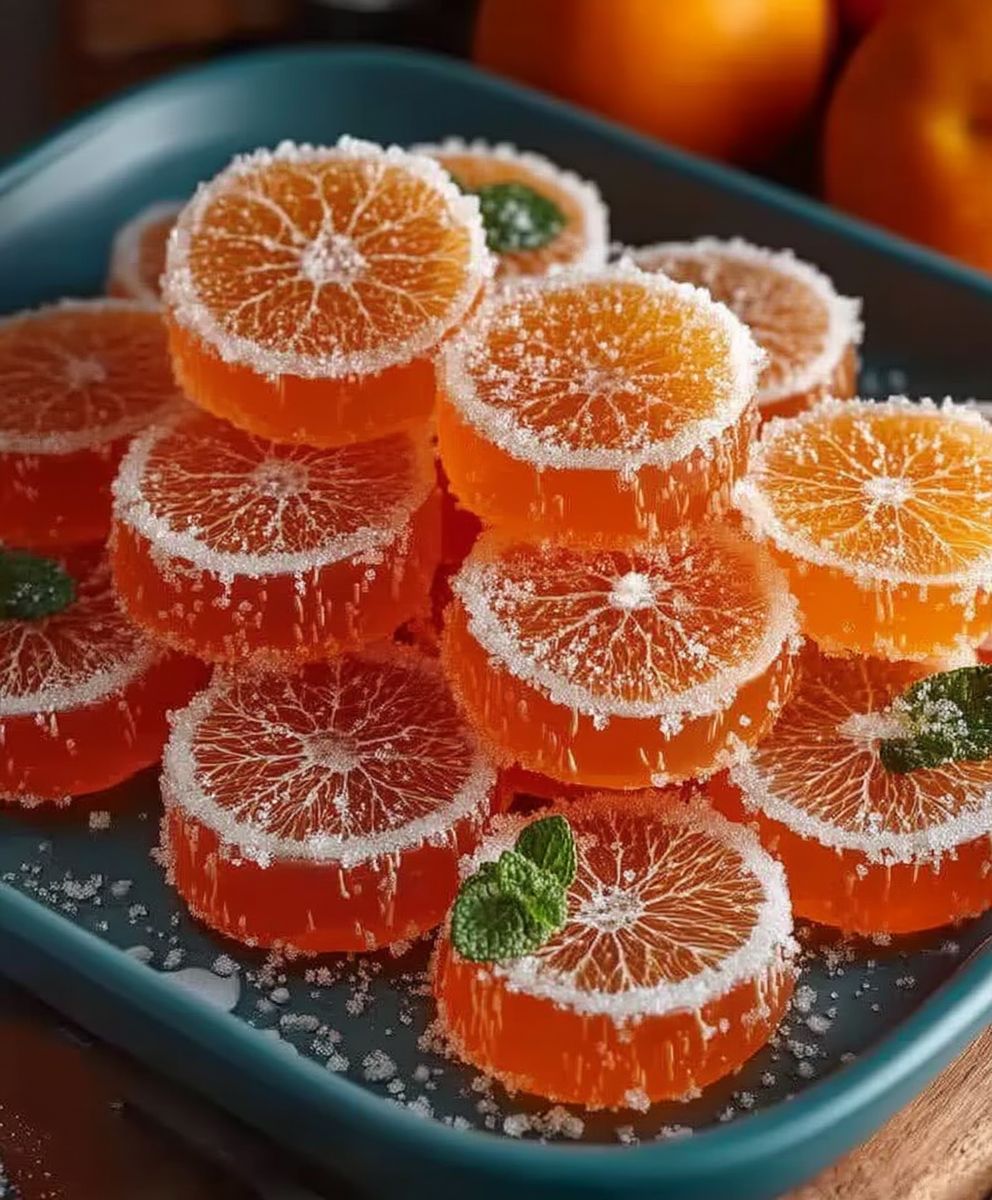
Cutting and Dusting the Candy
- Once the candy has set, remove it from the mold or dish by lifting the parchment paper. If you used a greased dish, you may need to gently run a knife around the edges to loosen it.
- Place the candy on a cutting board and use a sharp knife to cut it into small squares or rectangles, depending on your preference.
- To prevent the pieces from sticking together, dust them lightly with powdered sugar. You can do this by placing the cut pieces in a bowl with powdered sugar and tossing them gently.
Storing the Candy
- Store the orange candy in an airtight container at room temperature. It can last for up to two weeks, but I recommend enjoying it within the first week for the best flavor and texture.
- If you live in a particularly humid environment, consider refrigerating the candy to help maintain its firmness. Just be sure to bring it back to room temperature before serving for the best taste.
Serving Suggestions
- These classic homemade orange candies make a delightful treat on their own, but they can also be used as a garnish for desserts like cakes or ice cream.
- For a festive touch, package them in small bags or boxes
Conclusion:
If you’re looking for a delightful treat that combines nostalgia with a burst of citrus flavor, then this Classic Homemade Orange Candy is an absolute must-try! The process of making these candies is not only simple but also incredibly rewarding. With just a few ingredients, you can create a sweet and tangy confection that will impress your family and friends. The vibrant orange flavor is sure to brighten up any occasion, making it a perfect addition to your dessert table or a thoughtful homemade gift.
When it comes to serving suggestions, these candies can be enjoyed in various ways. You can serve them as a standalone treat, perfect for snacking or as a sweet finish to a meal. They also make a lovely addition to a candy buffet at parties or celebrations. For a more festive touch, consider packaging them in decorative boxes or jars tied with a ribbon, making them an ideal gift for holidays or special occasions.
If you’re feeling adventurous, there are plenty of variations you can try with this Classic Homemade Orange Candy recipe. For instance, you can experiment with different citrus fruits like lemon or lime for a unique twist. Adding a hint of spice, such as cinnamon or ginger, can also elevate the flavor profile and give your candies a warm, cozy touch. For those who enjoy a bit of crunch, consider incorporating finely chopped nuts or coconut flakes into the mixture before setting it. The possibilities are endless, and I encourage you to get creative!
I genuinely believe that making your own candy is a wonderful way to connect with the joy of cooking and the satisfaction of creating something delicious from scratch. I invite you to try this Classic Homemade Orange Candy recipe and share your experience with me! Whether you stick to the original recipe or put your own spin on it, I would love to hear how it turns out for you. Don’t forget to take some pictures and share them on social media, tagging your friends and family to inspire them to join in on the fun.
In conclusion, this Classic Homemade Orange Candy is not just a treat; it’s an experience that brings a little sweetness into your life. So gather your ingredients, roll up your sleeves, and let’s make some candy! I can’t wait to see how you enjoy this delightful recipe. Happy candy-making!
Classic Homemade Orange Candy: A Simple Recipe for Delicious Treats
A delicious and easy-to-make dish that combines fresh ingredients and bold flavors, perfect for any occasion. Enjoy a satisfying meal that is both nutritious and delightful!
Ingredients
- 500 g Mehl (Type 550)
- 10 g Salz
- 5 g Trockenhefe
- 350 ml Wasser
- 3 Zehen Knoblauch, gehackt
- 2 EL Olivenöl
Instructions
- In einer großen Schüssel Mehl, Salz und Hefe vermengen.
- Wasser hinzufügen und zu einem Teig verrühren.
- Knoblauch und Olivenöl unterrühren.
- Teig 12 Stunden gehen lassen.
Notes
- Der Teig darf während der Ruhezeit nicht bewegt werden.
- Für ein intensiveres Knoblaucharoma können mehr Zehen verwendet werden.


Leave a Comment