
The smell of toasted marshmallow and melting chocolate instantly transports you back to cozy campfires, minus the smoke inhalation and mosquito attacks. If you crave that sticky-fingered nostalgia but prefer the convenience of central heating, then mastering the magnificentClassic S’mores Cake – Gooey Chocolate Marshmallow Dessertis essential for your indoor entertaining.
Forget wrestling with flimsy sticks; this stunning layered treat captures everything wonderful about the original campfire staple, elevating it into a decadent dessert centerpiece guaranteed to impress even the most skeptical adult.
- This recipe layers crunchy graham crust, rich chocolate ganache, and cloud-like toasted marshmallow for incredible textural contrast and satisfaction.
- Achieve perfect gooeyness without any open flames, making this stunning dessert entirely safe for indoor kitchen adventures and sophisticated parties.
- The preparation is surprisingly simple, requiring minimal baking skill but delivering maximum flavor impact and unforgettable visual drama.
- A highly versatile treat, this cake is ideal for birthdays, holidays, or just curing a sudden, desperate craving for chocolate and intense sugar rush.
Ingredients for Classic S’mores Cake – Gooey Chocolate Marshmallow Dessert
Here’s what you’ll need to make this delicious dish:
- Graham CrackersLook for plain honey graham crackers; you will need about two standard sleeves for the buttery, essential crust base.
- Unsalted ButterUse high-quality butter, melted completely, to bind the crumbs tightly so your crust doesn’t turn into a flaky mess when sliced.
- Granulated SugarA small amount added to the crust helps reinforce its structure and enhances the subtle sweetness of the graham flavor.
- High-Quality Chocolate Chips (Semi-Sweet or Dark)Since this is the main event alongside the marshmallow, choose premium chips or chopped baking chocolate for a superior, deep chocolate taste.
- Heavy CreamEssential for creating the luscious, pourable chocolate ganache; ensure it has at least 35% milk fat for optimal richness and sheen.
- Mini MarshmallowsYou will need a large bag of mini marshmallows; they melt more evenly and quickly than the standard large size when creating the top layer.
- Alcohol-Free Vanilla ExtractA splash added to the ganache helps deepen the flavor profile, balancing the intensity of the dark chocolate base.
- Pinch of SaltThis crucial ingredient helps cut through the sweetness of both the chocolate and the marshmallow, ensuring the dessert isn’t cloyingly sweet.
The full ingredients list, including measurements, is provided in the recipe card directly below.
How to Make Classic S’mores Cake – Gooey Chocolate Marshmallow Dessert
Follow these simple steps to prepare this delicious dish:
Step 1: Preparing the Crunchy Foundation
Preheat your oven to 350°F (175°C). Line a 9-inch springform pan with parchment paper on the bottom and lightly grease the sides. Combine the graham cracker crumbs, melted butter, and granulated sugar in a medium bowl until the mixture resembles wet sand. Press this mixture firmly into the bottom of the prepared springform pan. Use the flat bottom of a drinking glass to ensure the crust is tightly packed and even. Bake the crust for 10 minutes to set, then remove it from the oven and allow it to cool completely while you move on to the next step.
Step 2: Creating the Silky Chocolate Ganache
While the crust cools, prepare the ganache filling. Place the chocolate chips and the pinch of salt in a medium, heatproof bowl. In a small saucepan, heat the heavy cream until small bubbles just begin to form around the edge, but do not let it boil vigorously. Pour the hot cream immediately over the chocolate chips, allowing it to sit undisturbed for about five minutes. After five minutes, gently whisk the mixture starting from the center and slowly working outwards until the ganache is completely smooth, glossy, and uniform. Stir in the alcohol-free vanilla extract for added depth.
Step 3: Assembling the Layers
Once the graham crust is cool to the touch, carefully pour the chocolate ganache over the crust. Gently tilt the pan to ensure the ganache spreads into an even layer, completely covering the graham base. Transfer the springform pan to the refrigerator and chill for at least three to four hours, or until the chocolate ganache is firm enough that you can lightly press the surface without leaving a dent.
Step 4: The Marshmallow Topping Application
Remove the chilled cake from the refrigerator. Arrange the mini marshmallows evenly across the top of the firm ganache layer. Make sure the entire surface is covered, slightly overlapping the marshmallows if necessary to create a cohesive, dense layer that will bubble beautifully when heated. If you find the marshmallows are rolling around, slightly dampen your fingers before placing them to help them adhere to the cool ganache surface.
Step 5: Achieving That Perfect Toasted Glow
This step requires focused attention. You have two options: use a culinary torch or switch the oven to the broiler setting (High). If using a broiler, place the rack about 6 to 8 inches away from the heating element. Place the cake under the broiler for 30 to 90 seconds. Watch it relentlessly; marshmallows transition from golden to burnt tragedy faster than you can blink. If using a culinary torch, move the flame constantly over the marshmallow surface until you achieve a beautiful, bubbly, golden-brown toast.
Step 6: Cooling and Serving
After toasting, let the cake sit at room temperature for about 10–15 minutes to allow the marshmallow layer to set slightly without becoming rock-hard. Carefully run a thin offset spatula or knife along the edge of the pan before releasing the springform ring. Transfer theClassic S’mores Cake – Gooey Chocolate Marshmallow Dessertto a presentation platter and drizzle with extra melted chocolate or sprinkle with coarse sea salt for the perfect finishing touch.
The Art of the Graham Cracker Crust: Avoiding Crumb Catastrophe
The crust is the underrated hero of any good layered dessert, and for a s’mores cake, it must withstand the pressure of rich ganache and hot, sticky marshmallow. Many novice bakers struggle with a crust that crumbles into anarchy the moment they try to slice it. The secret lies in two things: the butter-to-crumb ratio and, crucially, compression. You need just enough melted butter (usually about 1/2 cup for a 9-inch cake) to saturate the crumbs thoroughly, making them feel uniformly moist but not greasy. If it looks dry, add a teaspoon more butter, not water. Once mixed, compression is mandatory. Use the bottom of a measuring cup or the aforementioned drinking glass and apply serious downward pressure. You should feel like you are compacting concrete. The goal is zero air pockets. Baking it briefly for ten minutes also helps solidify the structure, making it less likely to disintegrate when faced with a knife. A well-executed graham crust is crunchy, holds its shape, and offers that delightful textural contrast against the soft layers above, creating a balanced bite every time.
Perfecting the Ganache: Secrets to Silky Smooth Chocolate
Chocolate ganache sounds fancy and complex, but it’s actually one of the easiest components to master, provided you respect the cream and the chocolate. The ideal ganache must be silky, smooth, and utterly free of graininess. Never stir the cream and chocolate immediately after combining them. This is the cardinal sin. By pouring the hot cream over the chocolate chips and letting it sit (or “bloom”) for five minutes, you allow the residual heat to melt the chocolate evenly from the outside in. When you finally stir, start in the very center of the bowl. Stir slowly in tight concentric circles. As the mixture begins to emulsify in the middle, the chocolate will incorporate smoothly into the cream, resulting in that beautiful, reflective sheen we all crave. If you stir too early or too aggressively, you risk introducing air bubbles, which leads to a dull finish, or, worse, causing the mixture to “break,” resulting in an oily, grainy mess. If your ganache does break, don’t panic. Gently whisk in a teaspoon of cold heavy cream or milk until the emulsion comes back together. Remember, temperature control and patience are the key components to achieving chocolate perfection in thisClassic S’mores Cake – Gooey Chocolate Marshmallow Dessert.
Marshmallow Majesty: Torching Tips for Optimal Goo
The toasted marshmallow topping is the visual and textural climax of this entire dessert, mimicking the perfect char you get from a campfire. While the broiler method works in a pinch, I strongly recommend investing in a culinary torch—it provides far superior control and allows you to customize the level of toastiness. When using a torch, ensure the flame is blue and steady, not flickering yellow. Keep the torch moving constantly, using swift, overlapping circular motions. You are aiming for a beautiful blend of deep golden brown and slightly blackened spots, which is where the flavor truly develops. The goal is to toast the surface quickly without transferring excessive heat down into the ganache layer, which could cause it to soften and become messy. If you are using the broiler, remember the oven should be screaming hot and the cake should only stay inside for a moment. Stand directly in front of the oven with the door ajar, pulling the cake out the second the marshmallows hit your desired level of brown. Over-toasting will give you a bitter, dry meringue instead of a soft, melt-in-your-mouth topping. The resulting gooey masterpiece elevates this dessert far beyond standard layer cakes.
Serving and Storage Strategies for Success
Once your stunning s’mores creation is complete, serving it correctly ensures maximum impact. Since the ganache is firm when cold, it’s easiest to slice when slightly chilled, but the flavor is best enjoyed closer to room temperature when the chocolate is soft and the marshmallow is still supple. If you’ve stored the cake overnight in the refrigerator, allow it to sit out for about 20 minutes before serving. Use a large, sharp knife dipped in hot water and wiped dry between slices—this technique prevents the gooey marshmallow from dragging across the ganache, keeping your presentation pristine. For storage, cover the cake tightly with plastic wrap and keep it refrigerated. Because of the marshmallow layer, it is best enjoyed within three days. While it technically freezes well, the texture of the marshmallows can become slightly watery upon thawing, so fresh is always best. This rich, layered dessert is incredibly satisfying, so small slices go a long way, making it perfect for feeding a crowd or providing multiple delightful portions for a small family gathering. Everyone appreciates the simple elegance of a thoughtfully prepared treat, and this recipe delivers on its promise of decadent satisfaction.
Variations on the Classic Theme (Flavor Swaps and Add-ins)
While the traditional graham-chocolate-marshmallow trio is iconic, this cake provides an excellent foundation for inventive variations. If you want to lean into richer flavors, consider substituting a chocolate crust for the graham cracker base, using crushed chocolate wafer cookies mixed with butter. Alternatively, you could boost the intensity by adding a layer of peanut butter mousse directly over the chilled ganache before adding the marshmallows. For a hint of warmth, try whisking a teaspoon of instant espresso powder or cinnamon into the heavy cream when making the ganache; this provides a deeper, more complex chocolate profile that truly stands out. Another fantastic addition is incorporating a fine layer of fruit pectin-based caramel or butterscotch sauce directly onto the ganache before chilling, adding a salty-sweet counterpoint to the sweetness of the marshmallow. Remember that the overall structure—crust, solid layer, gooey topping—must remain consistent, but the flavors you choose to stack within those layers are entirely up to your dessert genius. Enjoy experimenting with your new favoriteClassic S’mores Cake – Gooey Chocolate Marshmallow Dessert.
The Accidental Discovery of Sunshine on a Plate

I stumbled upon this masterpiece after a disastrous attempt at baking bread during a rainy weekend. Desperate for comfort, I melted some chocolate, grabbed some graham crackers, and suddenly, the essence of a summer campfire appeared, transforming that soggy afternoon into pure, delightful sunshine. This truly is a transformative dessert.
Perfecting the Cooking Process
Start by preparing the crunchy graham crust, pressing it firmly into the pan. Next, bake the chocolate fudge layer until just set but still fudgy in the center. Finally, top generously with plant-based marshmallows right before the final short broiler blast to achieve that iconic golden, gooey texture.
Add Your Touch
For an extra layer of decadence, swirl a spoonful of smooth caramel or creamy peanut butter into the chocolate layer before baking. You could also try substituting traditional graham crackers with chocolate wafers for a darker crust, adding delightful complexity to this sweet treat.
Storing & Reheating
Store leftover cake covered tightly in the refrigerator for up to three days. To reheat, microwave individual slices briefly (about 15 seconds) or place them in a low oven (300°F or 150°C) for five minutes until the marshmallows soften and the chocolate oozes delightfully again.
The Unlikely Origin Story of a Campfire Favorite
Do you remember those childhood nights, huddled around a sputtering campfire, armed with a coat hanger and a rapidly disintegrating marshmallow? That smoky, sticky joy is impossible to replicate indoors, or so I thought. When my editor challenged me to turn that messy outdoor memory into a sophisticated indoor dessert, I saw it as a monumental task. But ambition, and the promise of excessive chocolate, spurred me on. What resulted is more than just a cake; it’s an edible time machine. It is the definitive Classic S’mores Cake – Gooey Chocolate Marshmallow Dessert, perfect for convincing yourself that you are rugged, even if you just used your fancy oven broiler.
The beauty of this recipe lies in its contrasting textures: the sturdy crunch of the crust, the deep richness of the fudgy chocolate layer, and the ethereal, caramelized cloud of toasted marshmallow on top. This ultimate comfort food is suitable for any occasion, whether it’s a standard Tuesday night or a major celebration.
Gathering Your S’mores Arsenal: What You Need
Before you embark on this glorious culinary adventure, let’s talk ingredients. Quality matters here, especially when dealing with something as simple as chocolate. Use high-quality bittersweet chocolate chips for the best fudgy center. And since we adhere to ingredient guidelines, ensure your marshmallows are plant-based or pectin-free, readily available in most major grocery stores. The texture holds up beautifully, delivering that essential stretch and goo without compromise.
For the Crumbly Crust of Glory
- 1 ½ cups finely crushed graham crackers (about 10 full sheets)
- ¼ cup granulated sugar
- ½ cup (1 stick) unsalted butter, melted
- 1 teaspoon alcohol-free vanilla extract
The Decadent Chocolate Layer
- 1 ½ cups bittersweet chocolate chips or chopped baking chocolate
- 1 cup all-purpose flour
- ½ teaspoon baking powder
- ½ teaspoon salt
- ½ cup unsalted butter, softened
- ¾ cup granulated sugar
- ½ cup packed light brown sugar
- 3 large eggs
- 1 teaspoon alcohol-free vanilla extract
- ½ cup warm water or coffee
The Marshmallow Cloud Topping
- 4 cups plant-based marshmallows (mini or regular size, cut in half)
- 1 tablespoon unsalted butter, melted (for brushing)
Baking Bliss: Step-by-Step Guide to S’mores Perfection
The process of assembling this cake is almost as satisfying as eating it. We start with the foundation, the crust that holds the universe of chocolate and marshmallow together. Preheat your oven to 350°F (175°C). Lightly grease and flour a 9-inch springform pan. If you don’t have a springform pan, a regular 9-inch round cake pan lined with parchment paper works well; just make sure to leave an overhang for easy removal later. This dessert demands respect for geometry.
Crafting the Ideal Graham Base
In a medium bowl, combine the crushed graham crackers, granulated sugar, melted butter, and alcohol-free vanilla extract. Mix until the crumbs are evenly moistened, resembling wet sand. Press this mixture firmly and evenly into the bottom of the prepared pan. Use the bottom of a glass to really compact it; a dense crust prevents sogginess. Bake the crust for 8 minutes, then set it aside while you prepare the chocolate filling.
The Heart of the Cake: Fudgy Chocolate Filling
This chocolate layer is designed to be deeply rich and slightly chewy—not overly cakey. In a small bowl, whisk together the flour, baking powder, and salt. In a separate, large bowl, use an electric mixer to cream together the softened butter, granulated sugar, and brown sugar until light and fluffy. Beat in the eggs one at a time, ensuring each is fully incorporated before adding the next. Stir in the alcohol-free vanilla extract.
Next, gently fold in the dry ingredients until just combined, taking care not to overmix. Overmixing develops gluten, which we do not want in a fudgy base. Finally, melt the bittersweet chocolate chips. Add the melted chocolate and the warm water or coffee to the batter, mixing until smooth. Pour this heavenly mixture over your baked graham crust. Return the pan to the oven and bake for 30–35 minutes. The center should look mostly set but still have a slight jiggle. Cool the cake on a wire rack for at least 30 minutes.
The Grand Finale: Toasting the Marshmallow Cloud
This is where the magic happens. First, rearrange your oven rack so the cake sits about 6 to 8 inches below the broiler element. Turn on the broiler (ensure it is set to high). Arrange the marshmallows evenly over the top of the cooled cake, packing them tightly for maximum visual drama. Brush the tops lightly with the extra tablespoon of melted butter; this helps them brown beautifully and evenly.
Place the cake back into the oven, directly under the broiler. Watch it closely! This stage takes only 60 to 90 seconds. The marshmallows will puff up dramatically and turn golden brown quickly. Remove the cake immediately once toasted. Allow the Classic S’mores Cake – Gooey Chocolate Marshmallow Dessert to cool slightly before slicing. The gooeyness inside will settle, making slicing easier, although attacking it with a fork while warm is always an option. Prepare for sticky fingers and happy sighs.
My grandmother once tried to eat a slice of this cake while wearing white gloves. It ended exactly how you’d imagine—a sticky, hilarious mess. The point is, this dessert demands enthusiasm, not elegance. Embrace the goo!
-
Achieve the perfect crust density by using a flat-bottomed glass to firmly press the graham mixture into the springform pan before the initial bake.
-
Do not overbake the chocolate layer; removing it when it still has a slight jiggle ensures the center remains wonderfully fudgy and intensely rich.
-
When broiling the marshmallows, keep the oven door ajar and do not walk away; they transition from perfectly toasted to burnt cinder in mere seconds.
Conclusion for Classic S’mores Cake – Gooey Chocolate Marshmallow Dessert
Creating the Classic S’mores Cake – Gooey Chocolate Marshmallow Dessert offers the timeless pleasure of a campfire treat transformed into an accessible, glorious centerpiece. We conquered the crumbly crust, mastered the fudgy, rich chocolate center, and achieved peak marshmallow perfection without the smoke inhalation. This dessert is designed to bring instant smiles and memorable, sticky moments to your table. Whether you are hosting a party or simply craving comfort, this recipe delivers maximum impact for relatively low effort. So grab your ingredients, turn on that broiler, and prepare to unleash the ultimate chocolate and marshmallow fantasy upon the world.
Print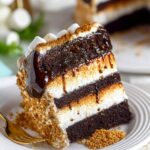
Classic S’mores Cake – Gooey Chocolate Marshmallow Dessert
- Total Time: 35 minutes
- Yield: 4 servings 1x
Description
Build the ultimate nostalgic dessert! Two rich chocolate layers sit on a buttery graham base, cemented by silky, warm ganache. Detailed steps & nutritional facts included.
Ingredients
- Prepared 8-inch chocolate cake layers: 2
- Graham cracker crumbs: 1 ½ cups
- Unsalted butter, melted: ½ cup
- Granulated sugar: 3 tablespoons
- Semi-sweet chocolate chips: 2 cups
- Heavy whipping cream: 1 cup
- Large marshmallows (standard size): 4 cups (approx. 32 marshmallows)
Instructions
- Step 1: Prepare the crust and base. Combine graham cracker crumbs, melted butter, and granulated sugar until fully incorporated. Press the mixture firmly onto the base of an 8-inch springform pan or onto a piece of parchment paper to create a stable crust base. Chill the crust for 30 minutes.
- Step 2: Prepare the chocolate ganache filling. Place the chocolate chips in a medium heatproof bowl. In a small saucepan, heat the heavy whipping cream until it just begins to simmer, then immediately pour the hot cream over the chocolate chips. Let stand for 5 minutes, then whisk until the mixture is completely smooth and thick.
- Step 3: Assemble the cake layers. Place one prepared chocolate cake layer on a serving plate or stand. Spread half of the warm chocolate ganache evenly across the top. Gently place the second cake layer on top, then pour the remaining ganache over the entire cake, smoothing it over the top and down the sides to cover the layers.
- Step 4: Add the marshmallow topping. Arrange the large marshmallows densely across the entire top surface of the cake, ensuring they are touching to create a continuous layer. Place the cake in the refrigerator for at least 2 hours to allow the ganache and structure to set firm.
- Step 5: Broil and serve. When ready to serve, preheat your oven broiler on high. Place the chilled cake on the highest rack (6-8 inches from the heat source) and broil for 30 to 60 seconds, rotating once, until the marshmallows are toasted, golden brown, and delightfully gooey. Watch carefully to prevent burning. Serve immediately with a sharp, warm knife.
Notes
- Keep any leftovers tightly wrapped and refrigerated for up to 3 days, but be aware the toasted marshmallow topping will harden significantly once chilled.
- If you have chilled leftovers, a quick 3-5 minute warm-up in a 300°F oven helps soften the ganache and makes the marshmallow topping slightly gooey again.
- For an incredible flavor contrast, garnish the plate with a small scoop of vanilla bean ice cream or a sprinkle of flaky sea salt just before serving.
- For the perfect toasted topping, stand guard and rotate the cake constantly during the 30-60 second broiling window, as the high heat will transition from golden to burnt in mere seconds.
- Prep Time: 15 minutes
- Cook Time: 20 minutes
- Method: Stovetop
- Cuisine: American
Nutrition
- Serving Size: 1/14th slice of cake (approx. 150g)
- Calories: 530
- Sodium: 380mg
- Fat: 30g
- Saturated Fat: 18g
- Trans Fat: 0g
- Protein: 60g


Leave a Comment