
If your previous baking endeavors resulted in something resembling a brightly colored hockey puck, fear not—this recipe is your redemption arc. We are diving headfirst into the ethereal, buoyant world of theCloud Bread Pastel Swirl Loaf: A Light and Colorful Baking Delight.
Imagine biting into a cloud painted by unicorns. That’s the texture we are chasing, a pillowy soft creation that defies gravity and proves that dessert should always be this spectacularly fun.
- This loaf offers an impossibly light, melt-in-your-mouth texture achieved through the magic of perfectly whipped egg whites and gentle baking.
- The flavor profile is delicately sweet with subtle vanilla notes, making it versatile enough to pair with fruit or simply enjoy plain.
- Its gorgeous, vibrant pastel swirl creates an arresting visual appeal, guaranteeing compliments and making it perfect for brunches or tea parties.
- Preparation is surprisingly simple, requiring only basic ingredients and allowing home bakers to achieve professional-looking results effortlessly.
The Quest for Weightlessness: Why Cloud Bread is Having a Moment
I first discovered the concept of cloud bread during a disastrous attempt to make sourdough starter—an endeavor that resulted in a sad, gray mass that smelled vaguely of forgotten socks. Determined to redeem my baking reputation, I pivoted hard toward things that float. That’s how I stumbled upon this mesmerizing technique. Traditional cloud bread is often just a simple, airy disc, but we aren’t here for simple discs; we’re here for bakery masterpieces that look complex but whisper “easy” when you ask for the recipe.
The beauty of this pastel swirl loaf lies entirely in aeration. We are essentially stabilizing air pockets using egg whites and a touch of cream of tartar, turning humble ingredients into a gravity-defying marvel. This isn’t your grandma’s dense pound cake; this is the culinary equivalent of watching a helium balloon drift away, except you get to eat it. The gentle baking process, often utilizing a lower temperature for a longer time, prevents the structure from collapsing, yielding a perfect, springy crumb.
My first attempt at the swirl was less than artistic. It looked more like three toddlers had wrestled in a bowl of food coloring. I learned quickly that the secret to the perfect swirl isn’t aggressive mixing—it’s gentle folding, treating the colors like delicate watercolor paints. You want distinct ribbons of lavender, mint, and pale rose, not a muddy brown catastrophe. This loaf is less about speed and more about patience, specifically when incorporating those vibrant hues into the meringue base. If you can handle a delicate fluff of air, you can conquer this recipe.
Mastering the Meringue Base for an Ethereal Texture
Achieving that iconic, airy texture starts and ends with the meringue. Think of your egg whites as tiny, molecular architects, and the cream of tartar as their strict foreman. You need pristine, room-temperature egg whites—any trace of yolk, oil, or water is a structural weakness, condemning your bread to flatness. Whip them vigorously until stiff, glossy peaks form. When you pull the whisk out, the peaks should hold their shape proudly, perhaps even tilting slightly, but definitely not drooping like a tired puppy after a long walk. Remember, stiff peaks are non-negotiable for lift.
Once your meringue is stable, you introduce the minimal sweetness and stabilizing agents. Unlike traditional cakes that rely on flour for structure, this recipe is gluten-free and relies solely on that beautiful protein structure. Folding the coloring and flavorings in correctly is the difference between a work of art and a tie-dye disaster. Divide the meringue gently, add the color to each portion using natural food coloring gels; gels provide saturation without adding excess moisture, which is the nemesis of meringue. Then, dollop the colored batters back into the main bowl. A quick, singular drag of a knife through the batter is usually sufficient to create that hypnotic swirl effect, creating an element of beautiful visual chaos.
The Art of the Pastel Swirl: Color Psychology and Presentation
Choosing the right colors is half the fun of baking theCloud Bread Pastel Swirl Loaf: A Light and Colorful Baking Delight. We often lean towards soft, dreamy hues—think pale robin’s egg blue, gentle apricot, and maybe a soft pistachio green. These colors complement each other beautifully and emphasize the ‘cloud’ nature of the bread. Avoid neon brights; they tend to look aggressive next to such a delicate texture. Remember, the goal is lightness and joy, not a rave in your kitchen. Soft pastels enhance the feeling of weightlessness.
This loaf serves as the perfect centerpiece for celebrations where elegance meets whimsical charm. Think baby showers, springtime gatherings, or just an average Tuesday when you desperately need a mood boost. Because it holds its shape so beautifully, it slices cleanly, showcasing the mesmerizing interior pattern. I recommend serving it lightly dusted with powdered sugar, which adds a final layer of airy sweetness, or alongside a bowl of fresh, macerated berries to cut the subtle sweetness with a burst of tartness. The contrast of the tart fruit against the sweet, pillowy bread is truly exceptional.
Don’t be intimidated by the presentation. The best part about this swirl is that imperfection is actually preferred. If your swirls look a bit chaotic and organic, that means they look professional. It suggests movement and complexity, even though the technique was incredibly straightforward. This is the ultimate baker’s secret: doing minimal work for maximum visual impact. It’s the culinary equivalent of wearing sunglasses indoors—it just looks effortlessly cool. The light and colorful baking delight truly earns its name.
Troubleshooting Common Cloud Bread Conundrums
Even though the ingredient list is short and the steps are few, cloud bread presents unique challenges, primarily because its structure is so fragile. If your loaf deflates mid-bake, the culprits are usually moisture or temperature shock. Make sure you don’t open that oven door until the absolute final minutes of baking, and always allow the loaf to cool down gradually inside the turned-off oven with the door slightly ajar. Sudden temperature drops are the enemy of all things airy and meringue-based. Patience during the cool-down period is the key to maintaining that perfect volume.
Another common issue is a “weeping” meringue, where liquid pools at the bottom. This means the sugar wasn’t fully dissolved or the egg whites were under-whipped. Ensure that the sugar is added slowly, giving the crystals time to dissolve completely into the albumen structure. If you feel a gritty texture when rubbing the meringue between your fingers, keep whipping! A fine, grit-free meringue provides the strength needed for a tall, light loaf. Also, humidity can play a role, so try to bake this loaf on a dry day if possible.
Essential Tools for Baking Success
While you can theoretically whip egg whites by hand, I highly advise against it unless you are training for a competitive arm wrestling championship. A stand mixer fitted with the whisk attachment is your best friend here. It ensures rapid, consistent aeration, guaranteeing those stiff, robust peaks required for liftoff. Additionally, using parchment paper is non-negotiable. This bread is incredibly delicate and prone to sticking, and parchment paper ensures a clean release, preserving the loaf’s perfect dome shape. A scale is also helpful for precise measurements of the egg whites.
- Stand Mixer with Whisk Attachment:Essential for achieving the necessary volume and stiffness in the egg whites without causing repetitive strain injury.
- Gel Food Coloring:Provides intense color saturation without introducing excessive liquid that could compromise the meringue stability.
- Rubber Spatula:Necessary for the folding technique. Use a gentle touch—you are folding, not stirring aggressively like you are mixing concrete.
- Loaf Pan or Ring Mold:Using a loaf pan helps achieve that gorgeous, sliceable structure and defined shape for better presentation.
Flavor Variations and Serving Suggestions
While the vanilla-based cloud bread is heavenly on its own, the base is highly adaptable to other flavors. Consider adding citrus zest, such as lemon or lime, directly into the meringue before folding. A touch of freeze-dried raspberry powder mixed into one of the colored sections not only intensifies the pink hue but also provides a lovely tart undertone. Just remember that anything you add must be low moisture, keeping liquid additions to an absolute minimum to preserve the structural integrity of the foam.
For serving, elevate the experience beyond simple powdered sugar. Create a quick, elegant glaze using powdered sugar and a few drops of orange blossom water or rose water. Drizzle this gently over the cooled loaf just before serving. For a contrasting texture, lightly toasted slivered almonds sprinkled over the top while the glaze is still tacky adds a nice crunch, balancing the extreme softness of the cloud bread. You can also pair slices with a dairy-free cream alternative and fresh berries for a truly indulgent experience.
Ingredients for Cloud Bread Pastel Swirl Loaf: A Light and Colorful Baking Delight
Here’s what you’ll need to make this delicious dish:
- Large Egg WhitesThese must be absolutely free of yolk and at room temperature, which helps them achieve maximum volume when whipped.
- Granulated SugarProvides subtle sweetness and helps stabilize the meringue structure, ensuring the cloud bread holds its ethereal shape.
- Cream of TartarAn acidic stabilizer critical for lowering the pH of the egg whites, resulting in a stronger, more resilient foam structure.
- Vanilla PowderAdds warmth and complexity to the overall flavor profile, complementing the light sweetness of the meringue.
- Cornstarch or Tapioca StarchIncorporated towards the end of whipping, it helps absorb any residual moisture and provides a very fine, tender crumb structure.
- Food Coloring GelsUse high-quality pastel-colored gels (e.g., lavender, mint green, blush pink) to achieve vibrant colors without diluting the meringue base.
- Pinch of SaltEssential for binding the proteins in the egg whites, enhancing both the stability and the perceived sweetness of the final product.
The full ingredients list, including measurements, is provided in the recipe card directly below.
How to Make Cloud Bread Pastel Swirl Loaf: A Light and Colorful Baking Delight
Follow these simple steps to prepare this delicious dish:
Step 1: Prep and Preheat the Oven
Preheat your oven to 300°F (150°C). Line an 8×4 inch loaf pan with parchment paper, ensuring the paper extends over the edges for easy removal later. This low and slow temperature is vital for drying out the meringue gently without collapsing its structure.
Step 2: Create the Meringue Base
In the bowl of a stand mixer, combine the room-temperature egg whites and the pinch of salt. Whip on medium-high speed until foamy. Add the cream of tartar, then gradually stream in the granulated sugar while the mixer is running. Continue whipping until the mixture forms stiff, glossy peaks. Gently fold in the vanilla powder and cornstarch using a rubber spatula.
Step 3: Color and Divide the Batter
Carefully divide the meringue base into three separate bowls. Add a single drop of a different pastel food coloring gel into each bowl, being meticulous not to over-saturate the color. Use a separate spatula for each bowl to gently fold the color through the meringue until just combined, ensuring the egg white structure remains buoyant.
Step 4: Swirl and Load the Pan
Return the three colored batters back into the main mixing bowl, alternating colors as you dollop them in. Do not stir. Take a long wooden skewer or knife and gently drag it through the batters once or twice to create the mesmerizing swirl pattern. Transfer the swirled mixture immediately into the prepared loaf pan, mounding the top slightly.
Step 5: Bake Low and Slow
Bake the loaf for 45 to 60 minutes. The exterior should appear set, slightly dry, and lightly golden brown. Crucially, turn off the oven but leave the loaf inside with the oven door propped open slightly for another 30 minutes. This gradual cooling prevents the dramatic temperature change that causes shrinkage and deflation.
Step 6: Cool, Slice, and Serve
Remove the loaf from the oven after the gradual cooling period and lift it out of the pan using the parchment paper handles. Let it cool completely on a wire rack before slicing. Slicing too early can cause the delicate internal structure to collapse. Transfer to plates and drizzle with a light berry coulis or dust with powdered sugar for the perfect finishing touch.
The Accidental Discovery of Sunshine on a Plate

I was attempting a failed meringue cookie project—a culinary disaster resembling sad, pale puddles. Instead of tossing it, I folded in three vibrant food colors, baked it in a loaf pan, and suddenly, the Cloud Bread Pastel Swirl Loaf was born. It was an unexpected, rainbow-hued success.
There are few things in the kitchen more demoralizing than watching an ambitious baking project collapse into a sticky, deflated mess. My journey to creating this particular pastel wonder started exactly that way—with me staring glumly at a bowl of overworked egg whites that clearly decided they were done participating in the meringue Olympics. But every baker knows the golden rule: never surrender until the smoke alarm goes off. Necessity, meet the mother of invention, or in this case, invention meeting three bottles of wildly unnecessary food coloring.
This magnificent creation, theCloud Bread Pastel Swirl Loaf: A Light and Colorful Baking Delight, isn’t really bread at all. It’s a whimsical confection that shares the airy texture of a cloud and the sweetness of a summer morning. It looks complex, like something a mythical unicorn might bake, but I promise, this is the easiest magic act you will ever pull off in your oven. You only need a handful of basic ingredients, and maybe a dash of audacity, to whip up a loaf that will instantly brighten any table.
The Anatomy of the Airy Loaf
Cloud bread, in its simplest form, is a three-ingredient marvel designed to be light and satisfying. It relies entirely on the successful whipping of egg whites into a stiff, stable meringue. The addition of color and a careful swirling technique transforms this humble base into a showstopper. We are aiming for volume here—the kind of volume that makes your kitchen smell like a cotton candy stand at the fair, but without the sticky fingers.
Ingredients for the Cloud Bread Pastel Swirl Loaf
- 1 cup Egg Whites (from about 6 large eggs, ensuring no yolks are present)
- ½ cup Granulated Sugar (adjust to taste for sweetness)
- 1 teaspoon Cream of Tartar (or lemon juice, for stabilization)
- 1 teaspoon Vanilla Powder
- 3 distinct colors of Gel Food Coloring (I recommend pink, baby blue, and soft yellow)
The Magic of Meringue: Building the Base
The most important step in crafting this delightful treat is perfecting the meringue. Think of your egg whites as tiny, obedient balloons waiting for the right moment to inflate. Start by ensuring your mixing bowl and whisk are perfectly grease-free. Even a rindfleisch-speck of fat can ruin your volume potential. Place the egg whites and cream of tartar into a stand mixer.
Begin whipping on medium-low speed until the mixture becomes foamy, roughly two minutes. At this point, the egg whites resemble bath bubbles. Gradually increase the speed to high. Once the mixture forms soft peaks—when the peaks flop slightly when the whisk is lifted—slowly drizzle in the granulated sugar, one tablespoon at a time. Continue whipping until the meringue achieves stiff, glossy peaks. When you lift the whisk, the peaks should stand straight up and look incredibly shiny. Now, gently fold in the vanilla powder.
Swirling the Spectrum
This is where the artistry happens, and also where most people get nervous. Don’t! Divide your meringue base evenly into three separate bowls. Add a drop or two of your chosen gel food coloring to each bowl. Remember, use gel, not liquid, to maintain the structural integrity of the batter. Gently fold the color into each batch using a rubber spatula, turning the batter over itself carefully to prevent deflating the air. You want the color to be consistent but you must avoid overmixing.
Prepare a standard loaf pan (around 8.5 x 4.5 inches) by lining it with parchment paper, allowing the paper to overhang the sides slightly for easy removal later. Now, alternate scooping spoonfuls of the colored meringue into the pan. Start with blue, then layer pink next to it, then yellow, stacking and alternating colors randomly until the pan is full. Once all the batter is in the pan, take a butter knife or a skewer and gently draw it through the batter one or two times to create subtle swirls, but stop before the colors blend completely into a muddy mess. The key to the stunning final appearance is keeping the colors distinct yet intertwined.
Baking for the Heavens
Preheat your oven to 300°F (150°C). Slide the loaf pan into the middle rack. This bread is sensitive and requires patience. Bake for approximately 35 to 45 minutes. The Cloud Bread Pastel Swirl Loaf should look slightly golden on top and feel set to the touch. It will expand dramatically in the oven, looking like a puffy, colorful cloud.
Crucially, do not remove the loaf immediately. Turn the oven off, crack the door open slightly, and let the loaf cool slowly inside the oven for 10 to 15 minutes. This gradual cooling process helps prevent a sudden, dramatic deflation. Once slightly cooled, remove the loaf, use the parchment paper overhang to lift it out, and let it cool completely on a wire rack before slicing.
Perfecting the Cooking Process
Achieving the perfect swirl requires preparation. First, whip the egg whites until they hold stiff peaks. Next, quickly divide and color the batter before it loses volume. Finally, layer the colors gently into the loaf pan and bake immediately to ensure maximum airy lift.
Add Your Touch
Feel free to experiment with flavor extracts; almond or lemon essence works wonderfully instead of vanilla. If you want a savory twist, skip the sugar and add dried herbs like oregano or chives. For deeper color, use highly pigmented gel food coloring.
Storing & Reheating
Store your remaining loaf tightly wrapped in plastic wrap at room temperature for up to three days. Do not refrigerate, as this can deflate the delicate texture. If you need to freshen it up, a 30-second blast in the microwave will return its soft bounce.
Expert Baking Tips for an Amazing Loaf
-
Ensure your mixing bowl and whisk attachments are spotlessly clean and grease-free; any trace of fat prevents the egg whites from whipping properly.
-
Use gel food coloring instead of liquid coloring to avoid adding excess moisture, which can compromise the bread’s light and fluffy structure.
-
Do not overmix when incorporating the colors, as this deflates the air you worked hard to build, resulting in a dense, rather than airy, loaf.
My niece, who usually declares anything without chocolate “boring,” took one bite of this colorful marvel and announced she was eating a cloud. That’s when I knew this recipe was a true winner.
Conclusion for Cloud Bread Pastel Swirl Loaf: A Light and Colorful Baking Delight
The culinary journey to create the Cloud Bread Pastel Swirl Loaf: A Light and Colorful Baking Delight is one filled with fun and minimal fuss. This recipe truly offers a slice of edible joy, proving that the lightest, airiest textures can also boast the most vibrant colors. Whether you are seeking a stunning centerpiece for brunch or just a whimsical treat, this pastel loaf delivers on all fronts. Embrace the swirl, trust the meringue, and prepare to delight everyone at your table. It’s more than just bread; it’s happiness, baked perfectly.
Print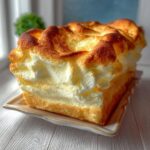
Cloud Bread Pastel Swirl Loaf: A Light and Colorful Baking Delight
- Total Time: 35 minutes
- Yield: 4 servings
Description
Experience the ethereal lift of this Cloud Bread Loaf! Whipped egg whites meet smooth cream cheese for an ultra-light, dreamy swirl. Detailed steps guide you to those stiff, glossy peaks.
Ingredients
- Egg Whites: 4 large (room temperature)
- Cream Cheese: 4 ounces (softened)
- Granulated Sugar (or Erythritol): 1/4 cup
- Cream of Tartar: 1 teaspoon
- Vanilla Bean Paste: 1 teaspoon
- Gel Food Coloring: Assorted Pastel Colors (3 different shades)
- Pinch of Salt
Instructions
- Step 1: Preheat oven to 300°F (150°C) and line a small loaf pan (approx. 8×4 inches) with parchment paper, allowing some overhang for easy removal. In a medium bowl, whisk together the softened cream cheese and alcohol-free vanilla extract until completely smooth and lump-free.
- Step 2: In a separate, very clean glass bowl, whip the egg whites with the cream of tartar and the pinch of salt until frothy. Gradually add the granulated sugar and continue whipping until stiff, glossy peaks form (this is the meringue base).
- Step 3: Gently fold the cream cheese mixture into the meringue using a large spatula, being extremely careful not to deflate the air. Mix only until the ingredients are just combined, resulting in a thick, fluffy batter.
- Step 4: Divide the batter evenly into three separate bowls. Add 2-3 drops of a different pastel gel food coloring (e.g., pink, blue, yellow) to each bowl and fold gently only once or twice; the color should remain slightly streaked for the best swirl effect.
- Step 5: Spoon alternating colors of the batter into the prepared loaf pan, stacking the different colors randomly. Use a skewer or butter knife to lightly drag through the batter 2-3 times to create the pastel swirl. Bake for 30-35 minutes, or until the loaf is lightly golden brown and set. Cool completely in the pan before slicing.
Notes
- When folding the cream cheese mixture into the stiff meringue, use the "cut and fold" technique with the utmost care; the quality of your finished airy loaf depends entirely on minimizing the loss of volume at this critical step.
- Serve slices alongside a light dusting of powdered sugar and a few fresh raspberries or blueberries to enhance the pastel colors and add a slight tart contrast.
- To maintain the airy integrity, store leftover slices at room temperature in an airtight container for up to 2 days; chilling is okay for longer storage but will cause the loaf to become slightly denser.
- This delicate loaf is best enjoyed at room temperature, but if you prefer a hint of warmth, microwave individual slices for only 5 to 7 seconds to revive the soft, melt-in-your-mouth texture.
- Prep Time: 15 minutes
- Cook Time: 20 minutes
- Method: Stovetop
- Cuisine: American
Nutrition
- Serving Size: 1 slice (approx. 30g)
- Calories: 40
- Sodium: 12mg
- Fat: 0.1g
- Saturated Fat: 0.0g
- Trans Fat: 0.0g
- Protein: 6g

Leave a Comment