
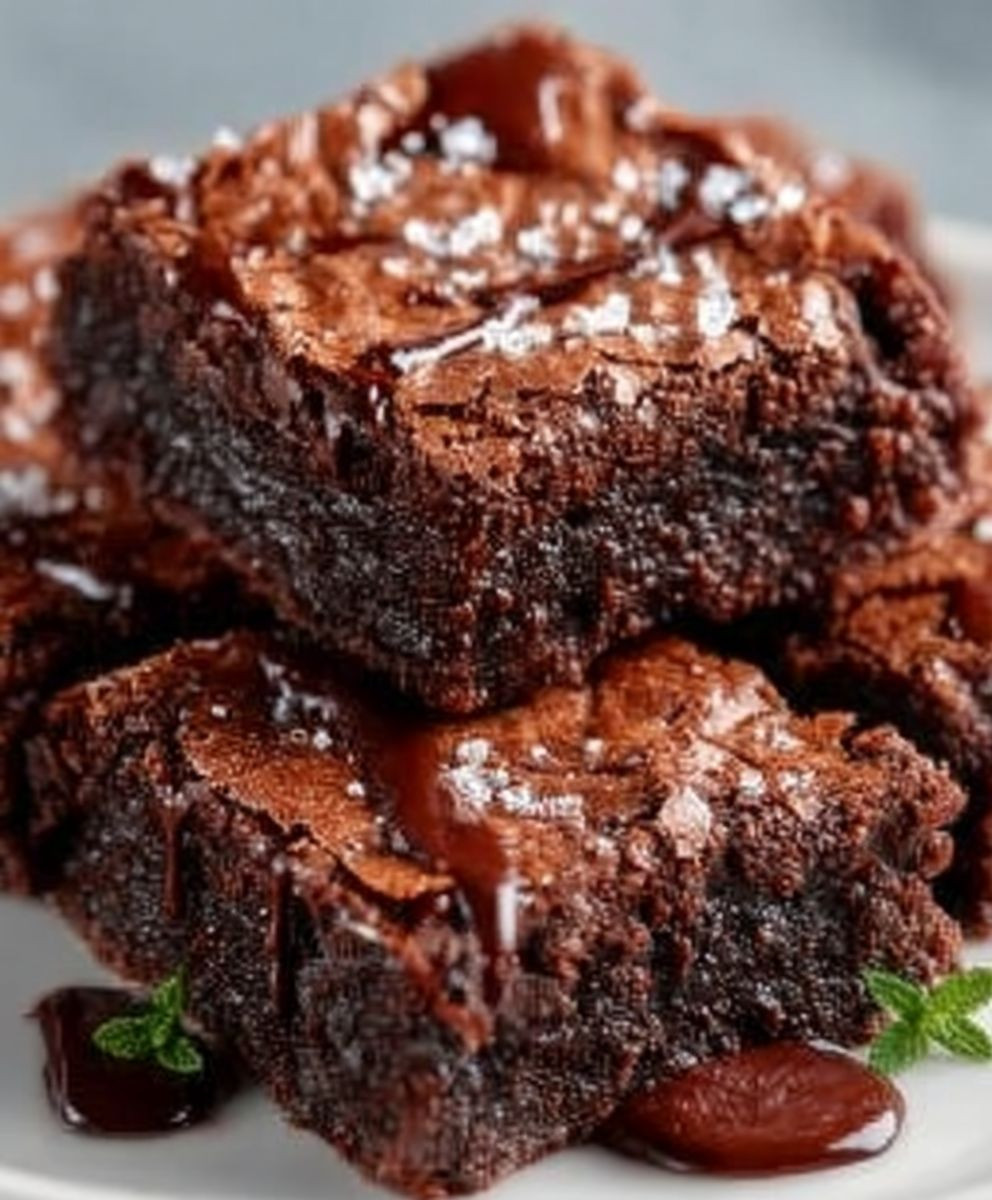
Flourless Greek Yogurt Brownies are a delightful twist on the classic brownie that will leave your taste buds dancing with joy. As someone who has always had a sweet tooth, I can confidently say that these brownies are a game-changer. Not only do they satisfy your chocolate cravings, but they also offer a healthier alternative without sacrificing flavor. The use of Greek yogurt adds a rich creaminess and moisture that makes these brownies incredibly fudgy and decadent.
Historically, brownies have been a beloved dessert in American cuisine since the early 20th century, but the introduction of healthier ingredients like Greek yogurt has given this traditional treat a modern makeover. People love Flourless Greek Yogurt Brownies for their rich chocolate flavor and chewy texture, making them the perfect indulgence for any occasion. Plus, they are incredibly easy to whip up, requiring minimal ingredients and effort. Whether you’re looking for a guilt-free dessert or a quick snack, these brownies are sure to impress!

Ingredients:
- 1 cup unsweetened cocoa powder
- 1 cup Greek yogurt (plain, full-fat or low-fat)
- 1/2 cup honey or maple syrup
- 1/4 cup coconut oil, melted
- 2 large eggs
- 1 teaspoon vanilla extract
- 1/2 teaspoon baking powder
- 1/4 teaspoon salt
- 1/2 cup dark chocolate chips (optional)
Preparing the Batter
- Preheat the oven: Start by preheating your oven to 350°F (175°C). This ensures that your brownies will bake evenly.
- Prepare the baking pan: Line an 8×8 inch baking pan with parchment paper, allowing some overhang on the sides for easy removal later. You can also lightly grease the pan with a bit of coconut oil to prevent sticking.
- Mix the wet ingredients: In a large mixing bowl, combine the Greek yogurt, honey (or maple syrup), melted coconut oil, eggs, and vanilla extract. Use a whisk to mix these ingredients together until they are smooth and well combined. Make sure there are no lumps of yogurt remaining.
- Sift in the dry ingredients: To avoid clumps, sift the cocoa powder, baking powder, and salt directly into the wet mixture. This step is crucial for achieving a smooth brownie texture.
- Combine the mixtures: Gently fold the dry ingredients into the wet ingredients using a spatula or wooden spoon. Be careful not to overmix; you want just enough to combine everything into a thick batter.
- Add chocolate chips: If you’re using dark chocolate chips, fold them into the batter now. This will add extra richness and texture to your brownies.
Cooking Process
- Pour the batter: Transfer the brownie batter into the prepared baking pan. Use a spatula to spread it evenly, making sure it reaches the corners of the pan.
- Bake the brownies: Place the pan in the preheated oven and bake for 20-25 minutes. The brownies are done when a toothpick inserted into the center comes out with a few moist crumbs but not wet batter.
- Cool the brownies: Once baked, remove the brownies from the oven and let them cool in the pan for about 10 minutes. Then, use the parchment paper overhang to lift them out of the pan and transfer them to a wire rack to cool completely.
Assembling and Serving
- Cut the brownies: Once the brownies are completely cool, use a sharp knife to cut them into squares. You can make them as large or small as you prefer.
- Optional toppings: If you want to elevate your brownies, consider adding a dusting of powdered sugar, a drizzle of melted chocolate, or a dollop of whipped cream on top before serving.
- Store leftovers: If you have any brownies left (which is unlikely!), store them in an airtight container at room temperature for up to 3 days or in the refrigerator for up to a week. You can also freeze them for longer storage; just make sure to wrap them tightly.
Tips for Perfect Brownies
- Use quality cocoa powder: The flavor of your brownies will largely depend on the quality of the cocoa powder you use. Opt for a high-quality unsweetened cocoa powder for the best results.
- Don’t overbake: Keep an eye on your brownies as they bake. Overbaking can lead to dry brownies, so it’s better to check them a few minutes early.
- Experiment with flavors: Feel free to add in extras like chopped nuts, dried fruit, or even a pinch of espresso powder to enhance the chocolate flavor.
- Let them cool: Allowing the brownies to cool completely before cutting will help them set and make them easier to slice.
- 500 g Mehl (Type 550)
- 10 g Salz
- 5 g Trockenhefe
- 350 ml Wasser
- 3 Zehen Knoblauch, gehackt
- 2 EL Olivenöl
- In einer großen Schüssel Mehl, Salz und Hefe vermengen.
- Wasser hinzufügen und zu einem Teig verrühren.
- Knoblauch und Olivenöl unterrühren.
- Teig 12 Stunden gehen lassen.
- Der Teig darf während der Ruhezeit nicht bewegt werden.
- Für ein intensiveres Knoblaucharoma können mehr Zehen verwendet werden.
Conclusion:
If you’re looking for a deliciously indulgent yet guilt-free treat, these Flourless Greek Yogurt Brownies are an absolute must-try! Not only do they satisfy your chocolate cravings, but they also pack a nutritional punch thanks to the Greek yogurt, which adds moisture and protein without the need for flour. This means you can enjoy a rich, fudgy brownie that’s lower in carbs and higher in nutrients than traditional recipes. Plus, they’re incredibly easy to whip up, making them perfect for both novice bakers and seasoned pros alike.
When it comes to serving suggestions, the possibilities are endless! You can enjoy these brownies warm, straight from the oven, or let them cool and serve them chilled for a refreshing dessert. For an extra touch of decadence, consider topping them with a dollop of whipped cream or a scoop of your favorite ice cream. A sprinkle of sea salt can also elevate the flavor profile, enhancing the rich chocolate taste. If you’re feeling adventurous, try adding in some mix-ins like chopped nuts, chocolate chips, or even a swirl of peanut butter for a delightful twist.
For those who want to experiment further, you can easily customize this recipe to suit your dietary preferences. If you’re vegan, substitute the eggs with flax eggs and use a plant-based yogurt. You can also swap out the cocoa powder for carob powder for a different flavor experience. The beauty of these Flourless Greek Yogurt Brownies is their versatility; you can make them your own while still enjoying the core deliciousness that makes them so special.
I encourage you to give this recipe a try and experience the joy of baking these brownies yourself. Once you take that first bite, I’m sure you’ll be hooked! Don’t forget to share your experience with friends and family, and let them know how easy it is to make a healthier dessert that doesn’t compromise on taste. If you have any variations or tips of your own, I’d love to hear about them! Your feedback not only helps me improve but also inspires others in our baking community. So roll up your sleeves, gather your ingredients, and let’s get baking these delightful Flourless Greek Yogurt Brownies together!
Flourless Greek Yogurt Brownies: A Healthy and Delicious Dessert Option
A delicious and easy-to-make dish that combines fresh ingredients and bold flavors, perfect for any occasion. Enjoy a satisfying meal that is both nutritious and delightful!


Leave a Comment