
Healthy Twix Bars: A Guilt-Free Indulgence
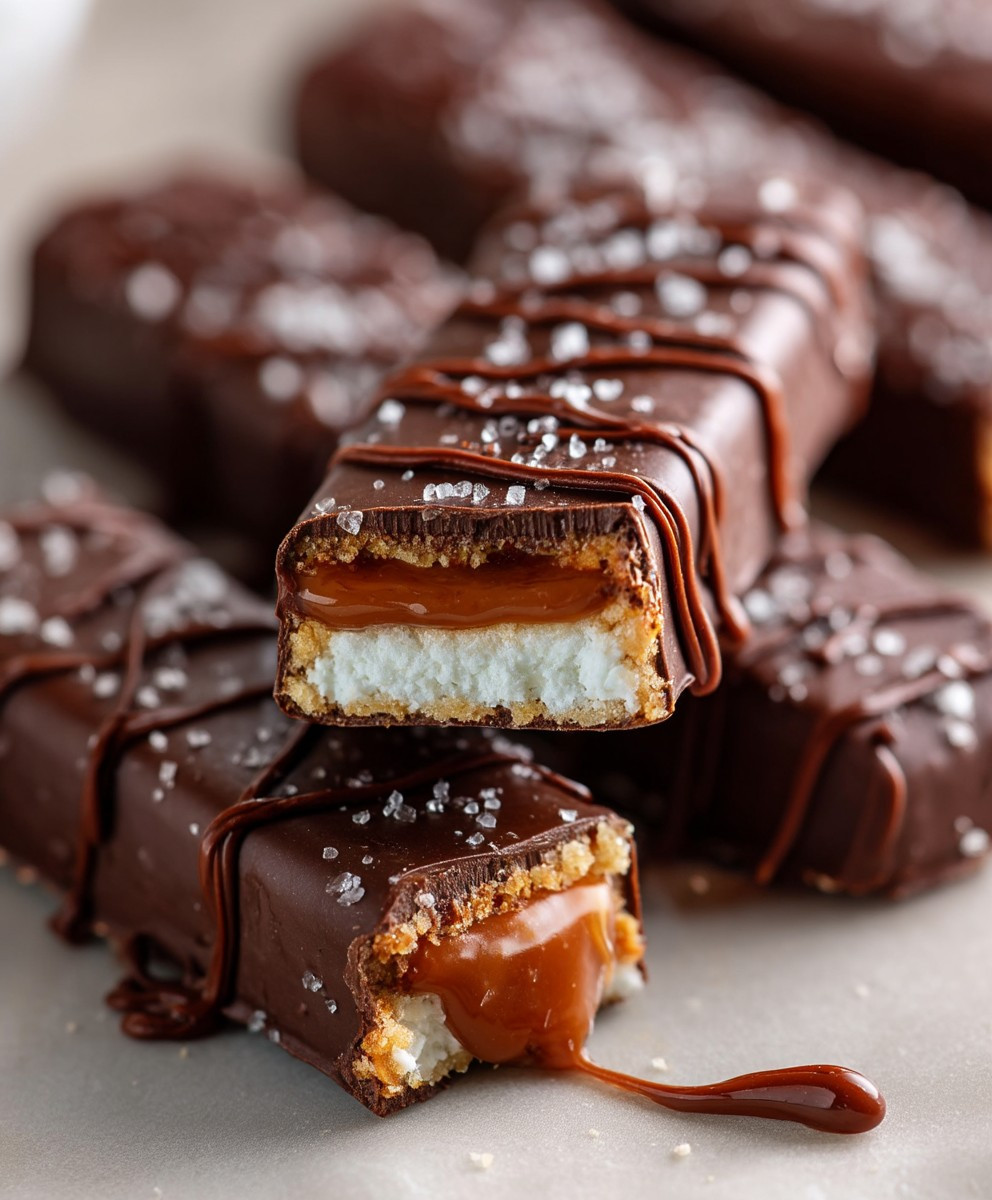
Healthy Twix Bars are a delightful twist on the classic candy bar that we all know and love. Imagine sinking your teeth into a rich, chocolatey treat that not only satisfies your sweet tooth but also aligns with your health goals. These bars are not just a healthier alternative; they are a celebration of flavors and textures that will leave you craving more.
The history of the Twix bar dates back to the late 1960s, and it has since become a beloved staple in the world of confectionery. However, as we become more health-conscious, the demand for healthier versions of our favorite treats has surged. That’s where Healthy Twix Bars come into play, offering a delicious way to enjoy the nostalgic taste of caramel and chocolate without the guilt.
People love these Healthy Twix Bars for their perfect balance of sweetness and crunch. The combination of a chewy base, creamy caramel, and a rich chocolate coating creates a texture that is simply irresistible. Plus, they are incredibly convenient to make at home, allowing you to whip up a batch whenever the craving strikes. So, let’s dive into this recipe and discover how to create your own Healthy Twix Bars that are sure to impress!

Ingredients:
- 1 cup almond flour
- 1/4 cup coconut oil, melted
- 1/4 cup maple syrup or honey
- 1/4 teaspoon sea salt
- 1/2 cup natural peanut butter or almond butter
- 1/4 cup coconut milk (full fat for creaminess)
- 1 cup dark chocolate chips (preferably 70% cocoa or higher)
- 1 tablespoon coconut oil (for melting chocolate)
- 1 teaspoon vanilla extract
Preparing the Base Layer
- In a medium mixing bowl, combine the almond flour, melted coconut oil, maple syrup (or honey), and sea salt. Stir until the mixture is well combined and forms a dough-like consistency.
- Line an 8×8 inch baking dish with parchment paper, leaving some overhang for easy removal later.
- Press the almond flour mixture evenly into the bottom of the prepared baking dish. Use a spatula or your hands to ensure it’s compact and smooth.
- Place the baking dish in the refrigerator for about 15-20 minutes to allow the base to firm up.
Making the Caramel Layer
- In a small saucepan over low heat, combine the peanut butter (or almond butter), coconut milk, and vanilla extract. Stir continuously until the mixture is smooth and creamy.
- Once the mixture is well combined, remove it from the heat and let it cool slightly.
- After the base layer has chilled, pour the caramel mixture over the almond flour base. Use a spatula to spread it evenly across the surface.
- Return the baking dish to the refrigerator for another 20-30 minutes to allow the caramel layer to set.
Preparing the Chocolate Coating
- While the caramel layer is setting, prepare the chocolate coating. In a microwave-safe bowl, combine the dark chocolate chips and 1 tablespoon of coconut oil.
- Microwave the chocolate in 30-second intervals, stirring in between, until it is completely melted and smooth. Be careful not to overheat the chocolate.
- Once melted, remove the bowl from the microwave and let it cool slightly while the caramel layer finishes setting.
Assembling the Twix Bars
- After the caramel layer has set, remove the baking dish from the refrigerator. Use the parchment paper overhang to lift the entire block out of the dish.
- Place the block on a cutting board and cut it into bars of your desired size. I usually aim for about 12 bars, but you can make them larger or smaller depending on your preference.
- Dip each bar into the melted chocolate, ensuring it is fully coated. You can use a fork to help lift the bars out of the chocolate, allowing any excess to drip off.
- Place the coated bars back onto the parchment-lined baking dish. Repeat this process until all bars are coated in chocolate.
- Once all the bars are coated, return the baking dish to the refrigerator for about 30 minutes to allow the chocolate to set completely.
Storing the Twix Bars
- After the chocolate has set, you can store the Twix bars in an airtight container in the refrigerator for up to two weeks. They can also be frozen for longer storage.
- If you choose to freeze them, make sure to separate the bars with parchment paper to prevent them from sticking together.
Enjoying Your Healthy Twix Bars
- When you’re ready to enjoy your healthy Twix bars, simply take them out of the refrigerator or freezer and let them sit for a few minutes to soften slightly.
- These bars make for a delicious snack or dessert that satisfies your sweet tooth without the guilt!
Note: Feel free to customize your Twix bars by adding toppings like crushed nuts, sea salt, or even a sprinkle of shredded coconut before the chocolate sets. Enjoy your healthy treat!
Conclusion:
If you’re looking for a delicious and guilt-free treat, these Healthy Twix Bars are an absolute must-try! Not only do they satisfy your sweet tooth, but they also provide a healthier alternative to traditional candy bars, making them perfect for any occasion. With a delightful combination of crunchy, chewy, and creamy textures, these bars are sure to impress both your taste buds and your health-conscious friends.
One of the best things about this recipe is its versatility. You can easily customize the ingredients to suit your preferences or dietary needs. For instance, if you’re vegan, simply substitute the honey with maple syrup or agave nectar. If you’re looking to add a bit of extra flavor, consider incorporating a pinch of sea salt on top of the chocolate layer for that perfect sweet-and-salty balance. You can also experiment with different nut butters, such as almond or cashew, to create a unique twist on the classic flavor.
When it comes to serving suggestions, these Healthy Twix Bars are perfect for sharing at gatherings, parties, or even as a midday snack. They can be cut into bite-sized pieces for easy sharing or served whole for a more indulgent treat. Pair them with a cup of herbal tea or a glass of almond milk for a delightful afternoon pick-me-up. You can also store them in the fridge for a quick grab-and-go snack throughout the week, making them a convenient option for busy days.
I encourage you to give this recipe a try and experience the joy of making your own Healthy Twix Bars. Not only will you enjoy the process of creating these delicious treats, but you’ll also feel great knowing that you’re indulging in something that’s both tasty and nutritious. Once you’ve made them, I’d love to hear about your experience! Share your thoughts, variations, and any creative twists you’ve added to the recipe.
So, roll up your sleeves, gather your ingredients, and get ready to whip up a batch of these scrumptious Healthy Twix Bars. Trust me, once you take that first bite, you’ll be hooked! Happy baking!
Healthy Twix Bars: A Guilt-Free Indulgence Recipe
Enjoy these healthy Twix bars featuring a nutty almond flour base, a creamy caramel layer, and a rich dark chocolate coating. Perfect for a guilt-free sweet treat!
Ingredients
- 1 cup almond flour
- 1/4 cup coconut oil, melted
- 1/4 cup maple syrup or honey
- 1/4 teaspoon sea salt
- 1/2 cup natural peanut butter or almond butter
- 1/4 cup coconut milk (full fat for creaminess)
- 1 cup dark chocolate chips (preferably 70% cocoa or higher)
- 1 tablespoon coconut oil (for melting chocolate)
- 1 teaspoon vanilla extract
Instructions
- In a medium mixing bowl, combine the almond flour, melted coconut oil, maple syrup (or honey), and sea salt. Stir until the mixture is well combined and forms a dough-like consistency.
- Line an 8×8 inch baking dish with parchment paper, leaving some overhang for easy removal later.
- Press the almond flour mixture evenly into the bottom of the prepared baking dish. Use a spatula or your hands to ensure it’s compact and smooth.
- Place the baking dish in the refrigerator for about 15-20 minutes to allow the base to firm up.
- In a small saucepan over low heat, combine the peanut butter (or almond butter), coconut milk, and vanilla extract. Stir continuously until the mixture is smooth and creamy.
- Once the mixture is well combined, remove it from the heat and let it cool slightly.
- After the base layer has chilled, pour the caramel mixture over the almond flour base. Use a spatula to spread it evenly across the surface.
- Return the baking dish to the refrigerator for another 20-30 minutes to allow the caramel layer to set.
- While the caramel layer is setting, prepare the chocolate coating. In a microwave-safe bowl, combine the dark chocolate chips and 1 tablespoon of coconut oil.
- Microwave the chocolate in 30-second intervals, stirring in between, until it is completely melted and smooth. Be careful not to overheat the chocolate.
- Once melted, remove the bowl from the microwave and let it cool slightly while the caramel layer finishes setting.
- After the caramel layer has set, remove the baking dish from the refrigerator. Use the parchment paper overhang to lift the entire block out of the dish.
- Place the block on a cutting board and cut it into bars of your desired size. Aim for about 12 bars, but you can make them larger or smaller depending on your preference.
- Dip each bar into the melted chocolate, ensuring it is fully coated. Use a fork to help lift the bars out of the chocolate, allowing any excess to drip off.
- Place the coated bars back onto the parchment-lined baking dish. Repeat this process until all bars are coated in chocolate.
- Once all the bars are coated, return the baking dish to the refrigerator for about 30 minutes to allow the chocolate to set completely.
- After the chocolate has set, store the Twix bars in an airtight container in the refrigerator for up to two weeks. They can also be frozen for longer storage.
- If you choose to freeze them, make sure to separate the bars with parchment paper to prevent them from sticking together.
- When you’re ready to enjoy your healthy Twix bars, simply take them out of the refrigerator or freezer and let them sit for a few minutes to soften slightly.
- These bars make for a delicious snack or dessert that satisfies your sweet tooth without the guilt!
Notes
- Feel free to customize your Twix bars by adding toppings like crushed nuts, sea salt, or even a sprinkle of shredded coconut before the chocolate sets.
- Enjoy your healthy treat!


Leave a Comment