
If happiness were edible, it would taste exactly like rich, velvety chocolate fused with creamy, salty peanut butter. This isn’t just dessert; it’s a monumental experience designed to solve every crisis, big or small, starting with your sweet tooth.
Prepare yourself for the legendary creation: the ultimate indulgence known as thePeanut Butter Chocolate Layer Cake with Reese’s Cups – Ultimate Dessert. This towering confection is guaranteed to stop conversation and start a chocolate-peanut butter obsession.
- This recipe simplifies complex layer cake construction, ensuring even novice bakers can achieve a stunning, professional-looking dessert without kitchen chaos.
- Experience an explosion of flavor where rich, dark chocolate cake layers harmonize beautifully with light, airy peanut butter frosting and crunchy candy pieces.
- The dramatic visual appeal, featuring sky-high layers and an abundant topping of chocolate-peanut butter cups, makes this cake the undisputed centerpiece of any gathering.
- Surprisingly versatile, this cake adapts flawlessly for birthdays, holidays, or simply a Tuesday night when you desperately need an ultimate comfort food experience.
The Saga of the Ultimate Peanut Butter and Chocolate Pairing
Every great recipe has an origin story, and this one involves a truly catastrophic baking failure and a subsequent moment of pure, sugary enlightenment. I once attempted to make a delicate French pastry for a major family event. It collapsed. Spectacularly. It looked less like a pastry and more like a puddle of sad, butter-flavored regret. In a desperate attempt to salvage the evening (and my reputation as a passable human), I threw caution—and three different kinds of chocolate—to the wind and realized that sometimes, the most magnificent desserts are born from embracing the glorious excess of America’s favorite pairing: chocolate and peanut butter.
Why do these two flavors work so well together? It’s a culinary masterpiece built on contrast. You have the deep, slightly bitter foundation of cocoa solids playing against the salty, creamy, sweet decadence of the peanut butter. It’s a textural dream, too—moist cake, smooth frosting, and the delightful, messy crunch of chopped peanut butter cups. We aren’t aiming for subtle sophistication here; we are aiming for unapologetic, celebratory flavor that makes you want to spontaneously high-five the nearest person. This isn’t a cake you eat politely; it’s a cake you conquer. The process might seem intimidating because of the layers, but trust me, we have shortcuts baked into this recipe that make assembling this edible mountain surprisingly easy, even if your previous baking exploits involved burning toast.
Choosing Your Chocolate Weaponry
The secret to the depth of this cake lies in the quality of the chocolate cake layers. Do not settle for weak, pale cocoa powder. You need the dark stuff, the kind that stains your fingers and makes your kitchen smell like a cocoa factory exploded—in a good way. We recommend using Dutch-process cocoa powder, as it creates a deeper, richer, almost black color and a smoother flavor profile compared to natural cocoa. If you want maximum flavor intensity, you can also melt a square of unsweetened baking chocolate and add it to the batter; this amps up the moisture content and gives the cake a truly fudgy center that perfectly complements the salty frosting. Remember, we are building a fortress of flavor, and chocolate is the foundation.
Ingredients for Peanut Butter Chocolate Layer Cake with Reese’s Cups – Ultimate Dessert
Here’s what you’ll need to make this delicious dish:
- All-Purpose FlourEnsure it is properly measured by spooning it into the measuring cup and leveling off, preventing a dense, dry cake.
- Dutch-Process Cocoa PowderEssential for achieving that deep, rich chocolate color and intense flavor that defines this specific layer cake.
- Baking Soda and Baking PowderThese leavening agents work together to give the cake layers their impressive height and tender crumb structure.
- Granulated Sugar and Brown SugarThe combination adds moisture and complexity; the brown sugar contributes a subtle molasses depth that complements the chocolate.
- SaltA vital ingredient, salt doesn’t just season; it expertly balances the intense sweetness of the chocolate and peanut butter.
- Buttermilk or Milk with VinegarThe acidity tenderizes the cocoa and activates the baking soda, resulting in an incredibly moist and fluffy cake.
- Vegetable OilUsed instead of butter in the cake batter to keep the layers exceptionally moist and tender, even days after baking.
- EggsShould be brought to room temperature before mixing, allowing them to incorporate better into the batter, ensuring a uniform emulsion.
- Hot Coffee or Hot WaterUsed to bloom the cocoa powder, which deepens its flavor dramatically and thins the batter to the perfect consistency.
- Unsalted Butter (for Frosting)Must be softened to room temperature so it can whip up light, fluffy, and completely smooth without any lumps.
- Creamy Peanut Butter (for Frosting)Opt for standard processed peanut butter (like a commercial brand) rather than natural separation types, as the stabilizers help maintain the frosting’s structure.
- Powdered SugarThis fine sugar dissolves quickly into the frosting, yielding a velvety smooth texture and providing necessary bulk and sweetness.
- Heavy Cream or Milk (for Frosting)Used sparingly to adjust the consistency of the peanut butter frosting, making it spreadable yet stable.
- Vanilla Bean PasteProvides a layer of aromatic complexity that enhances both the chocolate cake and the peanut butter frosting.
- Peanut Butter Cups (Mini or Chopped)Used lavishly for decoration and inclusion in the filling layers, providing that signature crunch and visual appeal.
The full ingredients list, including measurements, is provided in the recipe card directly below.
How to Make Peanut Butter Chocolate Layer Cake with Reese’s Cups – Ultimate Dessert
Follow these simple steps to prepare this delicious dish:
Step 1: Preparing the Deep Chocolate Cake Layers
Preheat your oven to 350°F (175°C). Prepare three 8-inch round cake pans by lining the bottoms with parchment paper circles and lightly spraying the sides with baking spray. In a large bowl, whisk together the flour, cocoa powder, sugars, baking soda, baking powder, and salt, ensuring everything is thoroughly combined to prevent pockets of leavening agents. In a separate bowl, whisk together the buttermilk, oil, eggs, and vanilla bean paste until smooth. Pour the wet ingredients into the dry ingredients and mix on low speed until just combined. Finally, slowly pour the hot coffee or hot water into the batter; this will make the batter very thin, but it is crucial for moistness. Distribute the batter evenly among the three prepared pans and bake for 28 to 32 minutes, or until a wooden toothpick inserted into the center comes out with only moist crumbs attached. Cool the cakes in the pans for 10 minutes before inverting them onto a wire rack to cool completely.
Step 2: Whipping Up the Ultimate Peanut Butter Frosting
While the cakes cool, prepare the star of the show: the rich peanut butter frosting. In the bowl of a stand mixer fitted with the paddle attachment, cream the softened butter until it is light and fluffy, usually about 3 minutes. Add the creamy peanut butter and beat until fully incorporated and smooth. Gradually add the powdered sugar, alternating with the heavy cream or milk, starting and ending with the sugar. Mix on low speed initially to prevent a powdered sugar cloud explosion, then increase to medium-high speed and beat for 3 to 5 minutes until the frosting is incredibly light, airy, and fluffy. If the frosting seems too stiff, add milk one teaspoon at a time; if too soft, add powdered sugar until the perfect spreading consistency is reached.
Step 3: Leveling and Crumb Coating the Layers
Once the cake layers are entirely cool, use a serrated knife or a cake leveler to gently slice off the domed tops, making sure each layer is perfectly flat and level. Place the first cake layer onto your serving platter. Spread about one cup of peanut butter frosting evenly across the top. If desired, sprinkle a handful of chopped peanut butter cups onto this filling layer for an extra textural surprise. Carefully place the second layer on top and repeat the frosting and candy application. Top with the final layer, ensuring it is centered. Now, apply a thin layer of frosting all over the cake—this is the “crumb coat” designed to lock in any loose crumbs. Chill the crumb-coated cake in the refrigerator for 20 to 30 minutes until the frosting is firm.
Step 4: The Final Flourish and Decoration
Remove the chilled cake and apply the remaining peanut butter frosting liberally to the top and sides, using an offset spatula to smooth the edges or create rustic swirls. This is your chance to embrace your inner artist; perfection is overrated, but impressive volume is not. Once the entire cake is covered, place your chosen peanut butter cups—whole, halved, or chopped—around the base or spiraling up the top of the cake. For extra decadence, you can melt a tablespoon of chocolate chips with a drop of oil and drizzle it haphazardly over the top, making the cake look extra professionally messy.
Transfer to plates and drizzle with sauce for the perfect finishing touch.
Mastering the Cake: Tips and Troubleshooting
Creating a beautiful layer cake can feel like a high-stakes baking competition, but a few professional secrets can turn potential kitchen disasters into show-stopping victories. The most critical step in successful layer cake baking is temperature control. Make absolutely sure your eggs, buttermilk, and butter (for the frosting) are at room temperature. Cold ingredients resist mixing and result in a chunky, uneven batter or stiff frosting, severely compromising the final texture.
The Importance of Blooming the Cocoa
When the recipe calls for hot liquid—in this case, hot coffee or hot water—you must use it. The heat “blooms” the cocoa powder, releasing its full aromatic potential and deep color. If you skip this step and use cold liquid, your chocolate cake will taste duller and look less rich. Think of it as waking up the chocolate flavor; you need the warmth to get the party started.
Preventing the Cake Slide
A common layer cake catastrophe is the dreaded slide, where layers migrate off-center, particularly after adding heavy frosting. To combat this, use a small dab of frosting directly on your serving plate or cake stand before placing the first layer down. This acts as an edible glue, anchoring the foundation. Furthermore, always chill your crumb coat. This hard shell stabilizes the layers before you apply the heavier final coat of frosting, ensuring your tower remains perfectly vertical and ready for its photoshoot.
Frosting Consistency Adjustments
Peanut butter frosting can be temperamental. If it’s too thick and tearing your cake layers, add milk or heavy cream, one teaspoon at a time, until it glides smoothly. If it’s too thin and threatens to ooze off the sides, beat in a tablespoon of extra powdered sugar or place the bowl in the refrigerator for about 15 minutes. The fat in the peanut butter and butter will firm up slightly, restoring stability. Humidity is the enemy of all frosting, so if you are baking on a rainy day, slightly reduce the amount of liquid used.
Storage and Presentation
This magnificent creation deserves to be stored properly to maintain its superior moisture and flavor. Because the frosting is butter-based, the cake is best kept covered at cool room temperature for up to two days. If you need to keep it longer, or if your kitchen is particularly warm, store the cake in an airtight container in the refrigerator for up to five days. However, be sure to let the cake sit out on the counter for at least an hour before serving to ensure the cake layers soften and the peanut butter frosting returns to its creamy, ideal texture. No one wants to chip a tooth on refrigerated peanut butter frosting.
Perfecting the Slice
To serve this ultimate dessert and achieve those picture-perfect slices, use a tall, sharp knife. Dip the knife into a container of hot water, wipe it completely dry, and then make your cut. Repeat this process—hot water, dry wipe—before every slice. This ensures a clean cut through the dense chocolate cake, the thick frosting, and the crunchy candy pieces, preventing the whole slice from dragging and crumbling. Serve generous slices, because honestly, nobody ever complained about having too much of this Peanut Butter Chocolate Layer Cake with Reese’s Cups – Ultimate Dessert.
Creative Cake Variations
While this recipe is perfect as written, you can easily customize it to match the occasion or your mood. For a crunchier texture in the layers, mix a quarter cup of finely chopped salted peanuts directly into the cake batter just before baking. To introduce a fruity dimension that balances the richness, consider adding a thin layer of high-quality raspberry jam between the cake layers along with the frosting. The tartness of the raspberry provides an unexpected, delicious counterpoint to the peanut butter and chocolate. For a holiday version, use small, shaped candy cups instead of standard rounds, offering seasonal flair.
The Accidental Discovery of Sunshine on a Plate

My baking journey hit a wall of bland vanilla until a sudden craving for the perfect chocolate peanut butter dessert struck. I was supposed to make simple cupcakes, but spilled cocoa powder and a bag of mini peanut butter cups turned the project into this spectacular, towering masterpiece. It truly brought sunshine to a rainy Tuesday afternoon.
Picture this: It was a dreary November afternoon, the kind where the sky looks like wet cement and motivation is zero. I was planning to bake something simple, perhaps a nice loaf of quick bread, when the siren song of chocolate and peanut butter started whispering from the pantry. I realized the world didn’t need another plain cake; the world needed a cake that aggressively high-fived your tastebuds. It needed a dessert that was unapologetically rich, dense, and topped with the single most addictive candy known to humankind. Thus began my epic quest to create the ultimate celebratory confection. I scrapped the quick bread and emerged hours later, dusted in cocoa and powdered sugar, with this majestic three-layer marvel: the very bestPeanut Butter Chocolate Layer Cake with Reese’s Cups – Ultimate Dessert.
This isn’t just baking; this is architecture you can eat. We start with a dark, intensely moist chocolate cake—so rich it practically needs a velvet rope. We stack those layers high, separating them with a cloud of creamy, fluffy peanut butter frosting that manages to be sweet, salty, and incredibly smooth all at once. The grand finale? A shiny, deep chocolate ganache cascading down the sides like a molten waterfall, peppered with chunks of actual peanut butter cups. If you love the chocolate-peanut butter combination, prepare to meet your new obsession. This cake will not only dominate your dessert table, but it will also likely earn you a standing ovation from anyone lucky enough to receive a slice.
Why This Layered Chocolate Peanut Butter Cake is the Ultimate Dessert
Many recipes promise extravagance, but this one delivers a theatrical experience. The contrast in textures is what sets this spectacular candy bar cake apart. You get the slight resistance of the fudgy chocolate layer, yielding to the airy, melt-in-your-mouth quality of the frosting, punctuated by the delightful crunch of the candy topping. It is pure decadence, structured for maximum enjoyment.
We approach this recipe not just as bakers, but as artists creating a multi-sensory experience. The cake layers must be sturdy enough to hold the generous weight of the frosting, yet tender enough to feel luxurious. Achieving this requires careful adherence to ingredient ratios and temperature controls. Forget skimpy frosting—we are building a mountain of flavor, designed to satisfy even the deepest peanut butter craving. It’s the perfect centerpiece for birthdays, holidays, or simply surviving Monday.
Ingredients for the Rich Chocolate Layers
- 2 cups all-purpose flour
- 2 cups granulated sugar
- 3/4 cup unsweetened cocoa powder (high quality is recommended)
- 2 teaspoons baking soda
- 1 teaspoon baking powder
- 1 teaspoon fine sea salt
- 1 cup full-fat buttermilk, room temperature
- 1/2 cup vegetable oil
- 2 large eggs, room temperature
- 1 teaspoon vanilla bean paste
- 1 cup hot water or hot brewed coffee
The Dreamy Peanut Butter Frosting and Chocolate Ganache
For the Creamy Peanut Butter Frosting:
- 1 cup (2 sticks) unsalted butter, softened
- 1 cup creamy peanut butter (do not use natural style)
- 4 cups powdered sugar, sifted
- 1/2 teaspoon fine sea salt
- 1/2 cup heavy cream, plus more if needed
- 1 teaspoon vanilla bean paste
For the Glossy Chocolate Ganache:
- 1 cup heavy cream
- 1 cup semi-sweet chocolate chips or finely chopped baking chocolate
- 1 tablespoon unsalted butter
For Decoration:
- 2 cups chopped peanut butter cups (mini or standard size)
Perfecting the Cooking Process
First, measure and sift all dry cake ingredients to ensure a tender crumb. While the cake layers are cooling completely—and this is crucial—prepare the luscious peanut butter frosting. Finally, assemble the cake only after the layers are cold, then chill the frosted cake briefly before drizzling with ganache.
Baking the Rich Chocolate Layers
Preheat your oven to 350°F (175°C) and grease three 8-inch round cake pans, lining the bottoms with parchment paper circles. In a large mixing bowl, whisk together the flour, sugar, cocoa powder, baking soda, baking powder, and salt. Make sure everything is thoroughly combined to avoid pockets of leavening agents.
In a separate, smaller bowl, whisk together the buttermilk, oil, eggs, and vanilla bean paste until just combined. Pour the wet ingredients into the dry ingredients. Mix on medium-low speed until the batter is smooth, scraping down the sides of the bowl as needed. Next, carefully pour in the hot water or coffee. The batter will be thin—this is perfectly normal and contributes to the cake’s ultimate moisture content. Divide the batter evenly among the prepared pans.
Bake for 28 to 32 minutes, or until a toothpick inserted into the center comes out with only moist crumbs attached. Let the cakes cool in the pans for about 10 minutes before inverting them onto a wire rack. Remove the parchment paper and allow the layers to cool completely before attempting to frost them. Warm cakes are the nemesis of good frosting, causing guaranteed structural failure.
Whipping Up the Silky Frosting
To prepare the magnificent peanut butter frosting, use an electric mixer to beat the softened butter and peanut butter together on medium speed until they are light and fluffy—this should take about three minutes. Gradually add the sifted powdered sugar, alternating with small splashes of heavy cream. Start slow to avoid a sugar cloud explosion in your kitchen. Beat in the vanilla bean paste and salt.
If the frosting appears too stiff, add a tiny bit more heavy cream, one teaspoon at a time, until you achieve a wonderfully spreadable, smooth consistency. Remember, this frosting needs to hold up the weight of the layers, so avoid making it too runny. Set aside about half a cup of frosting if you plan to pipe decorations later.
For the ganache, heat the heavy cream in a small saucepan until it just begins to simmer around the edges, then remove it from the heat immediately. Place the chocolate chips or chopped chocolate in a heat-proof bowl. Pour the hot cream over the chocolate and let it sit undisturbed for five minutes. Whisk the mixture gently starting from the center, moving outward, until the ganache is completely smooth and glossy. Stir in the tablespoon of butter for extra shine. Let the ganache cool slightly until it thickens to a drizzly consistency—about 15 to 20 minutes.
Assembling the Peanut Butter Chocolate Layer Cake with Reese’s Cups – Ultimate Dessert
Place your first cooled cake layer on your serving platter or cake stand. Spread about one cup of the peanut butter frosting evenly over the layer. Top with the second cake layer and repeat the frosting process. Place the final cake layer on top, then use the remaining frosting to crumb coat the entire cake lightly. Crumb coating seals in all the loose crumbs and ensures a clean final layer of frosting.
Chill the crumb-coated cake in the refrigerator for 20 minutes. Apply the remaining frosting thickly and smoothly over the top and sides. Once frosted beautifully, pour the slightly cooled ganache over the top center of the cake, allowing it to naturally drip down the sides. While the ganache is still tacky, shower the top edge of the cake generously with the chopped peanut butter cups. Press some candies gently onto the sides for extra appeal. This truly is the definitive Peanut Butter Chocolate Layer Cake with Reese’s Cups – Ultimate Dessert, ready to impress even the toughest critic.
Add Your Touch
Feel free to swap out the peanut butter cups for chopped malted milk balls or even crunchy toffee pieces. For a deeper chocolate intensity, substitute a portion of the milk with strong, cooled brewed coffee. A sprinkle of sea salt on the frosting also elevates the flavor beautifully.
Customization is the spice of baking life. If you want to increase the peanut butter intensity, consider swirling a couple of tablespoons of melted peanut butter into the ganache before drizzling it over the top. If you have guests who prefer a cream cheese tang, you can easily adapt the frosting by replacing a quarter cup of the butter with softened cream cheese—just be sure to adjust the powdered sugar slightly to maintain stiffness. For a fun, textural change, you can mix finely chopped roasted peanuts into the cake batter itself, providing an unexpected, savory element that plays beautifully against the sweetness.
Storing & Reheating
Store leftover cake tightly covered in the refrigerator for up to four days; this dessert actually tastes better the next day! Allow slices to sit at room temperature for 30 minutes before serving. Freezing whole layers before frosting works wonderfully for future use.
To ensure your cake maintains its quality, always wrap it well. Exposure to air is the enemy of moist cake. If freezing, wrap each individual cake layer tightly in plastic wrap, then foil, and they will stay fresh for up to two months. Thaw frozen layers overnight in the refrigerator before unwrapping and frosting. Never reheat a slice of this cake, as it will melt the frosting and ganache; instead, bring it slowly to room temperature to enjoy its optimal texture and flavor profile.
The first time I served this, my usually reserved Aunt Carol actually applauded. She said it was the best layered chocolate peanut butter cake she had ever tasted, solidifying its position as my signature celebration dessert.
Insider Tips for Cake Perfection
- Always use room temperature butter and eggs for the cake batter and frosting; this emulsifies properly, ensuring a light, fluffy, and smooth texture.
- Do not overmix the cake batter once you incorporate the flour; overmixing develops gluten, resulting in a tough, dry cake layer instead of a moist one.
- When making the ganache, use high-quality chocolate chips or chopped baking chocolate, pouring the hot cream slowly to guarantee a perfectly glossy, smooth drizzle.
Conclusion for Peanut Butter Chocolate Layer Cake with Reese’s Cups – Ultimate Dessert
We conquered the challenge of creating a spectacular chocolate peanut butter dessert that is worthy of any celebration. This recipe guides you through creating intensely moist chocolate layers, whipping up the rich, yet airy, peanut butter frosting, and finishing it all with a professional, glossy chocolate ganache and generous candy topping. Achieving this level of baking success relies on ensuring your ingredients are at the correct temperatures and cooling the layers fully before assembly. Whether you are hosting a grand party or simply seeking to elevate a quiet weekend, thisPeanut Butter Chocolate Layer Cake with Reese’s Cups – Ultimate Dessertguarantees satisfaction and admiration. Go ahead, grab your mixing bowls, and prepare to bask in the glory of the perfect layered confection.
Print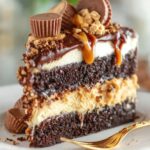
Peanut Butter Chocolate Layer Cake with Reese’s Cups – Ultimate Dessert
- Total Time: 35 minutes
- Yield: 4 servings
Description
Craft the ultimate dessert: fudgy cocoa layers crowned with a 4-cup powdered sugar peanut butter frosting. Baked perfection! Full instructions and nutrition facts included.
Ingredients
- Unsalted Butter: 2 cups (4 sticks), softened and divided
- Creamy Peanut Butter: 1.5 cups
- Powdered Sugar: 4 cups
- High-Quality Cocoa Powder: 1 cup (for the chocolate cake batter)
- Semi-Sweet Chocolate Chips: 1 cup
- Heavy Cream: 1/2 cup (plus more for frosting adjustment)
- Large Eggs: 4
- Miniature Reese’s Peanut Butter Cups: 24 pieces, chilled and halved
Instructions
- Step 1: Prepare and Bake the Chocolate Layers. Mix all dry cake ingredients (flour, sugar, cocoa powder, baking soda, etc.) and wet ingredients (butter, eggs, vanilla) to form the batter. Divide the batter evenly between two or three 8-inch prepared round cake pans and bake at 350°F (175°C) for 30–35 minutes, or until a toothpick inserted comes out clean. Cool completely on wire racks.
- Step 2: Make the Peanut Butter Frosting. In a large mixing bowl, beat 1.5 cups of the softened butter with the peanut butter until creamy. Gradually add the powdered sugar, alternating with small splashes of heavy cream or milk, beating until the frosting is light, fluffy, and spreadable.
- Step 3: Assemble the Layer Cake. Level the cooled cake layers using a serrated knife. Place the first layer on a serving platter and spread a thick, even layer of peanut butter frosting over the top. Stack the second layer and repeat. Apply a thin layer of frosting (crumb coat) to the sides and top of the entire cake, then chill for 20 minutes before applying the final, smooth coat of frosting.
- Step 4: Prepare and Apply the Ganache Drip. Heat the 1 cup of semi-sweet chocolate chips and the remaining 1/2 cup of heavy cream in a small saucepan until melted and smooth (or microwave in 30-second intervals). Allow the ganache to cool slightly until thickened but still pourable. Use a spoon or piping bag to carefully drizzle the ganache around the edges of the cake so it runs down the sides, then fill in the center.
- Step 5: Decorate and Chill. Immediately arrange the halved Reese’s Cups around the perimeter or across the top of the cake before the chocolate ganache sets. Place the completed cake in the refrigerator for at least one hour before slicing and serving for the cleanest cut.
Notes
- To maintain optimal moisture, store refrigerated leftovers in an airtight container or under a cake dome; always let slices sit out for 20–30 minutes before serving to soften the frosting and cake.
- Since this cake is best served chilled, reheating is unnecessary; simply let refrigerated slices come almost fully to room temperature to achieve the best flavor and texture contrast between the rich ganache and creamy frosting.
- This ultimate dessert pairs beautifully with a cold glass of milk, a robust espresso, or a small scoop of vanilla bean ice cream served alongside the slice.
- For the neatest final assembly, ensure the miniature Reese's Cups are thoroughly chilled before cutting them in half, allowing for clean cuts without smudging the peanut butter filling.
- Prep Time: 15 minutes
- Cook Time: 20 minutes
- Method: Stovetop
- Cuisine: American
Nutrition
- Serving Size: 1 slice (1/16th of cake)
- Calories: 850
- Sodium: 520mg
- Fat: 60g
- Saturated Fat: 33g
- Trans Fat: 0.5g
- Protein: 85g
Leave a Comment