
Pesto Grilled Cheese is not just a sandwich; it’s a delightful culinary experience that brings together the rich flavors of basil, garlic, and cheese in a warm, crispy embrace. This dish has its roots in Italian cuisine, where pesto originated as a vibrant sauce made from fresh basil, pine nuts, garlic, and olive oil. Over the years, it has evolved into a beloved ingredient that adds a burst of flavor to various dishes, including the classic grilled cheese.
People adore pesto grilled cheese for its perfect balance of taste and texture. The creamy, melted cheese pairs beautifully with the aromatic pesto, creating a sandwich that is both comforting and sophisticated. Whether you’re enjoying it for a quick lunch or a cozy dinner, this recipe is incredibly convenient to whip up, making it a favorite among busy home cooks. Join me as we explore how to make this delicious twist on a classic favorite!

Ingredients:
- 4 slices of bread (your choice, sourdough or whole grain works well)
- 4 tablespoons of pesto (store-bought or homemade)
- 4 slices of cheese (mozzarella, cheddar, or a blend)
- 2 tablespoons of unsalted butter
- Salt and pepper to taste
- Optional: sliced tomatoes or spinach for added flavor
Preparing the Ingredients
Before we dive into making our delicious pesto grilled cheese, let’s prepare our ingredients. This step is crucial for a smooth cooking process.
- Gather all your ingredients: Make sure you have everything listed above. It’s always a good idea to have everything within reach before you start cooking.
- Prepare the pesto: If you’re using homemade pesto, ensure it’s ready. If you’re using store-bought, give it a good stir to mix any separated oil.
- Slice the cheese: If you’re using a block of cheese, slice it into even pieces. This ensures that it melts evenly.
- Optional additions: If you’re adding tomatoes or spinach, wash and slice them accordingly. This will enhance the flavor and nutrition of your sandwich.
Assembling the Sandwich
Now that we have everything prepped, it’s time to assemble our pesto grilled cheese sandwiches.
- Spread the pesto: Take two slices of bread and spread 2 tablespoons of pesto on one side of each slice. Make sure to cover the entire surface for maximum flavor.
- Add the cheese: Place a slice of cheese on top of the pesto on each slice of bread. If you’re using additional ingredients like tomatoes or spinach, layer them on top of the cheese.
- Top it off: Place the remaining slices of bread on top, pesto side down, to create a sandwich.
Cooking the Sandwich
Now comes the fun part—cooking our sandwiches to golden perfection!
- Heat the skillet: Place a non-stick skillet or griddle over medium heat. Allow it to warm up for a couple of minutes.
- Add butter: Once the skillet is hot, add 1 tablespoon of unsalted butter. Let it melt and coat the bottom of the skillet.
- Cook the first side: Carefully place one sandwich in the skillet. Cook for about 3-4 minutes, or until the bottom is golden brown and crispy. Keep an eye on it to prevent burning.
- Flip the sandwich: Using a spatula, gently flip the sandwich over. Add the remaining tablespoon of butter to the skillet, allowing it to melt before cooking the other side.
- Cook the second side: Cook for another 3-4 minutes, or until the second side is also golden brown and the cheese is melted. You can cover the skillet with a lid for a minute to help the cheese melt faster.
Serving the Pesto Grilled Cheese
Once your sandwiches are cooked to perfection, it’s time to serve them up!
- Remove from skillet: Carefully take the sandwiches out of the skillet and place them on a cutting board.
- Slice and serve: Use a sharp knife to cut the sandwiches in half diagonally. This not only makes them easier to eat but also showcases the gooey cheese and vibrant pesto.
- Optional garnish: If you like, you can sprinkle a little salt and pepper on top or serve with a side of marinara sauce for dipping.
Tips for the Perfect Pesto Grilled Cheese
Here are some tips to ensure your pesto grilled cheese turns out perfectly every time:
- Choose the right bread: A sturdy bread like sourdough or whole grain holds up well to the fillings and provides a nice crunch.
- Don’t rush the cooking: Cooking on medium heat allows the cheese to melt thoroughly
Conclusion:
If you’re looking for a delightful twist on a classic comfort food, this Pesto Grilled Cheese is an absolute must-try! The combination of gooey, melted cheese with the vibrant, aromatic flavors of fresh pesto creates a sandwich that is not only satisfying but also bursting with flavor. Whether you’re enjoying it for lunch, a quick dinner, or even a late-night snack, this recipe elevates the humble grilled cheese to new heights.
One of the best things about this Pesto Grilled Cheese is its versatility. You can easily customize it to suit your taste preferences or dietary needs. For a heartier option, consider adding slices of ripe tomato or crispy bacon. If you’re feeling adventurous, try incorporating some sautéed mushrooms or spinach for an extra layer of flavor and nutrition. You can also experiment with different types of cheese; while mozzarella and provolone work beautifully, feel free to mix in some sharp cheddar or creamy goat cheese for a unique twist.
Serving suggestions are endless! Pair your Pesto Grilled Cheese with a warm bowl of tomato soup for a classic combination that never disappoints. Alternatively, serve it alongside a fresh salad for a lighter meal. You could even cut the sandwich into smaller pieces and serve it as an appetizer at your next gathering. The vibrant colors and enticing aroma will surely impress your guests and leave them wanting more.
I encourage you to give this Pesto Grilled Cheese a try! It’s a simple yet delicious recipe that can be whipped up in no time, making it perfect for busy weeknights or lazy weekends. Once you’ve made it, I’d love to hear about your experience! Did you stick to the classic recipe, or did you add your own twist? Share your thoughts and any variations you tried in the comments below. Your feedback not only helps me improve but also inspires others to get creative in the kitchen.
In conclusion, this Pesto Grilled Cheese is not just a meal; it’s an experience that brings comfort and joy with every bite. So grab your ingredients, fire up that skillet, and indulge in a sandwich that’s sure to become a favorite in your household. Happy cooking!
Pesto Grilled Cheese: A Delicious Twist on a Classic Sandwich
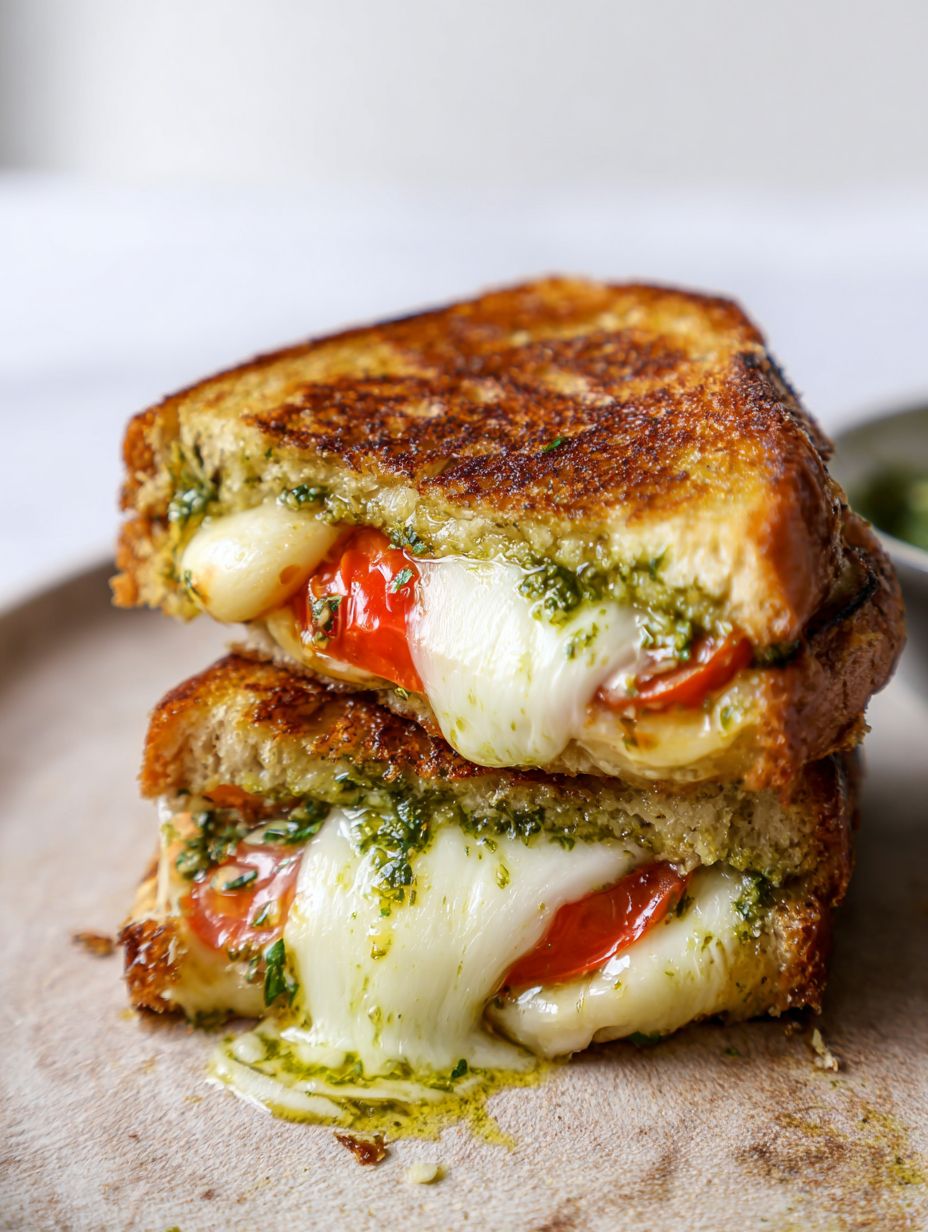
Enjoy a delightful twist on a classic with this Pesto Grilled Cheese, featuring layers of gooey cheese and vibrant pesto. Perfect for a quick lunch or cozy dinner, you can enhance it with fresh tomatoes or spinach for added flavor.
Ingredients
- 4 slices of bread (your choice, sourdough or whole grain)
- 4 tablespoons of pesto (store-bought or homemade)
- 4 slices of cheese (mozzarella, cheddar, or a blend)
- 2 tablespoons of unsalted butter
- Salt and pepper to taste
- Optional: sliced tomatoes or spinach for added flavor
Instructions
- Gather all your ingredients: Make sure you have everything listed above. It’s always a good idea to have everything within reach before you start cooking.
- Prepare the pesto: If you’re using homemade pesto, ensure it’s ready. If you’re using store-bought, give it a good stir to mix any separated oil.
- Slice the cheese: If you’re using a block of cheese, slice it into even pieces. This ensures that it melts evenly.
- Optional additions: If you’re adding tomatoes or spinach, wash and slice them accordingly. This will enhance the flavor and nutrition of your sandwich.
- Spread the pesto: Take two slices of bread and spread 2 tablespoons of pesto on one side of each slice. Make sure to cover the entire surface for maximum flavor.
- Add the cheese: Place a slice of cheese on top of the pesto on each slice of bread. If you’re using additional ingredients like tomatoes or spinach, layer them on top of the cheese.
- Top it off: Place the remaining slices of bread on top, pesto side down, to create a sandwich.
- Heat the skillet: Place a non-stick skillet or griddle over medium heat. Allow it to warm up for a couple of minutes.
- Add butter: Once the skillet is hot, add 1 tablespoon of unsalted butter. Let it melt and coat the bottom of the skillet.
- Cook the first side: Carefully place one sandwich in the skillet. Cook for about 3-4 minutes, or until the bottom is golden brown and crispy. Keep an eye on it to prevent burning.
- Flip the sandwich: Using a spatula, gently flip the sandwich over. Add the remaining tablespoon of butter to the skillet, allowing it to melt before cooking the other side.
- Cook the second side: Cook for another 3-4 minutes, or until the second side is also golden brown and the cheese is melted. You can cover the skillet with a lid for a minute to help the cheese melt faster.
- Remove from skillet: Carefully take the sandwiches out of the skillet and place them on a cutting board.
- Slice and serve: Use a sharp knife to cut the sandwiches in half diagonally. This not only makes them easier to eat but also showcases the gooey cheese and vibrant pesto.
- Optional garnish: If you like, you can sprinkle a little salt and pepper on top or serve with a side of marinara sauce for dipping.
Notes
- Choose the right bread: A sturdy bread like sourdough or whole grain holds up well to the fillings and provides a nice crunch.
- Don’t rush the cooking: Cooking on medium heat allows the cheese to melt thoroughly without burning the bread.


Leave a Comment