
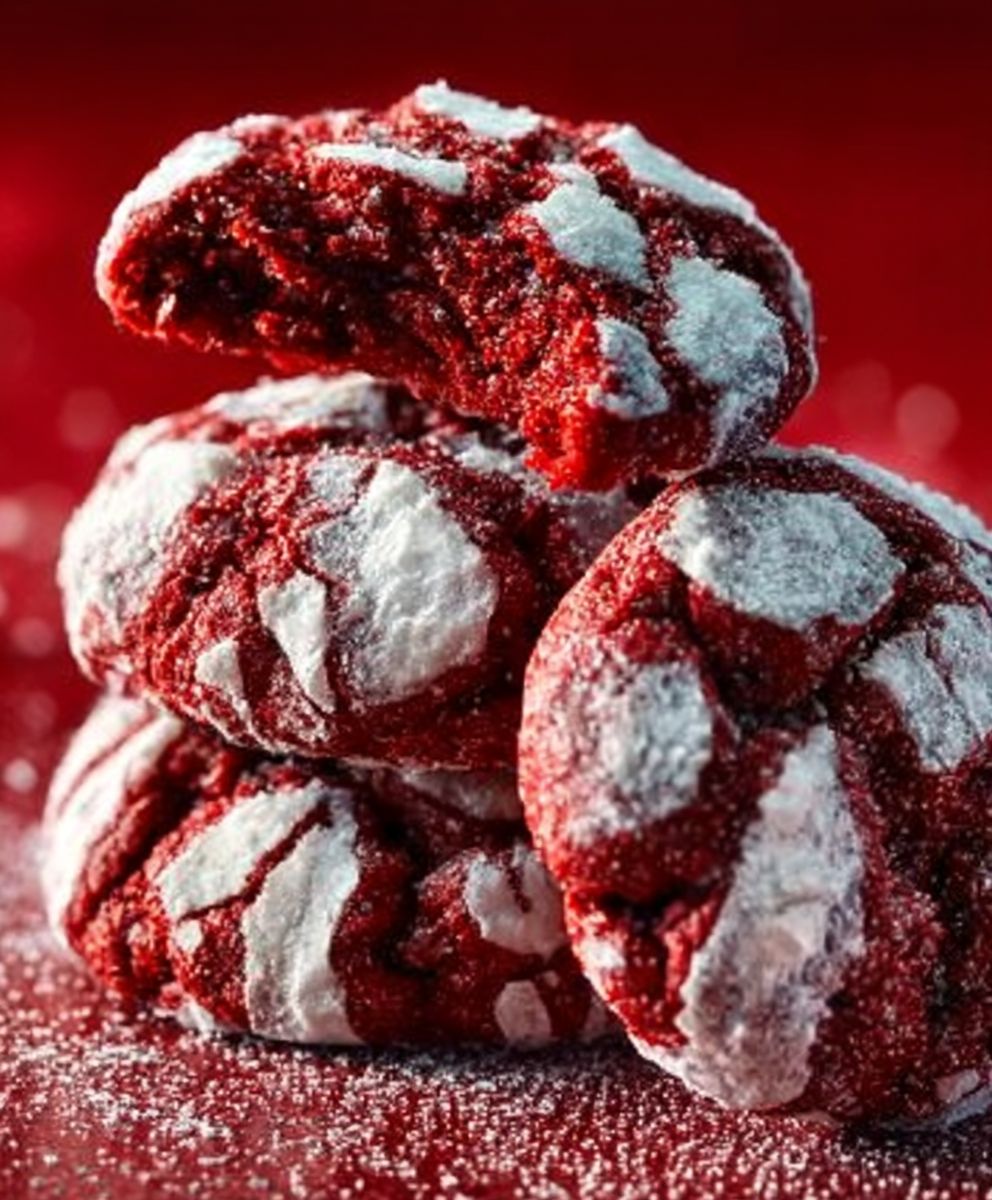
Red Velvet Crinkle Cookies: A Delightful Treat
Red Velvet Crinkle Cookies are not just a dessert; they are a celebration of flavor and texture that brings joy to any occasion. With their vibrant red hue and snowy white powdered sugar coating, these cookies are as visually stunning as they are delicious. Originating from the classic red velvet cake, these cookies have taken the culinary world by storm, becoming a favorite for both holiday gatherings and everyday indulgences.
What makes Red Velvet Crinkle Cookies so beloved is their perfect balance of soft, chewy texture and rich cocoa flavor, complemented by a hint of vanilla. The delightful contrast between the crisp exterior and the tender interior creates a mouthwatering experience that keeps people coming back for more. Plus, they are incredibly easy to make, making them a go-to recipe for both novice bakers and seasoned chefs alike. Whether you’re sharing them at a party or enjoying them with a cup of coffee, Red Velvet Crinkle Cookies are sure to impress and satisfy your sweet tooth.

Ingredients:
- 2 ½ cups all-purpose flour
- 1 tablespoon unsweetened cocoa powder
- 1 teaspoon baking powder
- ½ teaspoon baking soda
- ½ teaspoon salt
- 1 cup granulated sugar
- ½ cup vegetable oil
- 2 large eggs
- 1 teaspoon vanilla extract
- 1 tablespoon red food coloring
- ½ cup powdered sugar (for rolling)
Preparing the Dough
- Preheat the oven: Start by preheating your oven to 350°F (175°C). This ensures that your cookies bake evenly.
- Mix dry ingredients: In a medium bowl, whisk together the all-purpose flour, cocoa powder, baking powder, baking soda, and salt. Set this mixture aside as we will incorporate it later.
- Combine wet ingredients: In a large mixing bowl, combine the granulated sugar and vegetable oil. Use a hand mixer or a whisk to blend them together until the mixture is smooth and slightly fluffy.
- Add eggs and flavorings: Crack in the two large eggs, and add the vanilla extract and red food coloring. Mix everything together until the color is uniform and the mixture is well combined.
- Incorporate dry ingredients: Gradually add the dry ingredient mixture to the wet ingredients. I recommend doing this in three parts, mixing well after each addition. You want to ensure there are no lumps and that the dough is smooth and thick.
- Chill the dough: Cover the bowl with plastic wrap or a clean kitchen towel and refrigerate the dough for at least 30 minutes. Chilling helps the cookies maintain their shape while baking.
Preparing for Baking
- Prepare the baking sheets: While the dough is chilling, line two baking sheets with parchment paper. This prevents the cookies from sticking and makes for easy cleanup.
- Preheat the oven again: If your oven has cooled down, preheat it again to 350°F (175°C) to ensure it’s hot when the cookies go in.
- Prepare the rolling station: In a shallow bowl, add the powdered sugar. This will be used to coat the cookies before baking, giving them that signature crinkle effect.
Shaping the Cookies
- Scoop the dough: Once the dough has chilled, use a cookie scoop or a tablespoon to portion out the dough. Each cookie should be about 1 to 1.5 inches in diameter.
- Roll in powdered sugar: Take each portion of dough and roll it into a ball between your palms. Then, roll the ball in the powdered sugar until it is completely coated. This step is crucial for achieving the crinkle effect during baking.
- Place on baking sheets: Arrange the sugar-coated dough balls on the prepared baking sheets, leaving about 2 inches of space between each cookie to allow for spreading.
Baking the Cookies
- Bake the cookies: Place the baking sheets in the preheated oven and bake for 10-12 minutes. The cookies should look set and have cracks on the surface, but they should not be overbaked. They will continue to firm up as they cool.
- Cool on the baking sheets: Once baked, remove the cookies from the oven and let them cool on the baking sheets for about 5 minutes. This allows them to firm up a bit before transferring them.
- Transfer to a wire rack: After 5 minutes, carefully transfer the cookies to a wire rack to cool completely. This step is important to prevent them from becoming soggy.
Storing the Cookies
- Cool completely: Ensure that the cookies are completely cooled before storing them. This helps maintain their texture and prevents moisture buildup.
- 2 ½ cups all-purpose flour
- 1 tablespoon unsweetened cocoa powder
- 1 teaspoon baking powder
- ½ teaspoon baking soda
- ½ teaspoon salt
- 1 cup granulated sugar
- ½ cup vegetable oil
- 2 large eggs
- 1 teaspoon vanilla extract
- 1 tablespoon red food coloring
- ½ cup powdered sugar (for rolling)
- Preheat the oven: Start by preheating your oven to 350°F (175°C).
- Mix dry ingredients: In a medium bowl, whisk together the flour, cocoa powder, baking powder, baking soda, and salt. Set aside.
- Combine wet ingredients: In a large mixing bowl, blend the granulated sugar and vegetable oil until smooth and slightly fluffy.
- Add eggs and flavorings: Mix in the eggs, vanilla extract, and red food coloring until well combined.
- Incorporate dry ingredients: Gradually add the dry mixture to the wet ingredients in three parts, mixing until smooth and thick.
- Chill the dough: Cover the bowl and refrigerate for at least 30 minutes.
- Prepare the baking sheets: Line two baking sheets with parchment paper.
- Preheat the oven again: If needed, preheat the oven to 350°F (175°C).
- Prepare the rolling station: Place powdered sugar in a shallow bowl for coating the cookies.
- Scoop the dough: Use a cookie scoop or tablespoon to portion out the dough (1 to 1.5 inches in diameter).
- Roll in powdered sugar: Roll each dough ball in powdered sugar until fully coated.
- Place on baking sheets: Arrange the sugar-coated balls on the prepared sheets, leaving 2 inches of space between each.
- Bake the cookies: Bake for 10-12 minutes until set and cracked on the surface.
- Cool on the baking sheets: Let the cookies cool on the sheets for about 5 minutes.
- Transfer to a wire rack: Move the cookies to a wire rack to cool completely.
- Cool completely: Ensure cookies are fully cooled before storing to maintain texture.
- For best results, ensure all ingredients are at room temperature before starting.
- You can adjust the amount of red food coloring to achieve your desired color intensity.
- These cookies can be stored in an airtight container at room temperature for up to a week.
<
Conclusion:
In conclusion, these Red Velvet Crinkle Cookies are an absolute must-try for anyone looking to add a touch of sweetness and color to their dessert table. With their rich, velvety flavor and delightful texture, they are sure to impress both family and friends. The beautiful red hue, complemented by the snowy white powdered sugar coating, makes them not only delicious but also visually stunning. Whether you’re celebrating a special occasion or simply indulging in a sweet treat, these cookies are the perfect choice.
For serving suggestions, I recommend pairing these cookies with a glass of cold milk or a warm cup of coffee. The contrast of flavors and temperatures enhances the overall experience, making each bite even more enjoyable. You can also serve them alongside a scoop of vanilla ice cream for an indulgent dessert that will leave everyone wanting more. If you’re feeling adventurous, consider adding a twist by incorporating white chocolate chips or chopped nuts into the dough for added texture and flavor. You could even experiment with different types of cocoa powder to create a unique taste profile.
I encourage you to try this Red Velvet Crinkle Cookies recipe and share your experience with friends and family. Baking is not just about the end product; it’s about the joy of creating something delicious and the memories made along the way. Don’t forget to snap a few photos of your beautiful cookies and share them on social media! Tag your friends and invite them to join in on the fun of baking these delightful treats. I would love to hear how your cookies turn out and any variations you might try. Your feedback and creativity can inspire others to give this recipe a go!
So, roll up your sleeves, gather your ingredients, and let’s get baking! I promise you won’t regret it. These Red Velvet Crinkle Cookies are not just cookies; they are a celebration of flavor and creativity. Happy baking!
Red Velvet Crinkle Cookies: The Ultimate Recipe for a Delicious Treat
These Red Velvet Crinkle Cookies are a delicious combination of rich cocoa flavor and eye-catching color. With their soft, chewy texture and sweet powdered sugar coating, they make a stunning addition to any dessert table or a delightful treat for any occasion.


Leave a Comment