
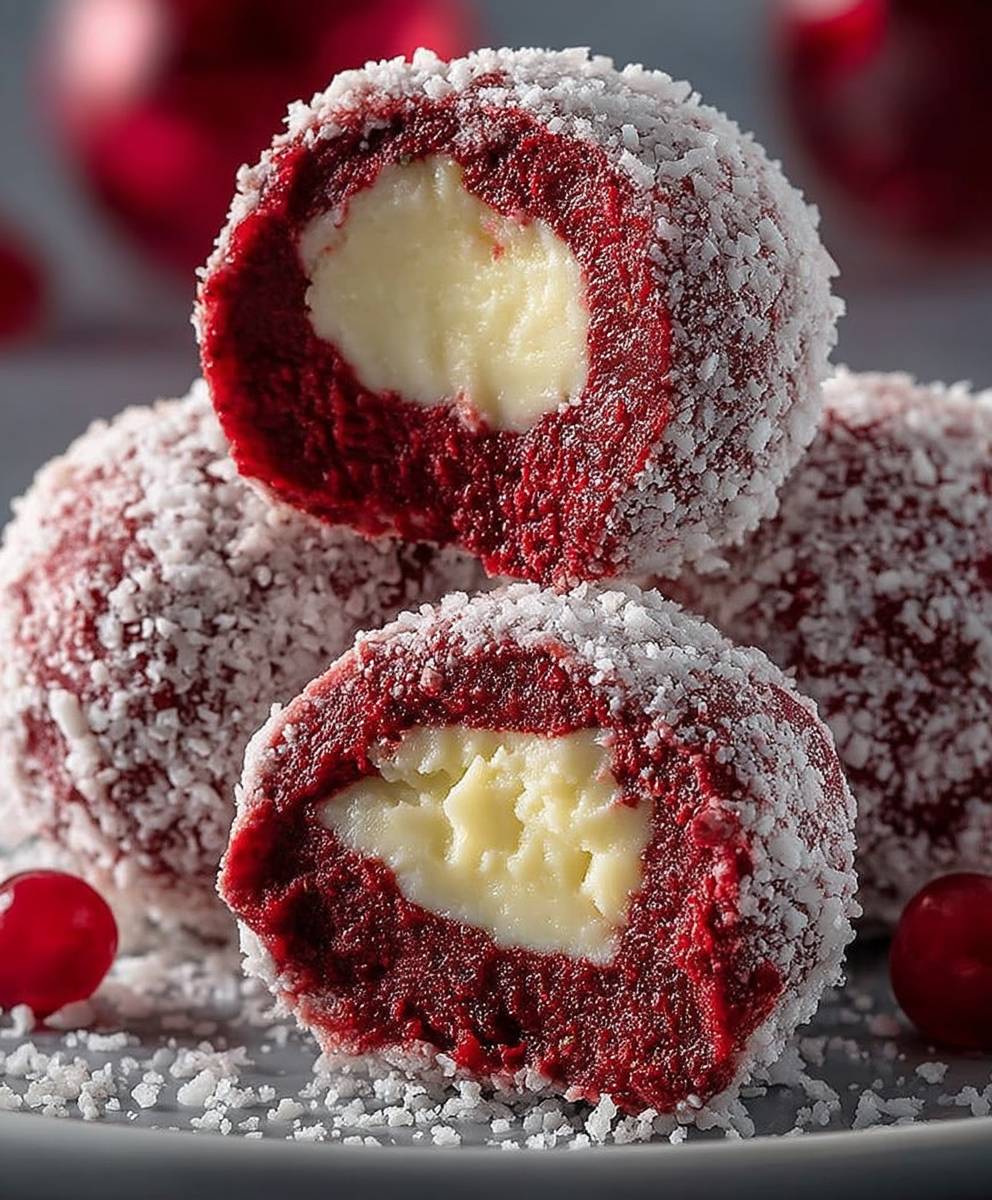
Red Velvet Snowballs: A Festive Delight
Red Velvet Snowballs are the perfect addition to your holiday dessert table, bringing a touch of elegance and a burst of flavor that everyone will adore. These delightful treats combine the rich, velvety taste of red velvet cake with the fun, festive spirit of snowballs, making them a unique twist on traditional Christmas desserts. Originating from the classic red velvet cake, which has roots in the Southern United States, these snowball cookies have become a beloved holiday staple in many households.
What makes Red Velvet Snowballs so irresistible? It’s the combination of their soft, crumbly texture and the sweet, creamy flavor that melts in your mouth. Not only are they visually stunning with their vibrant red hue and snowy white coating, but they are also incredibly easy to make, allowing you to whip up a batch in no time. Whether you’re hosting a holiday gathering or simply indulging in a sweet treat at home, Red Velvet Snowballs are sure to impress your family and friends. So, let’s dive into this festive recipe and spread some holiday cheer!

Ingredients:
- 2 ½ cups all-purpose flour
- 1 cup unsweetened cocoa powder
- 1 teaspoon baking soda
- 1 teaspoon salt
- 1 cup unsalted butter, softened
- 1 ½ cups granulated sugar
- 2 large eggs
- 1 teaspoon vanilla extract
- 1 tablespoon red food coloring
- 1 cup buttermilk
- 1 teaspoon white vinegar
- 1 cup powdered sugar (for rolling)
- 1 teaspoon vanilla extract (for frosting)
- 1 cup cream cheese, softened
- 1 cup chopped pecans or walnuts (optional)
Preparing the Batter
- Preheat your oven to 350°F (175°C). Line two baking sheets with parchment paper and set them aside.
- In a medium bowl, whisk together the all-purpose flour, cocoa powder, baking soda, and salt. This will be your dry mixture.
- In a large mixing bowl, cream the softened butter and granulated sugar together using an electric mixer on medium speed until the mixture is light and fluffy, about 3-4 minutes.
- Add the eggs one at a time, mixing well after each addition. Then, mix in the vanilla extract and red food coloring until fully combined.
- In a separate bowl, combine the buttermilk and white vinegar. This will create a buttermilk mixture that adds moisture and tang to your batter.
- Gradually add the dry mixture to the butter mixture, alternating with the buttermilk mixture. Start and end with the dry mixture. Mix until just combined; do not overmix.
Baking the Cookies
- Using a cookie scoop or tablespoon, drop rounded balls of dough onto the prepared baking sheets, spacing them about 2 inches apart.
- Bake in the preheated oven for 12-15 minutes, or until the edges are set and the tops are slightly cracked. The cookies will continue to cook slightly after being removed from the oven.
- Once baked, remove the cookies from the oven and let them cool on the baking sheets for about 5 minutes before transferring them to a wire rack to cool completely.
Preparing the Cream Cheese Frosting
- In a medium bowl, beat the softened cream cheese and 1 cup of powdered sugar together using an electric mixer on medium speed until smooth and creamy.
- Add the teaspoon of vanilla extract and mix until fully incorporated. If the frosting is too thick, you can add a splash of milk to reach your desired consistency.
- If you’re using nuts, fold in the chopped pecans or walnuts into the frosting for added texture and flavor.
Assembling the Red Velvet Snowballs
- Once the cookies have cooled completely, take one cookie and spread a generous amount of cream cheese frosting on the flat side of the cookie.
- Top with another cookie, flat side down, to create a sandwich. Repeat this process with the remaining cookies and frosting.
- Once all the cookies are assembled, roll each cookie sandwich in powdered sugar until fully coated. This will give them a beautiful snowy appearance.
- For an extra festive touch, you can sprinkle some additional chopped nuts on top of the powdered sugar coating.
Serving and Storing
- Place the assembled Red Velvet Snowballs on a decorative platter or in a festive tin for serving. They make a delightful addition to any holiday dessert table.
- If you have leftovers (which is rare!), store them in an airtight container in the refrigerator for up to 5 days. The flavors will continue to meld together, making them even more delicious.
- For longer storage, you can freeze the unassembled cookies and frosting separately. When ready to enjoy, thaw and assemble as needed.
Tips for Perfect Red Velvet Snowballs
- Make sure your butter is at room temperature for easy creaming with the sugar
Conclusion:
In conclusion, these Red Velvet Snowballs are an absolute must-try for anyone looking to add a festive touch to their holiday dessert table. With their rich, velvety flavor and delightful cream cheese filling, they are sure to impress your family and friends. The vibrant red color not only makes them visually stunning but also adds a unique twist to traditional holiday treats. Plus, the combination of textures—from the soft, moist cake to the crunchy exterior—creates a delightful experience with every bite.
If you’re looking to elevate your serving game, consider pairing these snowballs with a warm cup of hot cocoa or a glass of chilled eggnog. They also make for a perfect addition to a dessert platter alongside other holiday favorites like gingerbread cookies or peppermint bark. For those who love to experiment, you can easily customize the recipe by adding different fillings, such as chocolate ganache or a hint of peppermint extract for a refreshing twist. You could even roll them in crushed nuts or coconut flakes instead of powdered sugar for an extra layer of flavor and texture.
I encourage you to give this Red Velvet Snowballs recipe a try during your next holiday gathering or cozy night in. Not only will you enjoy the process of making them, but you’ll also create lasting memories as you share these delightful treats with your loved ones. Don’t forget to take pictures and share your experience with us! We’d love to see how your snowballs turn out and hear about any creative variations you come up with. Your feedback and stories inspire others to get into the kitchen and try their hand at baking, so let’s spread the joy of these festive desserts together!
So, roll up your sleeves, gather your ingredients, and let the holiday baking begin! Trust me, once you take that first bite of these Red Velvet Snowballs, you’ll understand why they are destined to become a cherished tradition in your home. Happy baking!
Red Velvet Snowballs: Delightful Christmas Desserts to Try This Holiday Season
These Red Velvet Snowballs are a festive treat featuring soft, rich cookies filled with creamy frosting. Perfect for holiday gatherings, they are rolled in powdered sugar for a delightful snowy appearance, making them a charming addition to any dessert table.
Ingredients
- 2 ½ cups all-purpose flour
- 1 cup unsweetened cocoa powder
- 1 teaspoon baking soda
- 1 teaspoon salt
- 1 cup unsalted butter, softened
- 1 ½ cups granulated sugar
- 2 large eggs
- 1 teaspoon vanilla extract
- 1 tablespoon red food coloring
- 1 cup buttermilk
- 1 teaspoon white vinegar
- 1 cup powdered sugar (for rolling)
- 1 teaspoon vanilla extract (for frosting)
- 1 cup cream cheese, softened
- 1 cup chopped pecans or walnuts (optional)
Instructions
- Preheat your oven to 350°F (175°C). Line two baking sheets with parchment paper and set them aside.
- In a medium bowl, whisk together the all-purpose flour, cocoa powder, baking soda, and salt. This will be your dry mixture.
- In a large mixing bowl, cream the softened butter and granulated sugar together using an electric mixer on medium speed until the mixture is light and fluffy, about 3-4 minutes.
- Add the eggs one at a time, mixing well after each addition. Then, mix in the vanilla extract and red food coloring until fully combined.
- In a separate bowl, combine the buttermilk and white vinegar. This will create a buttermilk mixture that adds moisture and tang to your batter.
- Gradually add the dry mixture to the butter mixture, alternating with the buttermilk mixture. Start and end with the dry mixture. Mix until just combined; do not overmix.
- Using a cookie scoop or tablespoon, drop rounded balls of dough onto the prepared baking sheets, spacing them about 2 inches apart.
- Bake in the preheated oven for 12-15 minutes, or until the edges are set and the tops are slightly cracked. The cookies will continue to cook slightly after being removed from the oven.
- Once baked, remove the cookies from the oven and let them cool on the baking sheets for about 5 minutes before transferring them to a wire rack to cool completely.
- In a medium bowl, beat the softened cream cheese and 1 cup of powdered sugar together using an electric mixer on medium speed until smooth and creamy.
- Add the teaspoon of vanilla extract and mix until fully incorporated. If the frosting is too thick, you can add a splash of milk to reach your desired consistency.
- If you’re using nuts, fold in the chopped pecans or walnuts into the frosting for added texture and flavor.
- Once the cookies have cooled completely, take one cookie and spread a generous amount of cream cheese frosting on the flat side of the cookie.
- Top with another cookie, flat side down, to create a sandwich. Repeat this process with the remaining cookies and frosting.
- Once all the cookies are assembled, roll each cookie sandwich in powdered sugar until fully coated. This will give them a beautiful snowy appearance.
- For an extra festive touch, you can sprinkle some additional chopped nuts on top of the powdered sugar coating.
- Place the assembled Red Velvet Snowballs on a decorative platter or in a festive tin for serving. They make a delightful addition to any holiday dessert table.
- If you have leftovers (which is rare!), store them in an airtight container in the refrigerator for up to 5 days. The flavors will continue to meld together, making them even more delicious.
- For longer storage, you can freeze the unassembled cookies and frosting separately. When ready to enjoy, thaw and assemble as needed.
Notes
- Make sure your butter is at room temperature for easy creaming with the sugar.
- Adjust the amount of food coloring to achieve your desired shade of red.

Leave a Comment